


ES
Durante el uso de este equipo eléctrico se deben respetar las medidas básicas de
seguridad. Antes de comenzar a trabajar con la máquina debe ponerse en
conocimiento con las siguientes instrucciones.
PRECAUCIÓN: Para evitar el riesgo quemaduras, peligro de incendio,
electrocución o lesiones:
1.
No deje la máquina enchufada a la red sin vigilancia. Cada vez que termine de
trabajar con la máquina o realice labores de limpieza o lubricación del equipo,
quite el enchufe de la toma de contacto.
2.
Desenchufe la máquina de la red eléctrica al sustituir la lámpara LED. Sustituya la
lámpara LED por una del mismo tipo.
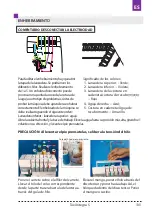
3.
La máquina debe estar desconectada de la red eléctrica durante el enhebrado
del hilo superior, colocación del carrete, cambio de aguja, sustitución del pie etc
4.
La máquina no es un juguete. Debe extremar las medidas de precaución si la
máquina es utilizada por un niño o en su presencia.
5.
La máquina debe utilizarse exclusivamente para los usos que se describen en las
siguientes instrucciones. Utilice los accesorios recomendados por el fabricante y
descritos en el siguiente manual de instrucciones.
6.
No utilizar la máquina si el cable o el enchufe están dañados, si el equipo no
funciona correctamente, si la máquina ha sido golpeada o dañada o si ha estado
en contacto con el agua. En caso de presentarse algunas de las situaciones
citadas, acuda al servicio técnico autorizado más próximo para revisarla,
repararla o realizar las regulaciones eléctricas o mecánicas pertinentes.
7.
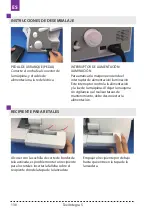
No encienda la máquina en caso de que el orificio que permite la ventilación
esté bloqueado. Debe prestar atención a que los orificios de ventilación de la
máquina y del pedal estén libres de cualquier tipo de suciedad, restos de tela o
polvo.
8.
No introducir ningún objeto en estos orificios.
9.
No utilizar al aire libre, la máquina sólo puede ser utilizada en recintos sin
humedad.
10.
No utilizar cerca de aerosoles ni en habitaciones alimentadas con oxígeno.
11.
Al conectar la máquina a la red - mantenga siempre libre acceso al contacto,
para que en caso de peligro, se pueda desconectar el equipo de la red eléctrica
rápidamente. Desenrrollar completamente el cable de conexión.
12.
Para apagar la máquina, coloque el interruptor en la posición STOP („0”), y a
continuación quite el enchufe del contacto.
13.
Tenga cuidado de que el cable no entre en contacto con superficies calientes y
que no represente ningún peligro al tropezar o engancharse con él.
14.
Para desconectar la máquina, no tire del cable, sino debe estirar del enchufe.
15.
Debe prestar atención a no colocar los dedos de las manos cerca de las partes
móviles de la máquina.
CONDICIONES DE SEGURIDAD
Texi Integra 5
124
Summary of Contents for Integra 5
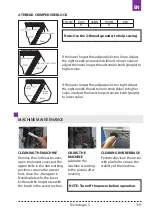
Page 1: ...OVERLOCK COVERLOCK 1 2 1 2 1 2 1 2 4 3 2 1 2...
Page 2: ......
Page 5: ...Texi Integra 5 5 CS...
Page 43: ...Texi Integra 5 43 CS...
Page 83: ...DE Texi Integra 5 83...
Page 123: ...EN Texi Integra 5 123...
Page 163: ...ES Texi Integra 5 163...
Page 203: ...FR Texi Integra 5 203...
Page 243: ...PL Texi Integra 5 243...
Page 244: ...RU 1 2 3 1 2 3 4 5 6 7 8 9 Texi Integra 5 244...
Page 245: ...RU 10 11 12 13 14 15 16 17 Texi Integra 5 245...
Page 250: ...RU o Texi Integra 5 250...
Page 251: ...RU 1 2 Texi Integra 5 251...
Page 252: ...RU 1 2 3 A B C 2 D A B A B C C D D 2 2 z 2 Texi Integra 5 252...
Page 253: ...RU 1 5 1 2 3 4 5 Texi Integra 5 253...
Page 254: ...RU 1 3 4 8 8 10 Texi Integra 5 254...
Page 255: ...RU 5 8 1 11 9 B C 10 3 3 8 Texi Integra 5 255...
Page 256: ...RU 4 11 12 10 1 12 1 10 Texi Integra 5 256...
Page 257: ...RU D A A 9 11 D 9 11 10 D D A A Texi Integra 5 257...
Page 258: ...RU 1 8 B C A 7 9 D 7 9 10 B B C C Texi Integra 5 258...
Page 259: ...RU 1 2 A 1 2 3 Texi Integra 5 259...
Page 260: ...RU 6 S 1 2 3 MATIC Texi Integra 5 260...
Page 261: ...RU 15 20 Texi Integra 5 261...
Page 262: ...RU A 2 3 4 Texi Integra 5 262...
Page 263: ...RU T S S A R A 3 0 4 5 R R Texi Integra 5 263...
Page 264: ...RU 3 0 4 5 2 2 5 2 6 7 F 1 4 3 4 Texi Integra 5 264...
Page 265: ...RU A B 0 7 2 0 1 0 A B 0 7 2 0 A B D Texi Integra 5 265...
Page 266: ...RU 2 0 1 0 0 5 1 0 3 3 2 0 1 0 Texi Integra 5 266...
Page 267: ...RU 2 1 R 2 A B 3 A B D 2 C 2 1 2 S 2 3 L 19 2 Texi Integra 5 267...
Page 268: ...RU 2 1 2 3 A A S 0 5 Texi Integra 5 268...
Page 269: ...RU 1 2 4 5 A 2 Texi Integra 5 269...
Page 272: ...RU 5 5 5 N N N N N N 5 2 3 Texi Integra 5 272...
Page 273: ...RU 4 2 4 4 2 5 N 4 Y N N N N N 0 4 2 2 4 Texi Integra 5 273...
Page 274: ...RU 3 N N N N N N Texi Integra 5 274...
Page 275: ...RU 3 4 2 7 4 1 5 7 Texi Integra 5 275...
Page 276: ...RU 3 3 4 5 7 4 1 5 5 5 7 m Texi Integra 5 276...
Page 277: ...RU 3 N 3 5 7 5 Texi Integra 5 277...
Page 278: ...RU 2 2 2 N 6 N 6 N Texi Integra 5 278...
Page 279: ...RU 2 N N Texi Integra 5 279...
Page 283: ...RU Texi Integra 5 283...
Page 285: ......
Page 286: ......


