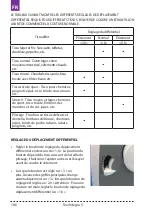
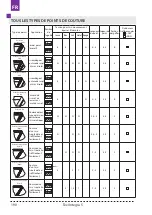
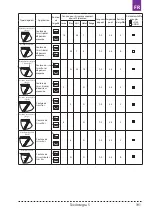


FR
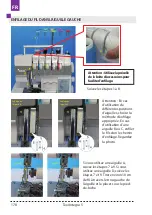
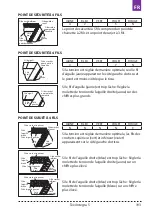
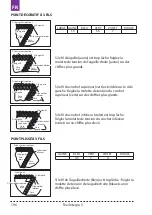
Point de recouvrement et point chainette à 2 fils :
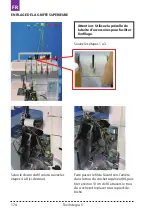
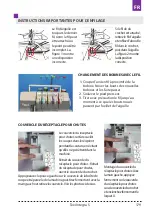
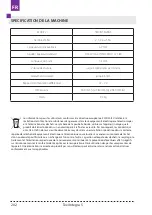
Plaque anticoupe.
Cette plaque est marquée d’une série de chiffres.
Le côté gauche est en millimètres et le côté droit
est en pouces. Les chiffres indiquent la distance
entre l’aiguille et le bord du tissu.
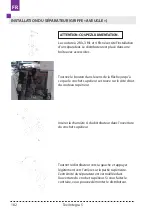
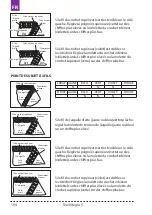
1.
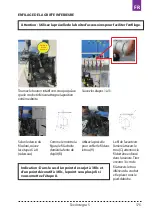
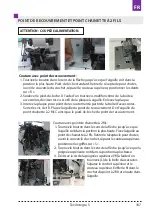
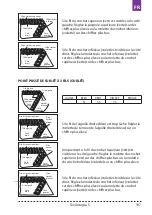
Montage et démontage de la plaque.
2.
Retirez la plaque de la boîte d’accessoires et
placez-la à l’endroit approprié sur le couvercle
du crochet. Cette plaque est marquée d’une
série de chiffres. Le côté gauche est en
millimètres et le côté droit est en pouces. Les
chiffres indiquent la distance entre l’aiguille et le
bord du tissu.
Attention : Lors de l’installation de la plaque, le crochet supérieur doit être
inséré.
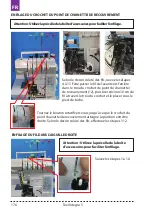
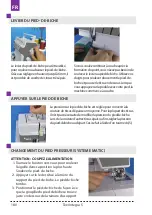
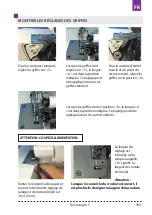
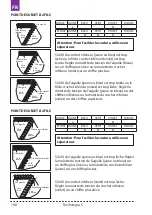
3.
Tournez le bouton dans le sens de la flèche jusqu’à ce que la vis A du crochet
supérieur soit dans la position la plus haute, appuyez sur la vis A, fermez le
couteau supérieur (le connecter au couteau inférieur pour le faire fonctionner),
faites glisser la plaque en avant. Glissez le commutateur de griffe sur la position
« S », l’aiguille sur la position la plus haute, lever le pied-de-biche. Retirer le pied-
de-biche et la plaque du point de recouvrement, insérer le pied-debiche et la
plaque à aiguille, fermer le couvercle du crochet.
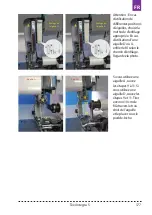
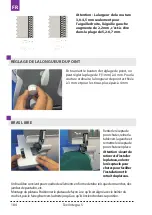
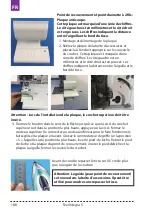
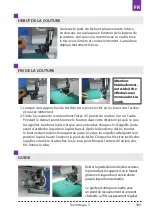
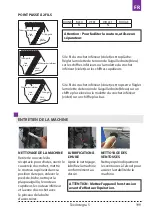
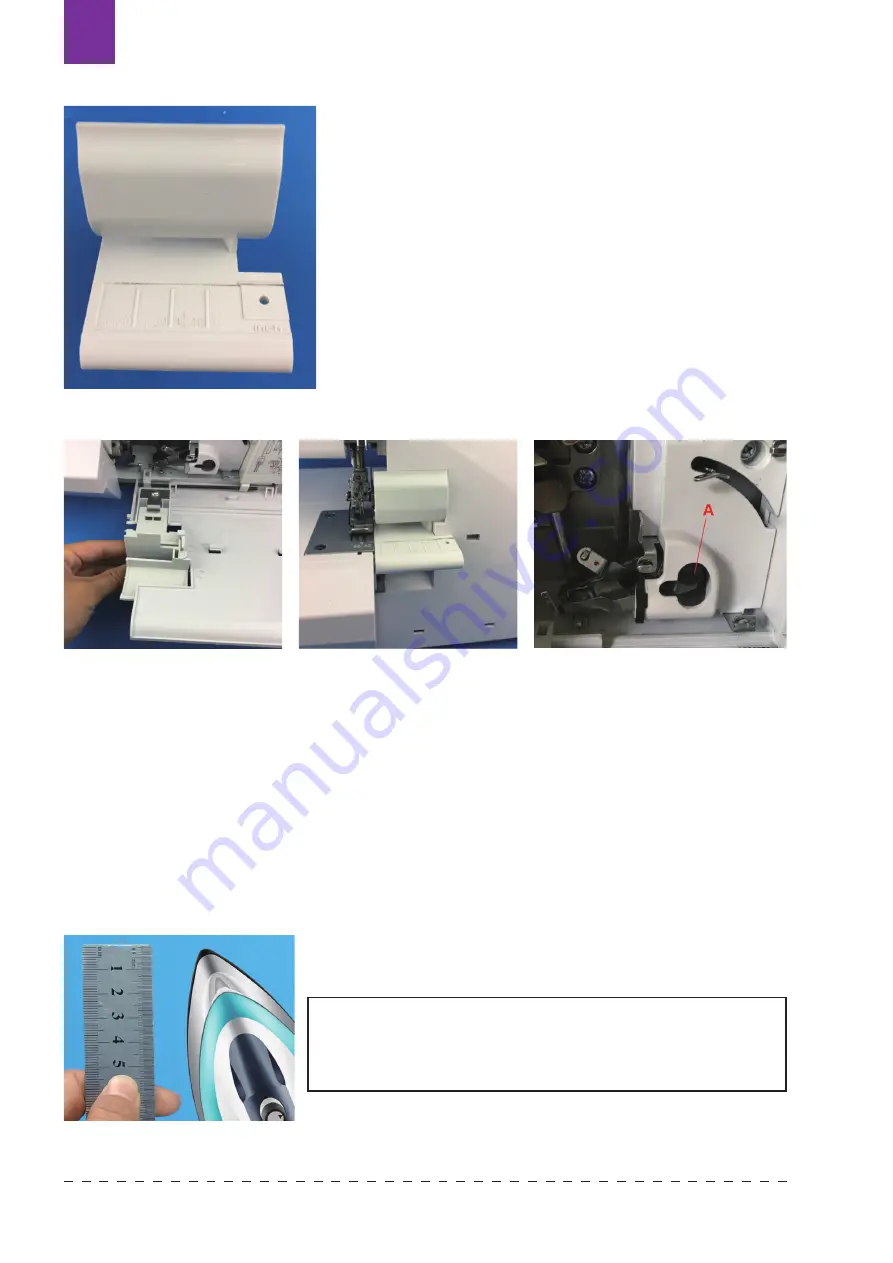
Avant de coudre, repasser le tissu sur 0,5 cm de plus
que la largeur de la couture.
Attention: Le guide (pour point de recouvrement)
se trouve dans la boîte d’accessoires. Il peut être
utilisé pour coudre sans repasser le tissu.
Texi Integra 5
188
Summary of Contents for Integra 5
Page 1: ...OVERLOCK COVERLOCK 1 2 1 2 1 2 1 2 4 3 2 1 2...
Page 2: ......
Page 5: ...Texi Integra 5 5 CS...
Page 43: ...Texi Integra 5 43 CS...
Page 83: ...DE Texi Integra 5 83...
Page 123: ...EN Texi Integra 5 123...
Page 163: ...ES Texi Integra 5 163...
Page 203: ...FR Texi Integra 5 203...
Page 243: ...PL Texi Integra 5 243...
Page 244: ...RU 1 2 3 1 2 3 4 5 6 7 8 9 Texi Integra 5 244...
Page 245: ...RU 10 11 12 13 14 15 16 17 Texi Integra 5 245...
Page 250: ...RU o Texi Integra 5 250...
Page 251: ...RU 1 2 Texi Integra 5 251...
Page 252: ...RU 1 2 3 A B C 2 D A B A B C C D D 2 2 z 2 Texi Integra 5 252...
Page 253: ...RU 1 5 1 2 3 4 5 Texi Integra 5 253...
Page 254: ...RU 1 3 4 8 8 10 Texi Integra 5 254...
Page 255: ...RU 5 8 1 11 9 B C 10 3 3 8 Texi Integra 5 255...
Page 256: ...RU 4 11 12 10 1 12 1 10 Texi Integra 5 256...
Page 257: ...RU D A A 9 11 D 9 11 10 D D A A Texi Integra 5 257...
Page 258: ...RU 1 8 B C A 7 9 D 7 9 10 B B C C Texi Integra 5 258...
Page 259: ...RU 1 2 A 1 2 3 Texi Integra 5 259...
Page 260: ...RU 6 S 1 2 3 MATIC Texi Integra 5 260...
Page 261: ...RU 15 20 Texi Integra 5 261...
Page 262: ...RU A 2 3 4 Texi Integra 5 262...
Page 263: ...RU T S S A R A 3 0 4 5 R R Texi Integra 5 263...
Page 264: ...RU 3 0 4 5 2 2 5 2 6 7 F 1 4 3 4 Texi Integra 5 264...
Page 265: ...RU A B 0 7 2 0 1 0 A B 0 7 2 0 A B D Texi Integra 5 265...
Page 266: ...RU 2 0 1 0 0 5 1 0 3 3 2 0 1 0 Texi Integra 5 266...
Page 267: ...RU 2 1 R 2 A B 3 A B D 2 C 2 1 2 S 2 3 L 19 2 Texi Integra 5 267...
Page 268: ...RU 2 1 2 3 A A S 0 5 Texi Integra 5 268...
Page 269: ...RU 1 2 4 5 A 2 Texi Integra 5 269...
Page 272: ...RU 5 5 5 N N N N N N 5 2 3 Texi Integra 5 272...
Page 273: ...RU 4 2 4 4 2 5 N 4 Y N N N N N 0 4 2 2 4 Texi Integra 5 273...
Page 274: ...RU 3 N N N N N N Texi Integra 5 274...
Page 275: ...RU 3 4 2 7 4 1 5 7 Texi Integra 5 275...
Page 276: ...RU 3 3 4 5 7 4 1 5 5 5 7 m Texi Integra 5 276...
Page 277: ...RU 3 N 3 5 7 5 Texi Integra 5 277...
Page 278: ...RU 2 2 2 N 6 N 6 N Texi Integra 5 278...
Page 279: ...RU 2 N N Texi Integra 5 279...
Page 283: ...RU Texi Integra 5 283...
Page 285: ......
Page 286: ......


