


RU
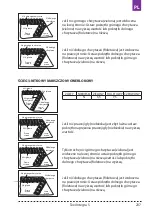
5-НИТОЧНЫЙ ПРЕДОХРАНИТЕЛЬНЫЙ СТЕЖОК
272
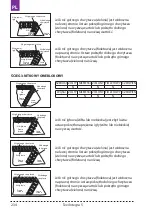
4-НИТОЧНЫЙ ПРЕДОХРАНИТЕЛЬНЫЙ СТЕЖОК
273
2-НИТОЧНЫЙ ЦЕПНОЙ СТЕЖОК
273
4-НИТОЧНЫЙ ОВЕРЛОЧНЫЙ СТЕЖОК
273
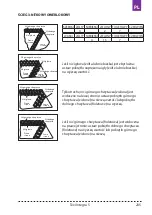
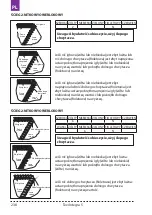
3-НИТОЧНЫЙ ОВЕРЛОЧНЫЙ СТЕЖОК
274
3-НИТОЧНЫЙ ОВЕРЛОЧНЫЙ СТЕЖОК
275
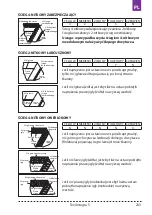
3-НИТОЧНЫЙ ДЕКОРАТИВНЫЙ СТЕЖОК
276
3-НИТОЧНЫЙ СБОРЧАТЫЙ СТЕЖОК
276
3-НИТОЧНЫЙ СБОРЧАТЫЙ ОВЕРЛОЧНЫЙ СТЕЖОК (КАЙМА)
277
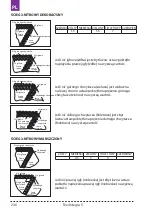
2-НИТОЧНЫЙ ОВЕРЛОЧНЫЙ СТЕЖОК
278
2-НИТОЧНЫЙ ОВЕРЛОЧНЫЙ СТЕЖОК
278
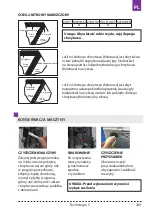
2-НИТОЧНЫЙ СБОРЧАТЫЙ СТЕЖОК
279
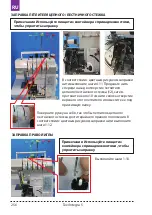
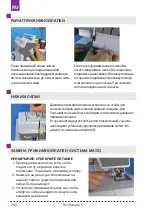
УХОД ЗА МАШИНОЙ
279
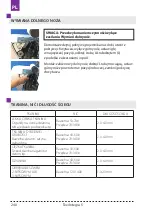
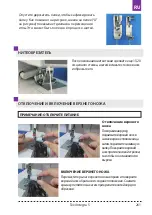
ЗАМЕНА НИЖНЕГО НОЖА
280
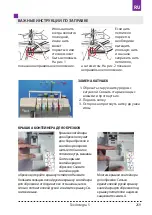
ТКАНЬ, НИТЬ И ДЛИНА СТЕЖКА
280
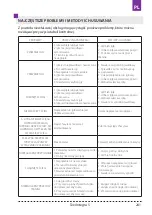
САМЫЕ РАСПРОСТРАНЕННЫЕ ПРОБЛЕМЫ И СПОСОБЫ ИХ
УСТРАНЕНИЯ
281
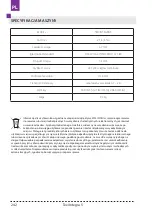
СПЕЦИФИКАЦИЯ
282
Texi Integra 5
247
Summary of Contents for Integra 5
Page 1: ...OVERLOCK COVERLOCK 1 2 1 2 1 2 1 2 4 3 2 1 2...
Page 2: ......
Page 5: ...Texi Integra 5 5 CS...
Page 43: ...Texi Integra 5 43 CS...
Page 83: ...DE Texi Integra 5 83...
Page 123: ...EN Texi Integra 5 123...
Page 163: ...ES Texi Integra 5 163...
Page 203: ...FR Texi Integra 5 203...
Page 243: ...PL Texi Integra 5 243...
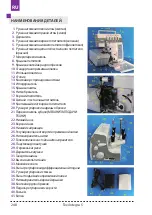
Page 244: ...RU 1 2 3 1 2 3 4 5 6 7 8 9 Texi Integra 5 244...
Page 245: ...RU 10 11 12 13 14 15 16 17 Texi Integra 5 245...
Page 250: ...RU o Texi Integra 5 250...
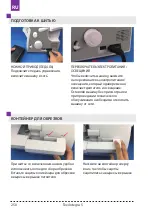
Page 251: ...RU 1 2 Texi Integra 5 251...
Page 252: ...RU 1 2 3 A B C 2 D A B A B C C D D 2 2 z 2 Texi Integra 5 252...
Page 253: ...RU 1 5 1 2 3 4 5 Texi Integra 5 253...
Page 254: ...RU 1 3 4 8 8 10 Texi Integra 5 254...
Page 255: ...RU 5 8 1 11 9 B C 10 3 3 8 Texi Integra 5 255...
Page 256: ...RU 4 11 12 10 1 12 1 10 Texi Integra 5 256...
Page 257: ...RU D A A 9 11 D 9 11 10 D D A A Texi Integra 5 257...
Page 258: ...RU 1 8 B C A 7 9 D 7 9 10 B B C C Texi Integra 5 258...
Page 259: ...RU 1 2 A 1 2 3 Texi Integra 5 259...
Page 260: ...RU 6 S 1 2 3 MATIC Texi Integra 5 260...
Page 261: ...RU 15 20 Texi Integra 5 261...
Page 262: ...RU A 2 3 4 Texi Integra 5 262...
Page 263: ...RU T S S A R A 3 0 4 5 R R Texi Integra 5 263...
Page 264: ...RU 3 0 4 5 2 2 5 2 6 7 F 1 4 3 4 Texi Integra 5 264...
Page 265: ...RU A B 0 7 2 0 1 0 A B 0 7 2 0 A B D Texi Integra 5 265...
Page 266: ...RU 2 0 1 0 0 5 1 0 3 3 2 0 1 0 Texi Integra 5 266...
Page 267: ...RU 2 1 R 2 A B 3 A B D 2 C 2 1 2 S 2 3 L 19 2 Texi Integra 5 267...
Page 268: ...RU 2 1 2 3 A A S 0 5 Texi Integra 5 268...
Page 269: ...RU 1 2 4 5 A 2 Texi Integra 5 269...
Page 272: ...RU 5 5 5 N N N N N N 5 2 3 Texi Integra 5 272...
Page 273: ...RU 4 2 4 4 2 5 N 4 Y N N N N N 0 4 2 2 4 Texi Integra 5 273...
Page 274: ...RU 3 N N N N N N Texi Integra 5 274...
Page 275: ...RU 3 4 2 7 4 1 5 7 Texi Integra 5 275...
Page 276: ...RU 3 3 4 5 7 4 1 5 5 5 7 m Texi Integra 5 276...
Page 277: ...RU 3 N 3 5 7 5 Texi Integra 5 277...
Page 278: ...RU 2 2 2 N 6 N 6 N Texi Integra 5 278...
Page 279: ...RU 2 N N Texi Integra 5 279...
Page 283: ...RU Texi Integra 5 283...
Page 285: ......
Page 286: ......


