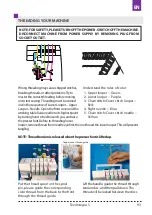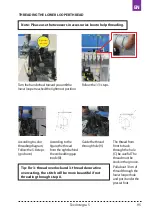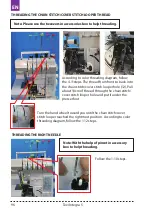
background image

EN

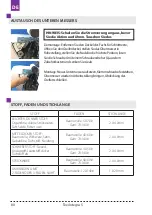
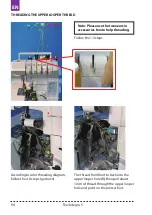
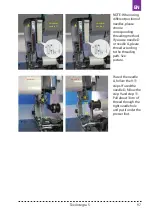
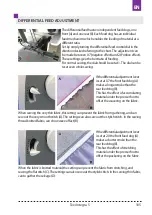
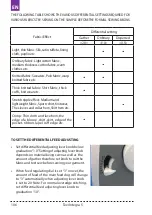
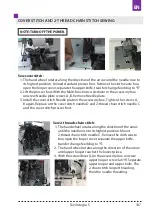
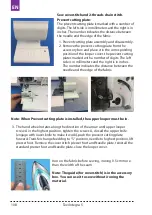
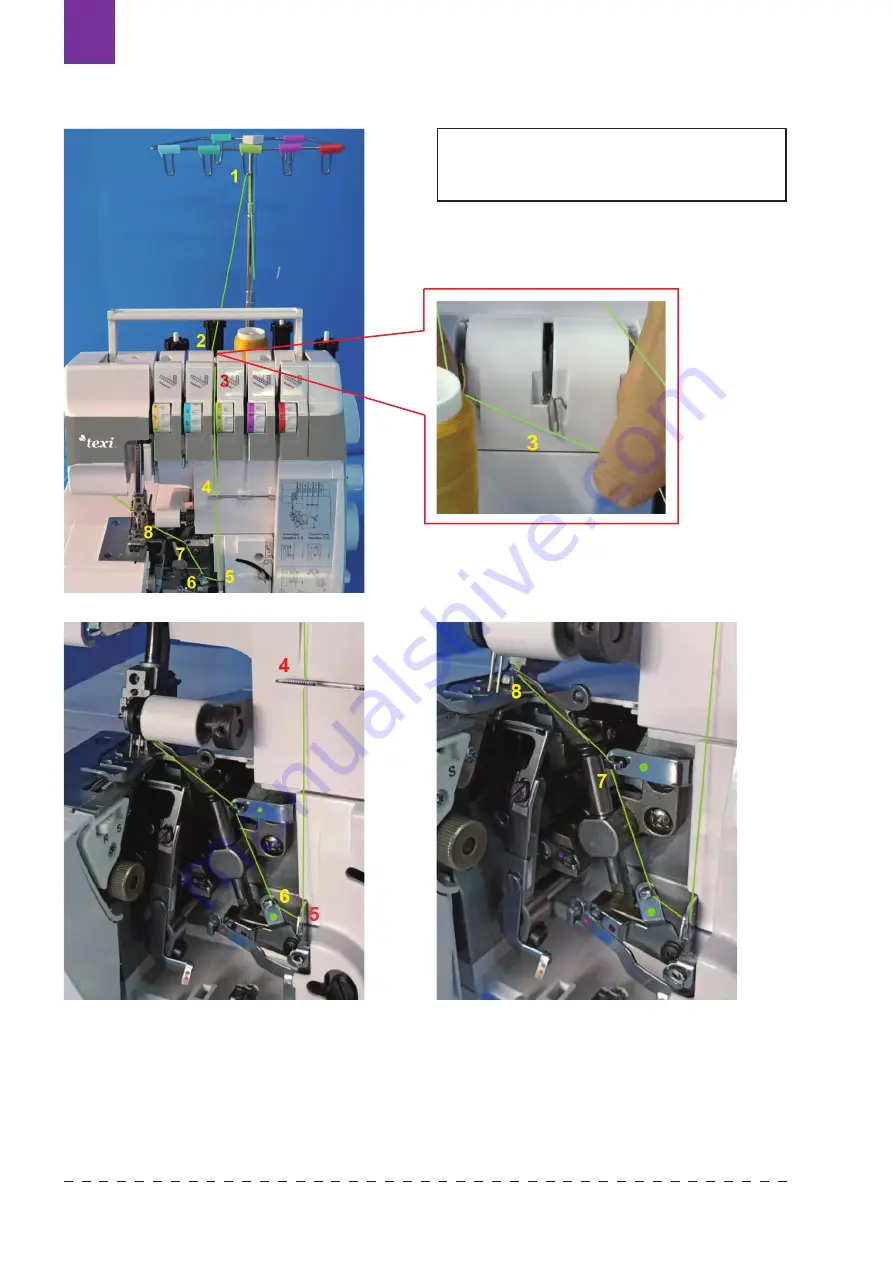
THREADING THE UPPER LOOPER THREAD

Follow the 1-3 steps.

According to color threading diagram, 

follow the 4-8 steps (go down).

The thread from front to back into the 

upper looper hole (8), then pull about 

10cm of thread through the upper looper 

hole and put it on the presser foot.

Note: Please use the tweezers in 

accessories box to help threading.

Texi Integra 5

94

Summary of Contents for Integra 5

Page 1: ...OVERLOCK COVERLOCK 1 2 1 2 1 2 1 2 4 3 2 1 2...

Page 2: ......

Page 3: ...CS U ivatelsk manu l 4 Benutzerhandbuch 44 DE User manual 84 EN Manual de usuario 124 ES Manuel d utilisation 164 FR Instrukcja obs ugi 204 PL 244 RU...

Page 4: ...ud je n kter z ventila n ch otvor blokov n Udr ujte ventila n otvory stroje i ped l ist 5 Nikdy nevkl dejte dn p edm ty do otvor stroje 6 Nepou vejte venku 7 Nepou vejte v m stnostech kde se pou vaj a...

Page 5: ...Texi Integra 5 5 CS...

Page 6: ...EHLY 16 NAVL K N LEV JEHLY 18 D LE IT INFORMACE T KAJ C SE NAVL K N 19 P KA P TLA N PATKY 20 P TLAK P TLA N PATKY 20 V M NA P TLA N PATKY 20 N NIT 21 VYPNUT A ZAPNUT VY HO NO E 21 INSTALACE 2 NI OV HO...

Page 7: ...CK 35 3 NI OV DEKORATIVN OBNITKOV N 36 3 NI OV KRIMPOVAN OVERLOCK 36 3 NI OV KRIMPOVAN OVERLOCK LEM 37 2 NI OV OBNITKOV N 38 2 NI OV OVERLOCK 38 2 NI OV KRIMPOVAN OVERLOCK 39 DR BA STROJE 39 V M NA SP...

Page 8: ...tla 16 N nit 17 Horn kli ka 18 Kli ka et zkov ho kryc hostehu 19 roubupevn n horn hokli ka e 20 Knofl kpronastaven eo ezu 21 Chapa 22 Spodn n 23 Horn n 24 Spodn kli ka 25 Otvorproregulacip tla n patky...

Page 9: ...ez vac deska kryc ho stehu 3 Stehov deska kryc ho stehu 4 P tla n patka kryc ho stehu 5 Disk c vky 6 Spodn n 7 Ty ov vod tko 8 Kart ek 9 Pinzeta 10 roubov k S 11 roubov k M 12 roubov k L 13 Dr k 2 nit...

Page 10: ...at zbytky materi l Vlo te v stupky na kontejneru do dr ek na krytu kli ka e HLAVN VYP NA OSV TLEN V stroj nebude fungovat pokud nen zapnut hlavn vyp na Stejn vyp na ovl d jak stroj tak osv tlen stroje...

Page 11: ...dr k c vek Vyt hn te ty ku stojanu na nit co nejv ce nahoru a se ozve klapnut Navl kn te pulky k ny nit na kol ky a prot hn te nit skrz vodi e na stojanu sm rem zezadu dop edu Pro velk k ny nit pou ve...

Page 12: ...2 ni ov mu et zkov mu stehu jehly roub D pat overlocku jehly Jak je zobrazeno na obr zku p i instalace jehly do jin ch pozic dos hnete jin ho stehu A B A B C C D D Pozn Pokud jsou navle eny jehly 2 ni...

Page 13: ...en mspodn hokli ka eodstra te nejd venitzjehly pot znovunavl kn tespodn kli ka T mp ededetezamot n nit Pozn mka Nap t nit jeuvoln no jakmile vihnetep tla noupatku Um st te c vku na kol k nave te odpo...

Page 14: ...rvy nit postupujte d le p es kroky 4 8 sm rem dol Prot hn te nit zep edu dozadu do otvoru horn ho kli ka e 8 pot vyt hn te asi 10 cm nit skrze otvor a vlo te ji do p tla n patky Pozn P i navl k n vyu...

Page 15: ...prava zamezerouapot dootvoru B D lepokra ujte zep edudozadu skrzeotvor C bu teopatrn Nit mus b tusazenav dr ce Prot hn te asi10cmnit spodn mkli ka em anave tejipod p tla noupatku NAVL K N SPODN HO KLI...

Page 16: ...slu enstv m Dle barvy nit pot postupujte po kroc ch 4 11 Prot hn te nit zep edu dozadu otvorem kli ka e et zkov ho kryc ho stehu 12 Z otvoru vyt hn te asi 10 cm nit a usa te ji pod p tla nou patku Ot...

Page 17: ...ou v te jehlu D nebo A navl kejte je dle vod tka Pou v te li jehlu A pokra ujte dle krok 9 11 P i pou it jehly D vynechejte bod 10 Skrze o ko prav jehly vyt hn te cca 10 cm nit a vlo te ji pod p tla n...

Page 18: ...pros m vyberte odpov daj c metodu navl k n Pokud pou v te jehlu B nebo C navl kejte je dle vod tka Pou v te li jehlu B pokra ujte dle krok 7 9 P i pou it jehly C vynechejte bod 8 Skrze o ko lev jehly...

Page 19: ...te kontejneraotev etekryt kli ka e Pomoc lev hopalce zatla tenakrytaodd ltejejod stroje pot levourukousiln zat hn teavyjm tejej Vizobr zkyv e Nasunut krytu Zatla tekryt podkrytkli ka epomoc lev rukyap...

Page 20: ...de ln it nast edn siln l tky Uv t inyl teknen t ebap tlakv becupravovat P i it na siln inaopaktenk l tkyupravtenejd vep tlakpatkypomoc roubov ku S POZN VYPN TE STROJ 1 Ot en m ru n ho kola sm rem k so...

Page 21: ...rozsah pohybu jehly B hem it m e slou it jako vod tko POZN VYPN TESTROJ Ot en mru n hokola zvedn tehorn n do nejvy polohy pot zvedn tep tla noupatku Ot ejtehorn mno emproti sm ruhodinov chru i ek doku...

Page 22: ...i ov it do otvoru na horn m kli ka i Oto te roz en m doleva a zlehka zatla te zadn st lehce dozadu pi ka roz en bude uzamknuta v otvoru na horn m kli ka i Opa n m postupem naopak m ete roz en vyjmout...

Page 23: ...e je chapa v poloze R jaz ek A je v t to poloze Toto nastaven je mo n pou t pro v echny rolovac lemy Vyjm tekontejnernaodpad ot en mknofl kunastavte ku o ezu nastavtejimezi3 0 4 5mm ka je ozna ena na...

Page 24: ...m p i it na siln j l tky mus b t jej hodnota 4 mm Vyjm te kontejner na odpad vyt hn te p edn podstavu sm rem doleva a kontejner op tovn nasu te Pozn P ed odstran n m a op tovnouinstalac p edn z kladny...

Page 25: ...rychlostzadn hopodava e to znamen epod v zadn mu podava ipouzepolovinul tky Stehsevtomtop pad natahuje Je lipod v n nastavenona hodnot 2 0 p edsunut podava je2xrychlej ne podava zadn P itomtonastaven...

Page 26: ...n kapes p sky klopy okraje man et N SLEDUJ C TABULKA UKAZUJE MO NOSTI DIFERENCI LN HO POD V N PRO R ZN TYPY L TEK P ED ZA TKEM SAMOTN HO IT SI NEJD VE ZKUSTE U T VZOREK NASTAVEN DIFERENCI LN HO POD V...

Page 27: ...ho stehu a znovu ut hn te rouby A a B Vym te jehlu za jehlu pro kryc stehy D a jehlu na 2 ni ov et zkov steh C a nasu te patku pro kryc steh it 2 ni ov ho et zkov ho stehu 1 Ot ejte ru n m kolem ve s...

Page 28: ...em l tky Pozn Je li deska nainstalov na horn kli ka mus b t vevnit 3 Ot ejte ru n m kolem ve sm ru ipky dokud nen roub horn ho kli ka e A ve sv nejvy poloze dot hn te jej zav ete horn n aktivujte jej...

Page 29: ...kolem ve sm ru ipky dokud jehla nepronikne do l tky Jehla je ve sv nejni poloze p edt m ne usly te jej cvaknut Po druh m kliknut ot ejte ru n m kolem v opa n m sm ru dokud jehla nedos hne nejvy poloh...

Page 30: ...bnitkov n steh pletenin 4 2 5 N 2 5 3 3 5 S 2 ni ov et zkov steh Tkan l tky denimov l tky spoje nevr sn n lemy 4 N 3 4 3 5 R 4 ni ov obnitkov n Se v n libovoln ch l tek zvl t p ise v n elastick chl te...

Page 31: ...S 3 ni ov krimpovan overlock it st edn siln ch l tek 4 5 7 4 F 2 3 5 R 3 ni ov krimpovan overlock lem it st edn siln ch l tek N 3 5 7 5 F 2 3 5 S 2 ni ov obnitkov n irok it tenk ch l tek 2 N F 2 3 5 S...

Page 32: ...kli ka e Nitkli ka e Nitkli ka e Nit prav jehly Nit prav jehly Nit prav jehly Nitjehly Obnitkovac nitjehly Nitkli ka e Nitspodn ho kli ka e Nithorn hokli ka e Pokud je nap t nastaveno spr vn na rubov...

Page 33: ...OV ERV 4 Y N LUT MODR ZELEN FIALOV ERV N N N N 0 4 ni ov vyztu en obnitkov n zahrnuje 2 ni ov et zkov steh a 2 ni ov obnitkovac steh Je li nastaveno spr vn nap t jehlovou nit lut lze vid t na rubov st...

Page 34: ...ho kli ka e fialov na vy hodnotu nebo regul tor horn ho kli ka e zelen na ni hodnotu Je li jehlov nit lut i zelen p li voln nastavte regul tor lut i modr na vy hodnotu Je li nit horn ho kli ka e zele...

Page 35: ...e fialov na l cov stran l tky nastavte regul tor spodn ho kli ka e fialov na vy hodnoty pop pad regul tor horn ho kli ka e zelen na hodnoty ni Nitspodn ho kli ka e Nitspodn ho kli ka e Nitspodn ho kl...

Page 36: ...r horn ho kli ka e zelen na vy hodnotu Je li nit spodn ho kli ka e fialov p li voln nastavte regul tor spodn ho kli ka e fialov na vy hodnotu Nitspodn hokli ka e Nitspodn hokli ka e Nitspodn hokli ka...

Page 37: ...horn ho kli ka e zelen vid t pouze nepatrn Nastavte regul tor horn ho kli ka e zelen na ni hodnoty pop pad nastavte regul tor spodn ho kli ka e fialov na hodnoty vy Je li nit spodn ho kli ka e fialov...

Page 38: ...avte jej regul tor modr nebo lut na vy hodnoty pop pad nastavte regul tor spodn ho kli ka e lut na hodnoty ni Je li nit spodn ho kli ka e fialov p li voln nastavte regul tor spodn ho kli ka e fialov n...

Page 39: ...stabilitu stroje Je li nit spodn ho kli ka e fialov p li voln nastavte regul tor prav jehly modr na ni hodnoty p padn nastavte regul tor spodn ho kli ka e fialov na vy hodnoty Je li nit spodn ho kli...

Page 40: ...dot hn te roub p esu te horn n zp t do pracovn polohy zav ete kryt kli ka e L TKA NIT D LKA STEHU LEHK TENK L TKY organt n tenk pleteniny taft hedv b atd Bavlna 50 70 P ze 70 140 2 0 4 0mm ST EDN SILN...

Page 41: ...pr vn navle en 1 Vym te jehlu 2 Spr vn usa te jehlu 3 Zvolte spr vnou jehlu 4 Spr vn navle te jehlu CHYBY STEH Nap t jehlov nit nen nastaveno spr vn Upravte nap t nit jehly 3 NI OV A 4 NI OV OVERLOCK...

Page 42: ...0 7 a 2 0 mm Rozm ry 360 mm 380 mm 380 m V ha 9 2 kg Uchovejte tento n vod k obluze Tento v robek je ur en pouze pro dom c pou it Toto za zen je vyrobeno v souladu s na zen m EMC 2014 30 EU o elektrom...

Page 43: ...Texi Integra 5 43 CS...

Page 44: ...eien benutzt werden Achten Sie darauf dass die Maschine in einem trockenen Raum benutzt wird 7 Benutzen Sie die Maschine in solchen Bereichen nicht in denen Aerosol Spray Produkte verwendet werden ode...

Page 45: ...alter auf 0 immer wenn Sie etwas neben der Nadel machen Einf deln Spulenkapselwechsel N hfu wechsel usw 18 Trennen Sie die Maschine vor der Stromversorgung immer wenn Sie die Wartungsarbeiten durchf h...

Page 46: ...EINF DELN DER LINKEN NADEL 58 WICHTIGE ANLEITUNG ZUM EINF DELN 59 N HFUSSHEBEL 60 N HFUSSDRUCK 60 AUSTAUSCH DES N HFUSSES MATIC SYSTEM 60 FADENABSCHNEIDER 61 EIN UND AUSSCHALTEN DES OBEREN MESSERS 61...

Page 47: ...EN ZIERSTICH 76 3 FADEN PLISSEESTICH 76 3 FADEN PLISSEE OVERLOCKSTICH SAUM 77 2 FADEN OVERLOCKSTICH 78 2 FADEN OVERLOCKSTICH 78 2 FADEN PLISSEESTICH 79 WARTUNG DER MASCHINE 79 AUSTAUSCH DES UNTEREN ME...

Page 48: ...Greifer 18 Ketten Leitergreifer 19 BefestigungsschraubedesoberenGreifers 20 Einstellknopff rdieSchnittbreite 21 Transporteurshalter 22 Untermesser 23 Obermesser 24 UntererEinf dler 25 LochzurEinstellu...

Page 49: ...um Verhindern des Schneidens des Leiterstichs 3 Leiterstich Stichplatte 4 Leiterstich N hfu 5 Spulenscheibe 6 Untermesser 7 F hrung 8 B rste 9 Pinzette 10 Schraubendreher S 11 Schraubendreher M 12 Sch...

Page 50: ...schl sse des Flusenbeh lter in die Kerben der Greiferabdeckung ein EIN AUS SCHALTER Um die Maschine einzuschalten brauchen Sie den EIN AUS Schalter zu dr cken Mit diesem Schalter steuern Sie die Strom...

Page 51: ...ition biserh rbarblockiert StellenSie dieGarnrollenaufdenTellernundf hrenSiedie F den berdieFadenf hrungenamSt nder von hintennachvorne F rgro ekonischeGarnrollen verwendenSiedieGarnrollenhalterausGum...

Page 52: ...tigungsschraube Cgeh rtzu einer2 Faden Kettenstichnadel Die Befestigungsschraube Dgeh rtzurOverlock Nadel Wie in der Abbildung gezeigt Die Nadel ist in verschiedenen Positionen installiert sodass Sie...

Page 53: ...reiferabdeckung umdasEinf delnzuerleichtern Sieseheneinfarbiges Einf delungsbild InderReihenfolge1 5einf deln Setzen Sie die Fadenspule auf den Stift und f hren Sie die richtige Fadenfarbe von hinten...

Page 54: ...ie Schritte 4 bis 8 aus siehe unten F hren Sie den Faden von vorne nach hinten zum oberen Greiferloch 8 f hren Sie dann etwa 10 cm Faden durch das obere Greiferloch und legen Sie ihn auf den N hfu Hin...

Page 55: ...mmt derFadenvon rechtshinterdem Einbettungsschlitz B F delnSieden Fadenvonvorne nachhintendurch dasLoch C Achten Siedarauf dass derFadenindie Nutgedr cktwird ZiehenSieca 10cm Fadendurchdas untereGreif...

Page 56: ...arbigen Fadenzeichnung die Schritte 4 bis 11 aus siehe unten F hren Sie den Faden von vorne nach hinten zum Loch im Ketten Leiterstichgreifer 12 f hren Sie dann etwa 10 cm Faden durch das Loch in dies...

Page 57: ...deln Sie entsprechend dem Einf delweg ein Siehe Foto Wenn Sie Nadel A verwenden befolgen Sie die Schritte 9 11 Wenn Sie Nadel D verwenden befolgen Sie die Schritte 9 und 11 Ziehen Sie ca 10 cm Faden d...

Page 58: ...tsprechende Einf delmethode Wenn Sie die Nadel B oder C verwenden f deln Sie entsprechend dem Einf delweg ein Siehe Foto Wenn Sie Nadel A verwenden befolgen Sie die Schritte 7 9 Wenn Sie Nadel D verwe...

Page 59: ...bfallbeh lter ffnen SiedieHakenabdeckung Dr ckenSiemitdemlinken DaumenaufdenDeckeldesFachsf rSchnittresteund nehmenSieihnvonderMaschine ZiehenSiedannmitder linkenHandfestdaranundnehmenSiedenDeckelab S...

Page 60: ...ist BeidenmeistenStoffen mussderN hfu drucknichtge ndertwerden WennSie anderedickeoderd nneStoffen hen stellenSiezuerstden N hfu druckein DieserfolgtmiteinemSchraubendreher S HINWEIS STROMVERSORGUNGAU...

Page 61: ...s kann beim N hprozess hilfreich sein HINWEIS STROMVERSORGUNGAUSSCHALTEN DrehenSiedenKnopf umdasObermesserindie h chstePositionzuheben undhebenSiedannden Druckn hfu an Drehen SiedasObermessergegen den...

Page 62: ...h ein Drehen Sie den Verteiler gegen den Uhrzeigersinn und schieben Sie den oberen Teil leicht nach hinten Die Verteilerspitze wird im oberen Greiferloch verriegelt Wenn Sie umgekehrt vorgehen k nnen...

Page 63: ...sition R gebracht haben befindet sich die Zunge A in der angegebenen Position Diese Einstellung kann f r alle Rolls ume verwendet werden Entfernen Sie den Beh lter f r Schnittreste und drehen Sie den...

Page 64: ...nd bei dickeren Stoffen 4 mm EntfernenSiedasFach f rSchnittreste ziehen SiedenTischnach linksundsetzenSiedas Fachf rSchnittreste wiederein Hinweis Entfernen SievordemAus undEinbaudes TischesdasFachf r...

Page 65: ...ltist bewegensichdieVorderz hne halbsolangsamwiedie Hinterz hne d h dieVorderz hne bewegendoppeltsovielMaterial wiedieHinterz hne Dadurchwird derStichgedehnt WennderEinstellhebelf rden Differentialtra...

Page 66: ...schl gen Manschetten usw DIE FOLGENDE TABELLE ZEIGT VERSCHIEDENE EINSTELLUNGEN F R DEN DIFFERENTIALTRANSPORT VON STOFFEN N HEN SIE EINE PROBE BEVOR SIE MIT DEM NORMALEN N HEN BEGINNEN DIFFERENTIALTRAN...

Page 67: ...Schrauben A und B an Setzen Sie die Leiternadel D und die 2 Faden Kettenstichnadel C sowie den Leiternaht N hfu ein N hen mit 2 Faden Kettenstich 1 Drehen Sie den Knopf in Pfeilrichtung bis sich die...

Page 68: ...te muss der obere Greifer eingefahren sein 3 Drehen Sie den Knopf in Pfeilrichtung bis sich die obere Greiferschraube A in der h chsten Position befindet ziehen Sie die Schraube A fest schlie en Sie d...

Page 69: ...jede klicken h ren kurz bevor Sie die unterste Position erreichen Drehen Sie nach dem zweiten Klicken den Knopf in die entgegengesetzte Richtung bis die Nadeln die h chste Position erreichen Heben Sie...

Page 70: ...verbinden und n hen 4 2 5 N 2 5 3 3 5 S 2 Faden Kettenstich Verbinden von Stoffen und Jeans ohne Overlockstiche 4 N 3 4 3 5 R 4 Faden Stich N henvon Stoffen insbesondere vonelastischen Stoffen N N N...

Page 71: ...mitteldicken Stoffen 4 5 7 4 F 2 3 5 R 3 Faden Plissee Overlockstich Saum N hen von d nnen und mitteldicken Stoffen N 3 5 7 5 F 2 3 5 S 2 Faden Overlockstich breit N hen von mitteldicken Stoffen 2 N F...

Page 72: ...ndes Kettenstichgreifers Fadendes Kettenstichgreifers Fadendes Kettenstichgreifers Faden der rechten Nadel des Kettenstichs Faden der rechten Nadel des Kettenstichs Faden der rechten Nadel des Kettens...

Page 73: ...ch und einen 2 Faden Overlockstich Wenn die Spannung optimal eingestellt ist erscheint nur der gelbe Nadelfaden auf der linken Stoffseite und der Stich ist geringer als der Stoff Wenn die Spannung opt...

Page 74: ...auf h here Zahlen oder den oberen Greiferknopf gr n auf niedrigere Zahlen Unterer Greiferfaden Faden des oberen Greifers Linker Nadelfaden Rechter Nadelfaden Rechte Seite Linke Seite Unterer Greiferfa...

Page 75: ...t Stellen Sie den unteren Greiferknopf lila auf h here Zahlen oder den oberen Greiferknopf gr n auf niedrigere Zahlen Unterer Greiferfaden Unterer Greiferfaden Unterer Greiferfaden UntererGreiferfaden...

Page 76: ...ntere Greiferfaden lila zu locker ist Stellen Sie den unteren Greiferspannungsknopf lila auf h here Zahlen Rechte Seite Rechte Seite Rechte Seite Rechte Seite Rechte Seite Rechte Seite Linke Seite Lin...

Page 77: ...n auf eine niedrigere Zahl oder den unteren Greiferknopf lila auf eine h here Zahl Wenn der untere Greiferfaden lila auf der rechten Seite sichtbar ist Stellen Sie den unteren Greiferknopf lila auf h...

Page 78: ...den unteren Greiferknopf gelb auf eine niedrigere Zahl Wenn der untere Greiferfaden lila zu locker ist Stellen Sie den unteren Greiferspannungsknopf lila auf h here Zahlen Hinweis Verwenden Sie den Ve...

Page 79: ...ew hrleisten Wenn der untere Greiferfaden lila zu locker ist Stellen Sie den rechten Nadelspannknopf blau auf niedrigere Zahlen oder den unteren Greiferfaden lila auf h here Zahlen Wenn der untere Gre...

Page 80: ...NeuesUntermesseraufsetzen Klemmschraubefestziehen ObermesserwiederinArbeitsstellungbringen Abdeckungdes Greifersschlie en STOFF FADEN STICHL NGE LEICHTER D NNER STOFF Organdine d nne Strickwaren Taft...

Page 81: ...osition 3 W hlen Sie die richtige Nadel 4 Richtig einf deln FALSCHER STICH Die Nadelfadenspannung ist nicht richtig eingestellt Stellen Sie die Nadelfadenspannung ein 3 ODER 4 FADEN OVERLOCKN HTE HABE...

Page 82: ...das Produkt nach der Beendigung seiner Nutzung als Sonderm ll zu lagern ist Aus diesem Grund m ssen alle Produkte deren Lebensdauer abgelaufen ist m ssen einer qualifizierten Entsorgung und dem Recyc...

Page 83: ...DE Texi Integra 5 83...

Page 84: ...ectrical or mechanical adjustment 4 Never operate the appliance with any air opening blocked Keep ventilation openings of this sewing machine and foot controller free from accumulation of lint dust an...

Page 85: ...EN SAVE THESE INSTRUCTIONS This sewing machine is designed and manufactured for household use only Texi Integra 5 85...

Page 86: ...EEDLE THREAD 98 IMPORTANT THREADING INSTRUCTIONS 99 CLOTH WASTE COVER 99 PRESSER FOOT LIFTER LEVER 100 HOW TO ADJUST THE PRESSER FOOT PRESSURE 100 REPLACING PRESSER FOOT 100 THREAD CUTTER 101 DISCONNE...

Page 87: ...AD OVERLOCK 115 3 THREAD DECORATIVE OVERCASTING 116 3 THREAD CRIMPED OVERLOCK 116 3 THREAD CRIMPED OVERLOCK HEM 117 2 THREAD OVERCASTING 118 2 THREAD OVERLOCK 118 2 THREAD CRIMPED OVERLOCK 119 MACHINE...

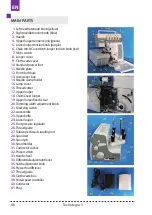
Page 88: ...15 Lampcover 16 Threadcutter 17 Upperlooper 18 Chain Coverlooper 19 Upperlooperfixedscrew 20 Trimmingwidthadjustmentknob 21 Feeddogswitch 22 Lowerknife 23 Upperknife 24 Lowerlooper 25 Footpressureregu...

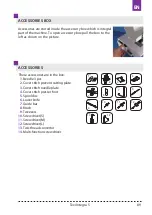
Page 89: ...sories are in the box 1 Needle 3 pcs 2 Cover stitch prevent cutting plate 3 Cover stitch needle plate 4 Cover stitch presser foot 5 Spool disc 6 Lower knife 7 Guide bar 8 Brush 9 Tweezers 10 Screwdriv...

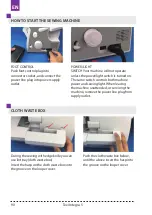
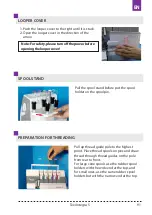
Page 90: ...into the groove on the looper cover POWER LIGHT SWITCH Your machine will not operate unless the power light switch is turned on The same switch controls both machine power and sewing light When leavin...

Page 91: ...he spool pin Pull up thread guide pole to the highest point Place thread spools on pins and draw thread through thread guides on the pole from rear to front For large cone spools use the rubber spool...

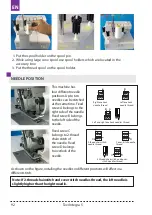
Page 92: ...the needle Fixed screw C belongs to 2 thread chain stitch of the needle Fixed screw D belongs to overlock of the needle As shown on the figure installing the needles in different positions will effect...

Page 93: ...ng NOTE Threadtensionisreleasedwhenthepresserfootisliftedup Put the thread spool on the spool pin please guide the corresponding color thread from the back to the front through the thread guide Lift t...

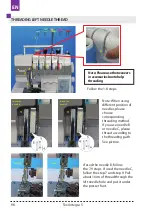
Page 94: ...reading diagram follow the 4 8 steps go down The thread from front to back into the upper looper hole 8 then pull about 10cm of thread through the upper looper hole and put it on the presser foot Note...

Page 95: ...htbehind theembeddinggap inside B Thethreadfrom fronttoback throughthehole C becareful The threadmustbe stuckinthegroove Pullabout10cmof threadthroughthe lowerlooperhole andputitunderthe presserfoot T...

Page 96: ...toward you until the chain stitch cover stitch looper reached the rightmost position According to color threading diagram follow the 1 12 steps According to color threading diagram follow the 4 11ste...

Page 97: ...e A please thread according to the threading path See picture If used the needle A follow the 9 11 steps If used the needle D follow the step 9 and step 11 Pull about 10cm of thread through the right...

Page 98: ...esponding threading method If you use needle B or needle C please thread according to the threading path See picture If used the needle B follow the 7 9 steps If used the needle C follow the step 7 an...

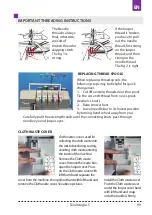
Page 99: ...ontheClothwastecoverwith leftthumbandseparatethe coverfromthemachine thenpullouthardwithlefthandand removetheClothwastecover Seeabovepictures InstalltheClothwastecover PushtheClothwastecover underthel...

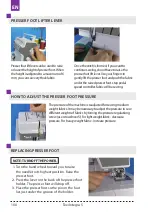
Page 100: ...tfabrics Itmaybenecessarytoadjustthepressuretosew differentweightsoffabricsbyturningthepressureregulationg screw usescrewdriverS Forlightweightfabric decrease pressure Forheavyweightfabric increasepre...

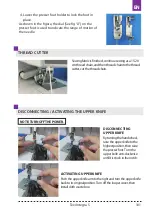
Page 101: ...the dial See fig A on the presser foot is used to indicate the range of motion of the needle NOTE TURNOFFTHEPOWER Byturningthehandwheel raisetheupperknifetothe highestposition thenraise thepresserfoo...

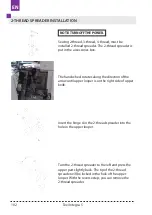
Page 102: ...e in the upper looper Turn the 2 thread spreader to the left and press the upper part slightly back The tip of the 2 thread spreader will be locked in the hole of the upper looper With the reverse ste...

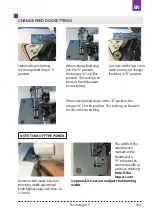
Page 103: ...R position the tongue A is in this position This setting can be used for all curl hem stitching Remove cloth waste box turn trimming width adjustment knob adjust range between 3 0 4 5 mm The width of...

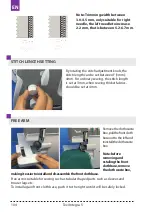
Page 104: ...h is set at 3mm when sewing thicker fabrics should be set at 4mm Removetheclothwaste box pullthefrontcloth baseouttotheleftand reinstalltheclothwaste box Note before removingand nstallingthefront clot...

Page 105: ...kesalongerstrokethanthe rearfeeddog B Thishastheeffectofaccumulating materialunderthepresserfootto offsetthewaveringonthefabric Ifthedifferentialadjustmentlever issetat2 0thefrontfeeddog A makesashort...

Page 106: ...the pocket ribbon lapel cuff edge etc THE FOLLOWING TABLE SHOWS THE VARIOUS DIFFERENTIAL SETTINGSREQUIRED FOR VARIOUS FABRICS TRY SEWING ON THE SAMPLE BEFORETHE FORMAL SEWING BEGINS TO SET THE DIFFERE...

Page 107: ...ws A B again Replace on the cover stitch needle D and 2 thread chain stitch needle C and the cover stitch presser foot Sew 2 threads chain stitch 1 The hand wheel rotates along the direction of the ar...

Page 108: ...distance between the needle and the edge of the fabric Note When Prevent cutting plate is installed the upper looper must be in 3 The hand wheel rotates along the direction of the arrow until upper lo...

Page 109: ...ofeachother Duringthelaststitch turnthehandwheeltoward youuntiltheneedlesstickintothefabricandyouhearclicksound justbeforereachingthe lowestposition Aftersecondclicks turnthehandwheelintheoppositedire...

Page 110: ...sting Connecting overcasting stitch of Knitted fabric 4 2 5 N 2 5 3 3 5 S 2 thread chain stitch Woven fabric denim fabric joint non wrapping edge 4 N 3 4 3 5 R 4 thread overcasting Sewanyfabric togeth...

Page 111: ...5 S 3 thread crimped overlock Sewing medium thickness fabric 4 5 7 4 F 2 3 5 R 3 thread crimped overlock hem Sewing medium thickness fabric N 3 5 7 5 F 2 3 5 S 2 thread overcasting wide Sewing medium...

Page 112: ...to the green the lower looper corresponds to purple COVER STITCH 5 THREAD SAFETY OVERCASTING If the tension is set in the best condition only a few of the needle thread blue yellow appear on the back...

Page 113: ...and the lower looper thread purple can be seen on the back side of the fabric If the left needle thread yellow is too loose Adjust the needle tension knob yellow to higher value If the needle thread...

Page 114: ...t the upper looper thread tension knob green to lower value If the needle thread yellow or blue is too loose Adjust the needle tension knob yellow or blue to higher value If the upper looper thread gr...

Page 115: ...er value Only a few of the upper looper thread green appears on the back side of the fabric Adjust the upper looper thread tension knob green to lower value or adjust the lower looper thread tension k...

Page 116: ...DE YELLOW BLUE GREEN PURPLE RED 1 5 5 5 7 If the needle thread yellow is too loose Adjust the needle tension knob yellow to higher value If the upper looper thread green is on the back side of the fab...

Page 117: ...n knob green to lower value If the right needle thread blue is too loose Adjust the right needle tension knob blue to higher value Only a few of the upper looper thread green appears on the back side...

Page 118: ...e to lower value or adjust the lower looper thread tension knob purple to higher value If the needle thread yellow or blue is too loose Adjust the needle tension knob yellow or blue to higher value or...

Page 119: ...ure after cleaning Periodically clean the sucker with alcohol to ensure the stability of the machine If the lower looper thread purple is too loose Adjust the right needle tension knob blue to lower v...

Page 120: ...w lower knife in tighten the fixing screw put the upper knife back to the working position close the lopper cover FABRIC THREAD STITCH LENGTH LIGHT THIN FABRIC Organdy Thin knitted fabric Taffeta Silk...

Page 121: ...3 Select the proper needle 4 Threading correctly STITCH ERROR The needle thread tension is not adjusted well Readjust the needle thread tension 3 THREAD OVERLOCK OR 4 THREAD OVERLOCK STITCH IS IRREGU...

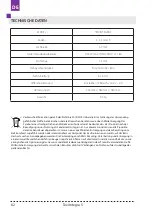
Page 122: ...tio 0 7 2 0 Dimensions 360 mm s 380 mm g 380 mm w Weigth 9 2 kg SAVE THESE INSTRUCTIONS This product is for household use or equivalent This appliance complies with EMC Directive 2014 30 EU covering t...

Page 123: ...EN Texi Integra 5 123...

Page 124: ...ha sido golpeada o da ada o si ha estado en contacto con el agua En caso de presentarse algunas de las situaciones citadas acuda al servicio t cnico autorizado m s pr ximo para revisarla repararla o r...

Page 125: ...e la aguja en la posici n m s alta para evitar que se rompa la aguja o se produzca cualquier otro tipo de da o en la m quina 20 Al realizar cualquier tipo de actividad cerca de la aguja como enhebrado...

Page 126: ...DE LA AGUJA IZQUIERDA 138 INSTRUCCIONES IMPORTANTES DE ENHEBRAMIENTO 139 TAPA DEL RECIPIENTE PARA RETALES 139 PALANCA DEL PIE PRENSATELAS 140 PRESI N DEL PIE PRENSATELAS 140 RECAMBIO DEL PIE PRENSATEL...

Page 127: ...E 3 HILOS 154 SOBREHILADO DE 3 HILOS 155 SOBREHILADO DECORATIVO DE 3 HILOS 156 SOBREHILADO RIZADO DE 3 HILOS 156 SOBREHILADO RIZADO DE 3 HILOS DOBLADILLO 157 SOBREHILADO DE 2 HILOS 158 DOBLADILLO DE 2...

Page 128: ...18 Lanzaderadecadeneta derecubrimiento 19 Tornillodelalanzaderasuperior 20 Ajustedelanchodelcorte 21 Selectordeconfiguraci n 22 Cuchilloinferior 23 Cuchillosuperior 24 Lanzaderainferior 25 Orificiode...

Page 129: ...iento 3 Placa de la aguja de la costura de recubrimiento 4 Pie de presi n de la costura de recubrimiento 5 Disco del carrete 6 Cuchillo inferior 7 Barra de guiado 8 Cepillo 9 Pinzas 10 Destornillador...

Page 130: ...leba sobre el recipiente donde la tapa de la lanzadera INTERRUPTOR DE ALIMENTACI N ILUMINACI N Para arrancar la m quina encienda el interruptor de alimentaci n iluminaci n Este interruptor controla la...

Page 131: ...s alta hasta que oiga un clic Coloque las bobinas de hilo en sus soportes y pasar los hilos por los gu a hilos de atr s hacia delante En caso de utilizar bobinas c nicas de gran tama o se pueden usar...

Page 132: ...El tornillo C sirve para la costura en cadeneta con 2 hilos El tornillo D sirve para el dobladillo Como se ve en la figura la aguja est instalada en diferentes posiciones en las que se realizan difere...

Page 133: ...nteelpieprensatelas PRECAUCI N Al levantar el pie prensatelas se libera la tensi n del hilo Poner el carrete sobre el alfiler del carrete Llevar el hilo del color correspondiente desde la parte traser...

Page 134: ...n la figura seguir los pasos 4 a 8 hacia abajo Poner el hilo desde el frente hasta el orificio de la lanzadera superior 8 despu s tirar unos 10 cm del hilo a trav s del orificio de la lanzadera superi...

Page 135: ...el espaciose alado B Elhilodebeirdesde lapartefrontalhasta latraseraatrav s delorificio C uidado Elhilodebe estarfijadoenla ranura Tirarunos10 cmdelhiloatrav s delorificioinferiory ponerlopordebajo de...

Page 136: ...hilo desde el frente hasta el orificio de la lanzadera de la costura en cadeneta costura de recubrimiento 12 Despu s tirar unos 10 cm del hilo a trav s del orificio de la lanzadera de la costura en ca...

Page 137: ...alizarel enhebramiento deacuerdo conlospasos recomendados Cf la figura Si se usa la aguja A seguir los pasos 9 a 11 Si se usa la aguja D seguir los pasos 9 y 11 Tirar unos 10 cm del hilo a trav s de l...

Page 138: ...m todode enhebramiento correspondiente Si usalaagujaBolaC realizarel enhebramientode acuerdoconlospasos recomendados Cf la figura Si se usa la aguja B seguir los pasos 7 a 9 Si se usa la aguja C segui...

Page 139: ...losretalesentrenenlam quina Retirarlatapadelrecipiente pararetales Retirarelrecipiente pararetales abrirlatapadela lanzadera Apretarlatapadel recipientepararetales conel pulgarizquierdoysepararlatapad...

Page 140: ...Paralamayor adelastelas no esnecesariocambiarlapresi ndelpie Encasodecoserotrotipo detelasm sgruesasofinas primerohayqueajustarelpie Parahacerlo hayqueusareldestornillador S 1 Girar la rueda manual h...

Page 141: ...ngo de movimiento de la aguja Este elemento puede servir de gu a durante la costura COMENTARIO DESCONECTARLAELECTRICIDAD Girandolaruedamanual elevar laagujasuperiorhacialaposici n superiorm ximaydespu...

Page 142: ...erior Girar el esparcidor de 2 hilos hacia la izquierda y apretar la parte superior ligeramente hacia atr s El extremo del esparcidor de 2 hilos ser bloqueado en el orificio en la lanzadera superior R...

Page 143: ...y 4 5 mm El ancho del ajuste est marcado en la placa de la aguja R indica el ancho del corte en la costura rizada Comentario Si la tapa de la lanzadera est abierta es m s f cil ajustar el ancho del c...

Page 144: ...gruesas debe ser de 4 mm Retirar el recipiente para retales tirar por la base del recipiente hacia la izquierda y reinstalar el recipiente Comentario antes de retirar e instalar la base frontal retir...

Page 145: ...d deltrasero Alahoradecoser el transportadorenv aalaparte traseras lolamitaddelatela En estasituaci nlacosturasealarga Cuandolalevadiferencialest en elnivelde2 0 eltransportador frontales2vecesm sr pi...

Page 146: ...LA SIGUIENTE TABLA MUESTRA VARIAS CONFIGURACIONES DIFERENCIALES REQUERIDOS PARA DIFERENTES TELAS RECOMENDAMOS REALIZAR UNA PRUENA ANTES DE PROTECEDER AL TRABAJO C MO CONFIGURAR EL TRANSPORTADOR DIFERE...

Page 147: ...biar por la aguja D y la aguja C de 2 hilos y el pie prensatelas Costura con la costura de 2 hilos 1 Girar la rueda manual en la direcci n de la flecha nasta que la aguja se encuentre en su posici n s...

Page 148: ...omentario Con la placa de seguridad instalada la lanzadera superior debe estar instalada en su lugar 3 Girar la rueda manual en la direcci n de la flecha hasta que el tornillo A de la lanzadora est en...

Page 149: ...Coser4 5costurasenelfrentecadatela Enlas ltimasagujas laruedamanualgiraenelsentidodelaflechahastaquelaagujapasepor latela Latelaalcanzasuposici nm sbajaantesdequesepuedao relclic Despu sdel segundocli...

Page 150: ...e 4 hilos Costurade conexi ny sobrehiladode unatelatrenzada 4 2 5 N 2 5 3 3 5 S Costura en cadeneta de 2 hilos Tela tela denim sin dobladillos 4 N 3 4 3 5 R Sobrehilado de 4 hilos Costurade cualesquie...

Page 151: ...edio 4 5 7 4 F 2 3 5 R Recubrimiento de 3 hilos rizado dobladillo Costura fina de telas de grosor medio N 3 5 7 5 F 2 3 5 S Sobrehilado de 2 hilos ancho Costura de telas de grosor medio 2 N F 2 3 5 S...

Page 152: ...lodela lanzadera paralasuturaen cadeneta Hilodela lanzadera paralasuturaen cadeneta Hilodela lanzadera paralasutura encadeneta Hilo de la aguja derecha para al sutura en cadeneta Hilo de la aguja dere...

Page 153: ...seguridad de 4 hilos incluye un sobrehilado de 2 hilos en cadeneta y un sobrehilado de 2 hilos Si la tensi n est bien configurada el hilo de la aguja amarillo puede ser visto por el lado trasero de l...

Page 154: ...a inferior violeta hasta un valor superior o ajustar la tensi n del hilo de la lanzadera superior verde hasta un valor inferior Hilodela lanzadera Hilo de la aguja de la lanzadera superior Hilo de la...

Page 155: ...st por el lado frontal de la tela Ajustar la tensi n del hilo de la lanzadera inferior violeta hasta un valor superior o ajustar la tensi n del hilo de la lanzadera superior verde hasta un valor infer...

Page 156: ...o Ajustar la tensi n del hilo de la lanzadera inferior violeta subiendo el valor Hilodelalanzadera inferior Hilodelalanzadera inferior Hilodela lanzaderainferior Ni dolnego chwytacza Hilodelalanzadera...

Page 157: ...hastaunvalorinferioroajustarlatensi ndelhilodela lanzaderainferior violeta hastaunvalorsuperior Si el hilo de la aguja de la lanzadera inferior violeta est por el lado frontal trasero de la tela Ajust...

Page 158: ...llo o azul hasta un valor superior o ajustar la tensi n del hilo de la lanzadera inferior amarillo hasta un valor inferior Si el hilo de la lanzadera inferior violeta est flojo Ajustar la tensi n del...

Page 159: ...ectar la alimentaci n antes de la operaci n SOBREHILADO RIZADO DE 2 HILOS Si el hilo de la lanzadera inferior violeta est flojo Ajustar la tensi n del hilo derecho azul hasta un valor inferior o ajust...

Page 160: ...laci n poner el nuevo cuchillo apretar el tornillo de fijaci n poner el cuchillo superior en la posici n de trabajo cerrar la tapa de la lanzadera TELA HILO LARGO DE LA COSTURA TELA LIGERA Y FINA Orga...

Page 161: ...rectamente ERROR EN LA COSTURA La tensi n entre la aguja y el hilo no est bien ajustada Ajustar la tensi n entre la aguja y el hilo SOBREHILADO DE 3 O 4 HILOS LA COSTURA DE SOBREHILADO ES IRREGULAR HI...

Page 162: ...tivo indica que el producto debe almacenarse en un lugar separado al final de su vida til Por lo tanto los productos que hayan llegado al final de su vida til deben eliminarse en un lugar especializad...

Page 163: ...ES Texi Integra 5 163...

Page 164: ...teur et indiqu es dans la pr sente notice 6 Il est interdit d utiliser la machine quand le c ble ou la fiche sont endommag s ou quand il y a des perturbations dans le fonctionnement quand la machine a...

Page 165: ...t interdit d utiliser des aiguilles tordues 18 Il ne faut pas tirer le tissu ni le pousser pendant la couture Cela pourrait endommager l aiguille 19 Il faut toujours laisser l aiguille en position la...

Page 166: ...78 INSTRUCTIONS IMPORTANTES POUR L ENFILAGE 179 CHANGEMENT DES BOBINES AVEC LE FIL 179 COUVERCLE DU R CEPTACLE POUR CHUTES 179 LEVIER DU PIED DE BICHE 180 APPUYER SUR LE PIED DE BICHE 180 CHANGEMENT D...

Page 167: ...95 POINT D CORATIF 3 FILS 196 POINT PLISS 3 FILS 196 POINT PLISS DE SURJET 3 FILS OURLET 197 POINT DE SURJET 2 FILS 198 POINT DE SURJET 2 FILS 198 POINT PLISS 2 FILS 199 ENTRETIEN DE LA MACHINE 199 RE...

Page 168: ...rieure 18 Crochetpourchainette recouvrement 19 Visdefixationducrochetsup rieur 20 Moletteder glagedelalargeurdecoupe 21 Commutateurdedents 22 Couteauinf rieur 23 Couteausup rieur 24 Boucleurinf rieur...

Page 169: ...point de recouvrement 3 Plaque d aiguille pour point de recouvrement 4 Pied de biche pour point de recouvrement 5 Disque de bobine 6 Couteau inf rieur 7 Guide 8 Pinceau 9 Pincette 10 Tournevis S 11 To...

Page 170: ...cle de chutes dans les encoches du couvercle du crochet COMMUTATEUR ALIMENTATION LUMIERE Afin de mettre en marche la machine il faut appuyer sur le commutateur alimentation lumi re Ce commutateur comm...

Page 171: ...clic Placer les bobines de fils sur les supports et faire passer les fils par les guidages sur le support de l arri re vers l avant Dans le cas de grandes bobines coniques il est possible d utiliser...

Page 172: ...point chainette 2 fils La vis de fixation D est pour l aiguille de surjet Comme le montre la figure l aiguille est install e dans diff rentes positions afin d obtenir diff rents points A B A B C C D...

Page 173: ...lage ouvrezlecouvercleducrochet vousverrezundessind enfilagecolor Effectuez l enfilagedufildansl ordre1 5 Placer la bobine de fil sur la tige guider la bonne couleur de fil de l arri re vers l avant t...

Page 174: ...apes 4 8 ci dessous Faire passer le fil de l avant vers l arri re dans le trou du crochet sup rieur 8 puis tirer environ 10 cm de fil travers le trou du crochet et le placer sous le pied de biche Atte...

Page 175: ...oite derri relafentede d p t B Lefildel avantvers l arri re traversle trou C attention le fildoit treenfonc danslarainure Tirer environ10cmde fil traversletrou inf rieurducrochet etleplacersousle pied...

Page 176: ...n color des fils suivez les tapes 4 11 Faire passer le fil de l avant vers l arri re dans le trou du crochet de point de chainette de recouvrement 12 puis tirer environ 10 cm de fil travers le trou du...

Page 177: ...filer le fil selon le chemin d enfilage Regardez la photo Si vous utilisez une aiguille A suivez les tapes 9 11 Si vous utilisez une aiguille D suivez les tapes 9 et 11 Tirer environ 10 cm de fil trav...

Page 178: ...enfilage appropri e En cas d utilisation d une aiguille B ou C enfiler le fil selon le chemin d enfilage Regardez la photo Si vous utilisez une aiguille A suivez les tapes 7 9 Si vous utilisez une ai...

Page 179: ...es Retrait dur ceptaclepourchutes ouvrirlecouvercleducrochet Appuyezaveclepoucegauchesurlecouvercledelabo tede coupeets parez ledelamachine puistirezfermementavecla maingaucheetretirezlecouvercle Voir...

Page 180: ...aisseurmoyenne Pourlaplupartdestissus iln estpasn cessairedemodifierlapressiondupiedde biche Lorsdelacoutured autrestissus paisoufins r glezlapression dupied debicheaud part Cecisefait l aided untourn...

Page 181: ...ouvement de l aiguille Cela peut tre utile dans le processus de couture ATTENTION COUPEZL ALIMENTATION Tournezleboutonpour leverlecouteausup rieur lapositionlaplushaute puis soulevezlepied de biche To...

Page 182: ...sup rieur Tourner le distributeur vers la gauche et appuyer l g rement vers l arri re sur la partie sup rieure L extr mit du s parateur est verrouill e dans l ouverture du crochet sup rieur Si vous fa...

Page 183: ...A est dans la position indiqu e Ce r glage peut tre appliqu tous les ourlets ondul s Retirer le r cipient d couper et tourner le bouton de r glage de la largeur de couture r gl sur 3 0 4 5 mm La large...

Page 184: ...3 mm et pour les tissus plus pais 4 mm Retirerler ceptacle pourchutes retirerla tableverslagaucheet remettreler ceptacle pourchutesenplace Attention Avantde retireretd installer leplateau enlever ler...

Page 185: ...smoinsvitequelesgriffes arri re c est direquelesgriffes avantd placentdeuxfoismoins detissuquelesgriffesarri re De cettefa on lepointesttendu Lorsquelelevierder glagede transportdiff rentielestr gl su...

Page 186: ...bords de poche rubans rabats poignets etc LE TABLEAU SUIVANT MONTRE LES DIFF RENTS R GLAGES DE D PLACEMENT DIFF RENTIEL REQUIS POUR DIFF RENTS TISSUS ESSAYER DE COUDRE UN CHANTILLON AVANT DE COMMENCE...

Page 187: ...de recouvrement D et l aiguille de point chainette 2 fils C ainsi que le pied de biche du point de recouvrement Couture avec point de chainette 2 fils 1 Tournez le bouton dans le sens de la fl che ju...

Page 188: ...de la plaque le crochet sup rieur doit tre ins r 3 Tournez le bouton dans le sens de la fl che jusqu ce que la vis A du crochet sup rieur soit dans la position la plus haute appuyez sur la vis A ferme...

Page 189: ...uilles touchent le tissu et que vous entendiez chaque clic d aiguille juste avant d atteindre la position la plus basse Apr s le deuxi me d clic tourner le bouton dans la direction oppos e jusqu ce qu...

Page 190: ...e surjet en tissus tricot s 4 2 5 N 2 5 3 3 5 S Point de chainette 2 fils Raccord de tissus et de denim sans point de surjet 4 N 3 4 3 5 R Point 4 fils Couturedetout typedetissu en particulierde tissu...

Page 191: ...s Couture de tissus tricot s d paisseur moyenne 4 5 7 4 F 2 3 5 R Point pliss de surjet 3 fils ourlet Couture de tissus fins et d paisseur moyenne N 3 5 7 5 F 2 3 5 S Point de surjet 2 fils large Cout...

Page 192: ...ainette Filducrochet pourpointde chainette Filducrochet pourpointde chainette Fil d aiguille pour point de chainette droit Fil d aiguille pour point de chainette droit Fil d aiguille pour point de cha...

Page 193: ...fil d aiguille jaune apparait sur le c t gauche du tissu et le point est moins visible que le tissu Si la tension est r gl e de mani re optimale les fils des crochets sup rieur vert et inf rieur viole...

Page 194: ...le fil de l aiguille droite jaune ou bleu est trop l che r gler la molette de tension de l aiguille jaune ou bleu sur un chiffre plus lev Si le fil du crochet sup rieur vert est visible sur le c t gau...

Page 195: ...droit R glez la molette du crochet inf rieur violette sur des chiffres plus lev s ou la molette du crochet sup rieur verte sur un chiffre inf rieur Fil du crochet sup rieur Fil du crochet sup rieur F...

Page 196: ...ds Si le fil du crochet inf rieur violet est trop l che R gler la molette de tension du crochet inf rieur violet sur un chiffre plus lev Filducrochet inf rieur Filducrochet inf rieur Fil du crochet su...

Page 197: ...ur vert sur des chiffres plus bas ou la molette du crochet inf rieur violette sur un chiffre plus lev Si le fil du crochet inf rieur violet est visible sur le c t droit R glez la molette du crochet in...

Page 198: ...e sur un chiffre plus lev ou la molette du crochet inf rieur jaune sur un chiffre plus bas Si le fil du crochet inf rieur violet est trop l che R gler la molette de tension du crochet inf rieur violet...

Page 199: ...le fil du crochet inf rieur violet est trop l che R gler la molette de tension de l aiguille droite bleu sur les chiffres inf rieurs ou la molette du crochet inf rieur violet sur les chiffres sup rie...

Page 200: ...etenue remettre la lame sup rieure en position de travail fermer le capot du crochet TISSU FIL LONGUEUR DU POINT TISSU L GER ET FIN Tissu fin et transparent en polyester tricot fin taffetas soie doubl...

Page 201: ...aiguilledanslabonneposition 3 Choisissezlabonneaiguille 4 Enfilezlefildemani recorrecte POINTINCORRECT Latensiondufildel aiguillen estpasbien r gl e R glezlatensiondufil LEPOINTDESURJET 3OU4 FILSESTD...

Page 202: ...pareil indique que le produit doit tre stock dans un endroit s par la fin de sa vie utile Par cons quent les produits qui ont atteint la fin de leur vie utile doivent tre recycl s dans une installatio...

Page 203: ...FR Texi Integra 5 203...

Page 204: ...gdy przew d lub wtyczka s uszkodzone gdy wyst puj zak cenia w funkcjonowaniu gdy maszyna zosta a uderzona lub uszkodzona lub te gdy pozostawa a w kontakcie z wod W takich przypadkach nale y zwr ci si...

Page 205: ...nale y ci gn tkaniny ani jej popycha Mog oby to spowodowa uszkodzenie ig y 16 Po zako czeniu szycia zawsze pozostawia ig w najwy szym po o eniu aby zapobiec z amaniu ig y czy innemu uszkodzeniu maszyn...

Page 206: ...IE PRAWEJ IG Y 216 NAWLEKANIE LEWEJ IG Y 218 WA NE INSTRUKCJE DOTYCZ CE NAWLEKANIA 219 POKRYWA POJEMNIKA NA CINKI 219 D WIGNIA STOPKI DOCISKOWEJ 220 DOCISK STOPKI 220 WYMIANA STOPKI SYSTEM MATIC 220 O...

Page 207: ...3 NITKOWY OWERLOKOWY 235 CIEG 3 NITKOWY DEKORACYJNY 236 CIEG 3 NITKOWY MARSZCZONY 236 CIEG 3 NITKOWY MARSZCZONY OWERLOKOWY 237 CIEG 2 NITKOWY OWERLOKOWY 238 CIEG 2 NITKOWY OWERLOKOWY 238 CIEG 2 NITKO...

Page 208: ...ampki 16 Obcinacznici 17 Chwytaczdolny 18 Chwytacz a cuszkowy drabinkowy 19 rubamocowaniag rnegochwytacza 20 Pokr t oregulacjiszeroko ciprzycinania 21 Prze czniktransportera 22 Dolnyn 23 G rnyn 24 Naw...

Page 209: ...3 szt 2 P ytka zabezpieczaj ca 3 P ytka ciegowa ciegu drabinkowego 4 Stopka dociskowa ciegu drabinkowego 5 Tarcza szpulki 6 Dolny n 7 Prowadnik 8 Szczotka 9 Pinceta 10 rubokr t S 11 rubokr t M 12 rubo...

Page 210: ...ie pojemnika na cinki W zaczepy pojemnika na cinki w wyci cia pokrywy chwytacza PRZE CZNIK ZASILANIA WIAT A Aby uruchomi maszyn nale y w czy prze cznik zasilania wiat a Prze cznik ten steruje zasilani...

Page 211: ...ci do najwy szego po o enia Szpulki nici umie na podstawkach a nici przeprowad przez prowadnice na stojaku od ty u do przodu W przypadku du ych szpulek sto kowych mo na u y gumowych uchwyt w szpulek o...

Page 212: ...g y ruba mocowania C nale y do ig y 2 nitkowego ciegu a cuszkowego ruba mocowania D nale y do ig y owerloka W zale no ci od pozycji ig y maszyna b dzie szy a r nymi ciegami A B A B C C D D Uwaga W prz...

Page 213: ...ydonajwy szegopo o eniaobracaj cko onap dowewswoj stron ipodnie stopk dociskow UWAGA Popodniesieniustopkidociskowejzwolnionezostajenaci gni cienici Szpulki nici umie na podstawkach poprowad odpowiedn...

Page 214: ...unkiem nici wykonaj kroki 4 8 ni ej Przeprowad ni od przodu do ty u do otworu g rnego chwytacza 8 nast pnie przeci gnij oko o 10 cm nici przez otw r g rnego chwytacza i umie j na stopce dociskowej Uwa...

Page 215: ...eprowad ni odprawejstrony dowg bienia B a doosadzania Ni odprzodu doty uprzezotw r C uwa aj ni musi by wci ni ta wrowek Przeci gnij oko o10cmnici przezotw r dolnegochwytacza iumie j pod stopk dociskow...

Page 216: ...wym schematem nawlekania nici wykonaj kroki 4 11 Przeprowad ni od przodu do ty u do otworu chwytacza ciegu a cuchowego drabinkowego 12 nast pnie przeci gnij oko o 10 cm nici przez otw r tego chwytacza...

Page 217: ...ia ig y D lub A nale y nawleka wed ug cie ki nawlekania Patrz zdj cie W przypadku u ycia ig y A wykonaj kroki 9 11 W przypadku u ycia ig y D wykonaj kroki 9 i 11 Przeci gnij oko o 10 cm nici przez otw...

Page 218: ...ie nale y wybra odpowiedni metod nawlekania W przypadku u ycia ig y B lub C nale y nawleka wed ug cie ki nawlekania Patrz zdj cie W przypadku u ycia ig y A wykonaj kroki 7 9 W przypadku u ycia ig y D...

Page 219: ...ikania down trzamaszyny Zdejmowaniepokrywy pojemnikana cinki Zdejmij pojemnikna cinki otw rz pokryw chwytacza Naci nij lewymkciukiempokryw pojemnikana cinkiioddzielj odmaszyny nast pnie poci gnijmocno...

Page 220: ...kanino redniejgrubo ci Wprzypadkuwi kszo citkaninnie mapotrzebyzmianydociskustopki Wprzypadkuszyciainnych grubychlubcienkichtkaninnale ynapocz tkuustawi docisk stopkidociskowejwzale no ciodpotrzeb Wyk...

Page 221: ...odzia ka na stopce A wskazuje zakres ruchu ig y Mo e to by pomocne w procesie szycia UWAGA wy czmaszyn iod czj od r d azasilania Obracaj cko opasoweunie g rnyn donajwy szej pozycji anast pniepodnie st...

Page 222: ...oru g rnego chwytacza Obr go w lewo i naci nij g rn cz lekko do ty u Ko c wka lepego chwytacza zostanie zablokowana w otworze g rnego chwytacza Post puj c odwrotnie mo na zdemontowa lepy chwytacz Szyc...

Page 223: ...portera w pozycji R j zyczek A znajduje si we wskazanej pozycji Ustawienie to mo e by stosowane do wszystkich roluj cych cieg w Zdejmij pojemnik na cinki obr pokr t o regulacji szeroko ci ciegu ustaw...

Page 224: ...ia si na 3 mm a dla grubszych tkanin na 4 mm Zdejmijpojemnikna cinki wyci gnijstolik wlewoiponownie za pojemnik na cinki Uwaga Przedzdj ciem izamontowaniem stolikanale ywyj pojemnikna cinki cou atwiam...

Page 225: ...dniez bkiporuszaj si opo ow wolniejni tylne czyli e przedniez bkiprzesuwaj dwa razymniejmateria uni tylne Dzi kitemu ciegjestnaci gany Gdyd wigniaregulacjitransportu r nicowegojestustawionana2 0 przed...

Page 226: ...sp dnice kraw dzie kieszeni wst ki klapy mankiety itp PONI SZA TABELA POKAZUJE R NE USTAWIENIA TRANSPORTU R NICOWEGO WYMAGANE DLA R NYCH TKANIN WYPR BUJ SZYCIE NA PR BCE PRZED ROZPOCZ CIEM NORMALNEGO...

Page 227: ...ami Doci nij ruby A i B Za ig ciegu drabinkowego D i ig 2 nitkowego ciegu a cuszkowego C oraz stopk dociskow ciegu drabinkowego Szycie ciegiem 2 nitkowym a cuszkowym 1 Obr pokr t o w kierunku strza ki...

Page 228: ...kraw dzi tkaniny Uwaga Podczas instalacji p ytki g rny chwytacz musi by wsuni ty 3 Obr pokr t o w kierunku strza ki a ruba A g rnego chwytacza znajdzie si w najwy szej pozycji doci nij rub A zamknij...

Page 229: ...woj stron dop ki ig y nie wbij si w materia i nie us yszysz klikni cia ka dej z nich tu przed osi gni ciem najni szej pozycji Po drugim klikni ciu przekr pokr t o w przeciwnym kierunku a ig y osi gn n...

Page 230: ...giem owerlokowym dzianiny 4 2 5 N 2 5 3 3 5 S cieg 2 nitkowy a cuszkowy czenie tkanin i denimu bez cieg w owerlokowych 4 N 3 4 3 5 R cieg 4 nitkowy Zszywanie dowolnych tkanin wszczeg lno ci elastyczny...

Page 231: ...o redniej grubo ci 4 5 7 4 F 2 3 5 R cieg 3 nitkowy marszczony owerlokowy Szycie tkanin cienkich i redniej grubo ci N 3 5 7 5 F 2 3 5 S cieg 2 nitkowy owerlokowy szeroki Szycie tkanin o redniej grubo...

Page 232: ...wego Ni chwytacza ciegu a cuszkowego Ni chwytacza ciegu a cuszkowego Ni prawej ig y ciegu a cuszkowego Ni prawej ig y ciegu a cuszkowego Ni prawej ig y ciegu a cuszkowego Ni ig owa ciegu a cuszkowego...

Page 233: ...bezpieczaj cy zawiera 2 nitkowy cieg a cuszkowy i 2 nitkowy cieg owerlokowy Je li napr enie jest ustawione w spos b optymalny tylko ni ig owa ta pojawia si po lewej stronie tkaniny Je li napr enie jes...

Page 234: ...Ustaw pokr t o dolnego chwytacza fioletowe na wy sz warto lub pokr t o g rnego chwytacza zielone na ni sz Ni dolnego chwytacza Ni g rnego chwytacza Ni ig y lewej Ni prawej ig y Prawa strona Lewa stron...

Page 235: ...pokr t o dolnego chwytacza fioletowe na wy sz warto lub pokr t o g rnego chwytacza zielone na ni sz Ni dolnego chwytacza Ni dolnego chwytacza Ni dolnego chwytacza Ni dolnegochwytacza Ni g rnego chwyt...

Page 236: ...ielone na wy sz warto Je li ni dolnego chwytacza fioletowa jest zbyt lu na ustaw pokr t o napr enia dolnego chwytacza fioletowe na wy sz warto Prawa strona Prawa strona Prawa strona Prawa strona Prawa...

Page 237: ...wytacza zielone na ni sz warto lub pokr t o dolnego chwytacza fioletowe na wy sz Je li ni dolnego chwytacza fioletowa jest widoczna na prawej stronie Ustaw pokr t o dolnego chwytacza fioletowe na wy s...

Page 238: ...iebieskie na wy sz warto lub pokr t o dolnego chwytacza te na ni sz Je li ni dolnego chwytacza fioletowa jest zbyt lu na ustaw pokr t o napr enia dolnego chwytacza fioletowe na wy sz warto Uwaga Aby u...

Page 239: ...o chwytacza fioletowa jest zbyt lu na ustaw pokr t o napr enia prawej ig y niebieskie na ni sz warto lub pokr t o dolnego chwytacza fioletowe na wy sz Je li ni dolnego chwytacza fioletowa jest zbyt na...

Page 240: ...rny n z powrotem w pozycji roboczej zamknij pokryw chwytacza TKANINA NI D UGO CIEGU LEKKA CIENKA TKANINA Organdyna cienka dzianina tafta jedwab podszewka itp Bawe na 50 70 Prz dza 70 140 2 0 4 0mm TK...

Page 241: ...ycji 3 Wybierz w a ciw ig 4 Nawlecz w spos b prawid owy NIEW A CIWY CIEG Napr enie nici ig owej nie jest dobrze ustawione Ustaw napr enie nici ig owej 3 LUB 4 NITKOWE CIEGO OWERLOKOWE MAJ NIEREGULARNY...

Page 242: ...produkt powinien zosta sk adowany w wyodr bnionym miejscu Dlatego te produkty kt rych okres u ytkowania si zako czy musz zosta oddane do utylizacji w miejscu specjalizuj cym si w selektywnej zbi rce...

Page 243: ...PL Texi Integra 5 243...

Page 244: ...RU 1 2 3 1 2 3 4 5 6 7 8 9 Texi Integra 5 244...

Page 245: ...RU 10 11 12 13 14 15 16 17 Texi Integra 5 245...

Page 246: ...RU 244 248 249 249 250 250 251 251 251 252 253 254 255 256 256 258 259 260 260 MATIC 260 261 261 262 T 263 264 264 265 266 2 267 269 269 269 270 272 272 Texi Integra 5 246...

Page 247: ...RU 5 272 4 273 2 273 4 273 3 274 3 275 3 276 3 276 3 277 2 278 2 278 2 279 279 280 280 281 282 Texi Integra 5 247...

Page 248: ...RU 1 2 3 4 5 6 7 8 9 10 11 12 13 14 15 16 17 18 19 20 21 22 23 24 25 26 27 28 29 30 31 32 33 34 35 36 37 38 39 40 41 Texi Integra 5 248...

Page 249: ...RU 1 3 2 3 4 5 6 7 8 9 10 S 11 M 12 L 13 2 14 13 12 11 10 14 9 8 7 6 5 4 3 2 1 Texi Integra 5 249...

Page 250: ...RU o Texi Integra 5 250...

Page 251: ...RU 1 2 Texi Integra 5 251...

Page 252: ...RU 1 2 3 A B C 2 D A B A B C C D D 2 2 z 2 Texi Integra 5 252...

Page 253: ...RU 1 5 1 2 3 4 5 Texi Integra 5 253...

Page 254: ...RU 1 3 4 8 8 10 Texi Integra 5 254...

Page 255: ...RU 5 8 1 11 9 B C 10 3 3 8 Texi Integra 5 255...

Page 256: ...RU 4 11 12 10 1 12 1 10 Texi Integra 5 256...

Page 257: ...RU D A A 9 11 D 9 11 10 D D A A Texi Integra 5 257...

Page 258: ...RU 1 8 B C A 7 9 D 7 9 10 B B C C Texi Integra 5 258...

Page 259: ...RU 1 2 A 1 2 3 Texi Integra 5 259...

Page 260: ...RU 6 S 1 2 3 MATIC Texi Integra 5 260...

Page 261: ...RU 15 20 Texi Integra 5 261...

Page 262: ...RU A 2 3 4 Texi Integra 5 262...

Page 263: ...RU T S S A R A 3 0 4 5 R R Texi Integra 5 263...

Page 264: ...RU 3 0 4 5 2 2 5 2 6 7 F 1 4 3 4 Texi Integra 5 264...

Page 265: ...RU A B 0 7 2 0 1 0 A B 0 7 2 0 A B D Texi Integra 5 265...

Page 266: ...RU 2 0 1 0 0 5 1 0 3 3 2 0 1 0 Texi Integra 5 266...

Page 267: ...RU 2 1 R 2 A B 3 A B D 2 C 2 1 2 S 2 3 L 19 2 Texi Integra 5 267...

Page 268: ...RU 2 1 2 3 A A S 0 5 Texi Integra 5 268...

Page 269: ...RU 1 2 4 5 A 2 Texi Integra 5 269...

Page 270: ...RU 5 5 N 3 4 4 5 R 5 N N N N N 3 3 5 S 4 4 2 5 N 2 5 3 3 5 S 2 4 N 3 4 3 5 R 4 N N N N 2 5 3 3 5 S 3 N N N 2 5 3 3 5 S 3 N N N F 2 3 5 S 3 4 2 7 F 2 3 5 S 3 4 1 5 7 F 2 3 5 S Texi Integra 5 270...

Page 271: ...RU 3 1 5 5 5 7 F 2 3 5 S 3 4 5 7 4 F 2 3 5 R 3 N 3 5 7 5 F 2 3 5 S 2 2 N F 2 3 5 S 2 2 N F 2 3 5 S 2 6 N F 2 3 5 S 2 6 N F 2 3 5 S 2 N N F 2 3 5 R Texi Integra 5 271...

Page 272: ...RU 5 5 5 N N N N N N 5 2 3 Texi Integra 5 272...

Page 273: ...RU 4 2 4 4 2 5 N 4 Y N N N N N 0 4 2 2 4 Texi Integra 5 273...

Page 274: ...RU 3 N N N N N N Texi Integra 5 274...

Page 275: ...RU 3 4 2 7 4 1 5 7 Texi Integra 5 275...

Page 276: ...RU 3 3 4 5 7 4 1 5 5 5 7 m Texi Integra 5 276...

Page 277: ...RU 3 N 3 5 7 5 Texi Integra 5 277...

Page 278: ...RU 2 2 2 N 6 N 6 N Texi Integra 5 278...

Page 279: ...RU 2 N N Texi Integra 5 279...

Page 280: ...RU A L 50 70 70 140 2 0 4 0mm 40 60 70 140 2 0 4 0mm 30 50 70 140 2 0 4 0mm 40 60 70 140 2 0 4 0mm 2 3 120 140 1 0 2 0mm Texi Integra 5 280...

Page 281: ...RU 1 2 3 1 2 3 1 2 3 4 5 1 2 3 4 5 1 2 3 4 1 2 3 4 3 4 1 2 1 2 1 2 3 1 2 3 1 2 3 1 2 3 Texi Integra 5 281...

Page 282: ...RU TEXI INTEGRA 5 2 3 4 5 6 7 HA1 SP HA 1 130 705H 12 80 1 4 mm 1200 4 0 7 2 0 360 380 380 9 2 2014 30 EU Texi Integra 5 282...

Page 283: ...RU Texi Integra 5 283...

Page 284: ...wing product Household sewing machine model Texi Integra 5 335 With this declaration relates complies with following directives Electromagnetic compatibility 2014 30 EU EN 55014 1 2006 A1 A2 EN 55014...

Page 285: ......

Page 286: ......
Reviews: