background image

MULTIFUNCTION SEWING MACHINE

Summary of Contents for Joy 25

Page 1: ...MULTIFUNCTION SEWING MACHINE...

Page 2: ......

Page 3: ...CS U ivatelsk manu l 4 Benutzerhandbuch 26 DE User manual 52 EN Manual de usuario 76 ES Manuel d utilisation 102 FR Instrukcja obs ugi 126 PL Manual do usu rio 152 PT 176 RU...

Page 4: ...opravu 4 Nikdy nepou vejte za zen pokud je n kter z ventila n ch otvor blokov n Udr ujte ventila n otvory stroje i ped l ist 5 Nikdy nevkl dejte dn p edm ty do otvor stroje 6 Nepou vejte venku 7 Nepou...

Page 5: ...en a vyroben pouze pro dom c pou it M jte pros m na pam ti e tento v robek je t eba bezpe n recyklovat v souvislosti s platnou legislativou odpov daj c zem o elektrick ch elektronick ch v robc ch V p...

Page 6: ...K N STROJE 13 VKL D N C VKY 14 NAVLEKAC NIT DO JEHLY 14 VYTA EN SPODN NIT 15 NASTAVEN NAP T HORN NIT 15 NAP T NIT U ZIGZAG STEHU 16 KOLE KO PRO VOLBU STEHU 16 KOLE KO PRO NASTAVEN D LKY STEHU 17 VOLBA...

Page 7: ...Jehla 20 Vodi nit na jeheln ty i 21 roubek jeheln svorky 22 Dr k p tla n patky 23 roubek p tla n patky 24 P tla n patka 25 Jeheln deska 26 Podava 27 Navl ka horn nit Z KLADN STI P ed zapojen m stroje...

Page 8: ...m st no za eln m krytem Pro v m nu rovky odstra te roubek a eln kryt stroje Pro odstran n Zatla it a oto it vlevo Pro nasazen Zatla it a oto it vpravo ic stroj lze pou t s nasazen m pracovn m stolkem...

Page 9: ...te p ku do st edov polohy pro vlo en nebo odstran n l tky 3 Zdvihn te p ku do nejvy polohy pro v m nu p tla n patky i vlo en nebo odstran n siln j vrstvy l tek P KA PRO ZDVIH A SPOU T N P TLA N PATKY...

Page 10: ...r k patek tak aby h delka patky le ela p mo pod dr kou dr ku Spus te p tla nou patku a t m dojde k jej mu zafixov n do dr ku V M NA P TLA N PATKY Kol ky se pou vaj p i dr en pulek nit aby doch zelo k...

Page 11: ...5 Pevn ut hn te roub jeheln svorky Pozn mka Nepou vejte tup nebo ohnut jehly Pro kontrolu polo te jehlu plochou stranou na rovny povrch mezera mezi jehlou a povrchem by m la b t rovnom rn Upozorn n P...

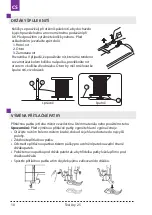
Page 12: ...e spojkov m kolem proti sm ru hodinov ch ru i ek pravou rukou Voln konec nit p idr ujte rukou a se l pn te ped l Zastavte stroj po n kolika ot k ch c vky a odst ihn te voln konec nit v bl zkosti c vky...

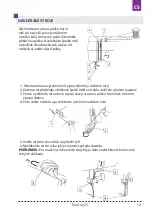
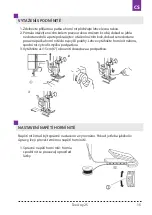
Page 13: ...provl kn te ji doln m vodi em nit 5 Ve te nit dol do vodi e na jeheln ty i 6 Navl kn te nit do o ka jehly sm rem zep edu dozadu POZN MKA Pro snaz navle en nit do jehly je dobr odst ihnout konec nit o...

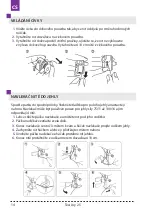
Page 14: ...patku do spodn polohy Stiskn te tla tko pro polohu jehly a nastavte ji nahoru Navleka m e b t pou v n pouze pro jehly s ly 75 11 a 100 16 a jim odpov daj c nit 1 Lehce stla te p ku navleka e a um st...

Page 15: ...ne posuvn p ka horn nit do nejvy polohy Lehce vyt hn te horn nit nahoru spodn nit vytvo smy ku pod patkou 3 Vyt hn te asi 15 cm 6 obou nit dozadu za a pod patkou VYTA EN SPODN NIT NASTAVEN NAP T HORN...

Page 16: ...i it zigzag steh by m lo b t nap t nit nastaveno na tro ku ni hodnotu ne p i it rovn ch steh Pokud bude horn nit lehce viditeln na rubov stran l tky doc l te lep ho vzhledu zigzag steh KOLE KO PRO VO...

Page 17: ...sm rem ke znam nku Pokud jsou stehy uvoln n oto te kole kem ke znam nku IT ROVN M STEHEM Zdvihn te p tla nou patku a um st te l tku pod l vod c ry na jeheln desce Spus te jehlu do l tky Spus te p tla...

Page 18: ...dov poloze a vyzna enou lini sla v p edn sti jsou v milimetrech sla vzadu jsou v palc ch Druh l tky Nit Jehla Lehk Bavln 120 150 Hedv b 120 150 Synt 120 150 70 80 St edn t k Bavln 100 120 Hedv b 100 1...

Page 19: ...te p tla nou patku a ijte velmi pomalu pro lep kontrolu rovn stehy ijte v bl zkosti hrany l tky a zigzag stehy by m ly proch zet l tkou a na druh stran zachyt vat p elo en lem 4 5 P i it kontrolujte...

Page 20: ...lu do nejvy polohy ot en m ru n ho kola 3 Zvolte lev strana knofl kov d rky na kole ku Spus te jehlu a za n te t stejnou d lku jako je prav strana knofl kov d rky Zastavte stroj a zdvihn te jehlu do n...

Page 21: ...stehu oto en m kole ka pro nastaven d lky stehu na 0 5 Upravte ku stehu ujist te se e jehla proch z pravou i levou d rkou knofl ku Pozn mka Ot ejte ru n m kolem po sm ru hodinov ch ru i ek a zkontrol...

Page 22: ...olohy a otev ete kryt chapa e Vyjm te c vkov pouzdro ze stroje uchopen m za z klopku 2 Posu te dr ky chapa e ve sm ru ipek 3 Odstra te kryt chapa e 4 Vyjm te chapa Po dokon en slo te zp t v echny sti...

Page 23: ...1 roubek eln ho krytu 2 eln ryt 3 Pou ijte n kolik kapek kvalitn ho oleje pro it stroje do bod vyzna en ch ipkami na obr zc ch Stroje kter jsou ast ji pou v ny je t eba mazat 2 3 x do roka Pokud stro...

Page 24: ...hlu do jeheln svorky Jehla je tup nebo ohnut Vyme te jehlu L tka byla postrkov na i potahov na p i it Nechejte stroj pod vat l tku p irozen Zbyt du e napr enie g rnej nitki Zmniejsz napr enie nitki g...

Page 25: ...nom rn D lka stehu je nastavena na 0 Zvy te d lku stehu V c vce do la nit Navi te novou spodn nit Stroj nefunguje Stroj nen zapojen v el s ti Vlo te koncovku do z suvky Vyp na stroje je v pozici 0 P e...

Page 26: ...unktionsst rungen vorkommen wenn die Maschine angeschlagen wurde oder im Kontakt mit Wasser war In solchen F llen soll man sich an einen autorisierten Partner wenden um die Maschine zu berpr fen repar...

Page 27: ...delbesch digung f hren 16 Nach der Arbeit lassen Sie die Nadel immer in ihrer obersten Stelle um die Besch digung der Nadel oder andere Besch digung der Maschine vorzubeugen 17 Schalten Sie die Maschi...

Page 28: ...EINF DELN DER OBERFADEN 35 NADELEINF DLER 37 UNTERFADEN NACH OBEN BRINGEN 37 OBERFADENSPANNUNG 38 FADENSPANNUNG F R ZICKZACK STICH 39 STICHAUSWAHL 39 EINSTELLEN DER STICHL NGE 40 AUSWAHL VON STRETCHST...

Page 29: ...Stichplatte 26 Transporteur 27 Nadeleinf dler TEILE DER N HMASCHINE NETZANSCHLUSS 1 2 3 4 5 6 7 8 9 10 11 12 13 14 15 16 17 18 20 19 21 22 26 25 24 27 23 Bevor Sie die Maschine an Strom anschlie en ve...

Page 30: ...n Sie Folgendes tun Nehmen Sie die Blende heraus und schrauben Sie die Schraube des hinteren Geh uses ab Nehmen Sie das Geh use heraus Schrauben Sie die Gl hbirne aus Richtung links Schrauben Sie die...

Page 31: ...nopflochfu 8 F hrung 9 Rei verschlussfu 10 N hfu zum Ann hen von Kn pfen FUSSL FTUNG Es sind drei Positionen des N hfu es m glich 1 Der N hfu soll immer beim N hen gesenkt werden 2 Der N hfu soll geho...

Page 32: ...ie am N hfu bis der Schnappschloss funktioniert WECHSELN DES N HFUSSES MATIC SYSTEM GARNROLLENST NDER Bei der fabrikneuen Maschine sind die Garnrollenst nder im Geh use versteckt eingedr ckt damit sie...

Page 33: ...verursachen dass die Maschine die Knoten macht oder die Stiche ausl sst Sie k nnen auch die Besch digung von Mechanismen der Maschine hervorrufen Man muss auch die St rke der Nadel an die gen hte Stof...

Page 34: ...f 4 Verschieben Sie den Spuler mit der Spule nach rechts 5 Halten Sie das Ende vom Faden und bet tigen Sie das Fu pedal es beginnt das Aufspulen Wenn ein bisschen Faden umgewickelt ist lassen Sie das...

Page 35: ...den durch den Schlitz der Spulenkapsel 3 Dann f hren Sie den Faden durch die Feder der Fadenspannung bis zum Ausgangsloch 4 Ziehen Sie mindestens 10 cm Faden au er der Spulenkapsel Falsche Reihenfolge...

Page 36: ...Teller von Oberfadenspannung 2 5 Ziehen Sie den Faden nach oben ber den Tellern 2 und spannen Sie sie stark an sodass die Feder der Fadenspannung bet tigt wird 6 F hren Sie den Faden von rechts nach...

Page 37: ...e den Nadeleinf dler und ziehen Sie langsam den Faden nach rechts durch die Fadenf hrung 2 Senken Sie den Nadeleinf dler so niedrig wie es m glich ist 3 Drehen Sie den Hebel von Nadeleinf dler nach hi...

Page 38: ...NG W hrend des N hens mit einem Geradestich wenn die Oberfadenspannung richtig eingestellt ist sollen sich die Ober und die Unterfaden in der Mitte von zwei Stofflagen verbinden 1 Stellen Sie die rich...

Page 39: ...Reihe ist m glich wenn Sie die Stichl nge 3 Ist die Oberfadenspannung zu lose eingestellt liegt die Verknotung auf der unteren Stoffseite In solcher Situation soll die Fadenspannung vergr ert werden...

Page 40: ...Uhrzeigersinn drehen Um die Fadenspannung zu verringern in die Gegenrichtung EINSTELLEN DER STICHL NGE AUSWAHL VON STRETCHSTICHEN Um die Stichl nge zu ndern es betrifft die einzelnen Stiche an soll ma...

Page 41: ...zu n hen 3 Der Stoff wird von dem Transporteur verschoben 4 Um das Nahtende zu verst rken dr cken Sie die Taste zum R ckw rtsn hen und n hen Sie einige Stiche r ckw rts 5 Wenn Sie das N hen zum Ende...

Page 42: ...hen Sie die Stoffkante und schneiden Sie die Stoffresten ab Benutzen Sie dazu den Standardfu ELASTISCHER BLINDSTICH E und BLINDSTICH F dienen zum S umen von R cken oder Hosenbeinen sie sind auf dem O...

Page 43: ...n Der Stoff soll der Abbildung nach zusammengelegt und unter den N hfu gelegt werden Beim N hen sollen Sie den Stoff so f hren dass sich die Nadel auf der rechten Seite hinter der Stoffkante bewegt Da...

Page 44: ...s Stellen Sie die Nadel in diesen Stoffteil wo das Knopfloch gen ht werden soll N hen Sie nach den Knopflochabmessungen nach unten bis sich die Schlitten bei dem Punkt A befinden Halten Sie die Maschi...

Page 45: ...adel k nnen Sie dazu ein Streichholz verenden Achten Sie dabei dass die Nadel das Streichholz nicht bewegt 5 Stellen Sie die Stichbreite ein und Pr fen Sie ob die eingestellte Stichbreite zu den L che...

Page 46: ...hten Rei verschlussseite muss sich der N hfu auf der linken Seite der Nadel befindet Der Stich soll sich so nahe der Z hnen von Rei verschluss wie m glich befinden ANN HEN VON APPLIKATIONEN W hlen Sie...

Page 47: ...fer 5 Greifertr ger 6 se zur Einstellung der Greiferringposition 7 Schlitz des Greifertr gers REINIGEN UND LEN VON GREIFER 1 Beseitigen Sie Staub sowie Faden und Stoffreste von dem Greiferring 3 und d...

Page 48: ...opfen l ausreichend Mehr l kann verursachen dass die lresten den Stoff verschmutzen Wenn die Maschine nach l ngerem Stillstand nicht gleichm ig arbeitet soll man sie mit einigen Tropfen l vor der Inbe...

Page 49: ...rke Passen Sie die richtige Fadenst rke an Der Unterfaden wird gebrochen Der Unterfaden ist nicht richtig aufgespult F deln Sie die Maschine erneut ein Faden und Stoffreste begrenzen die Greiferbewegu...

Page 50: ...ung Vergr ern Sie die Oberfadenspannung Falsch angepasste Faden oder Nadelst rke Passen Sie die richtige St rke von Faden und Nadel an Der Stoff wird nicht transportiert Die Faden und Stoffresten bloc...

Page 51: ...toffresten blockieren den Transporteur Reinigen Sie den Transporteur Die Maschine ist nicht ausreichend ge lt Pr fen Sie die Informationen zur richtigen Wartung der Maschine Die Gl hbirne leuchtet nic...

Page 52: ...electrical or mechanical adjustment 4 Never operate the appliance with any air opening blocked Keep ventilation openings of this sewing machine and foot controller free from accumulation of lint dust...

Page 53: ...EN SAVE THESE INSTRUCTIONS This sewing machine is designed and manufactured for household use only Texi Joy 25 53...

Page 54: ...BBIN CASE 60 WINDING THE BOBBIN 61 INSERTING THE BOBBIN 62 THREADING THE UPPER THREAD 62 NEEDLE THREADER 64 DRAWING UP THE BOBBIN THREAD 64 ADJUSTING THE THREAD TENSION 65 THREAD TENSION FOR ZIGZAG ST...

Page 55: ...EN MAINTANANCE 72 CLEANNING AND REMOVING THE HOOK 72 CLEANING THE FEED DOG 72 OILING THE MACHINE 73 USEFUL HINTS 74 Texi Joy 25 55...

Page 56: ...2 Presser foot holder 23 Presser foot screw 24 Presser foot 25 Needle plate 26 Feed dog 27 Threader MAIN PARTS CONNECTING THE MACHINE 1 2 3 4 5 6 7 8 9 10 11 12 13 14 15 16 17 18 20 19 21 22 26 25 24...

Page 57: ...ING TO FREE ARM MACHINE Sewing speed can be varied by the foot control The harder you press on the control the faster the machine runs Unplug the power supply before changing the bulb Lamp type LED E1...

Page 58: ...5 Oiler 6 Buttonhole opener Brush 7 Buttonhole foot 8 Guide presser foot 9 Zipper foot 10 Presser foot for sewing buttons PRESSER FOOT LIFTER There are three positions for your presser foot 1 Lower t...

Page 59: ...red foot with its pin directly under the slot 5 Lower the presser foot lifter and the presser foot will snap Into place CHANGING THE PRESSER FOOT THREAD STAND The spool pins are used for holding the s...

Page 60: ...lat side to the back and push it up as far as it will go 5 Tighten the needle clamp screw Do not use bent or blunt needles Place needle on a flat surface and check to see if bent Needle system 130 705...

Page 61: ...indle and push it to the right With the free end of the thread held in your hand depress the foot control 5 Stop the machine when it has made a few turns and cut the thread close to the hole in the bo...

Page 62: ...er clockwise 2 Draw thread into notch 3 Pull thread toward the left and along the inside of spring until it slips into notch being sure that thread does not slip out of notch 4 Pull thread out about 1...

Page 63: ...rom the back of the spool 3 Draw thread into thread guide 1 4 Guide thread through tension disc 2 and pull it up 5 Draw the thread through take up lever from right to the left 3 6 Then draw thread dow...

Page 64: ...DLE THREADER Lower the presser foot Set needle in up position 1 Lower the threader slowly and draw thread through guide and pull toward the right 2 Lower the lever as far as will go 3 Rotate the lever...

Page 65: ...rect thread tension Upper and bobbin threads should interlock in the middle of fabric 2 When bobbin thread appears on top side of fabric Turn the tension dial to a lower number to loosen the upper thr...

Page 66: ...the pattern selector dial 2 To choose your pattern place dial on the correct symbol A L which refers to pattern table printed on the machine head 3 When sewing stretch set the stitch length dial at S...

Page 67: ...s of the seams Press reverse stitch button and sew 4 5 stitches Using foot control press pedal with pressing reverse stitch button Lower thread usually doesn t requiare any additional adjustment In ca...

Page 68: ...of both threads MARKS ON THE NEEDLE PLATE Line on the stitch plate help to guide material evenly Distance from stitch from the central needle position to the edge of material is marked on the drawing...

Page 69: ...uld be sew near to the edge of teh fabric and zigzag fall on the hen and pierce the soft fold 4 5 While sewing make sure that fabric is transported correctly SHELL TUCK H used mostly for decorative se...

Page 70: ...CH J K L these stitches are used to sew a decorative edge on garments and table cloths BUTTONHOLE SEWING 1 Mark position and length of buttonhole on fabric 2 Insert buttonhole foot and adjust fabric t...

Page 71: ...tton NOTE Turn the handwheel toward you counterclockwise to check that the needle correctly goes into the left and right hole of the button 5 Start sewing Button sewing tips 6 Attach a shank lever on...

Page 72: ...CLEANNING AND REMOVING THE HOOK CAUTION Unplug the power supply before making below acitivies Raise the needle to its highest position and open the hook cover Open thehinged latch of bobbin case and t...

Page 73: ...e arrows in the figures For machine in constant use oil two or three times a year In case the machine does not work smoothly due to standing idle for some time apply a few drops of kerosene at the oil...

Page 74: ...ect size needle on stretch fabric 1 Reinsert needle 2 Insert new needle 3 Choose correct size needle for fabric 4 Use stretch needle Fabric puckers 1 Machine not properly threaded 2 Bobbin threaded in...

Page 75: ...umulated in the hook race and feed dog 1 Remove the needle plate and bobbin case and clean the hook race and feed dog Machine will not run 1 Cord not plugged into electrical outlet 2 Power switch is n...

Page 76: ...a ha sido golpeada o da ada o si ha estado en contacto con el agua En caso de presentarse algunas de las situaciones citadas acuda al servicio t cnico autorizado m s pr ximo para revisarla repararla o...

Page 77: ...pre la aguja en la posici n m s alta para evitar que se rompa la aguja o se produzca cualquier otro tipo de da o en la m quina 20 Al realizar cualquier tipo de actividad cerca de la aguja como enhebra...

Page 78: ...EXTRAER EL HILO INFERIOR 87 REGULACI N DE TENSI N DEL HILO SUPERIOR 88 TENSI N DE HILOS EN PUNTADA ZIGZAG 89 SELECCI N DE PATR N 89 REGULACI N DE LONGITUD DE PUNTADA 90 SELECCI N DE PUNTADAS FLEXIBLE...

Page 79: ...Palanca de montaje del pie prensatela 23 Tornillo de montaje del pie prensatela 24 Pie prensatela 25 Placa de aguja 26 Transportador 27 Enhebrador PARTES PRINCIPALES Antes de conectar la m quina a la...

Page 80: ...lementos dif cilmente accesibles perneras mangas etc PEDAL DE ARRANQUE PEDAL L MPARA LED BRAZO LIBRE PRECAUCI N Antes de proceder al cambio de la l mpara LED apague la m quina y retire el enchufe de l...

Page 81: ...dobladillo de ojal 8 Gu a 9 Pie para coser cremalleras 10 Pie prensatela especial para coser botones Disponibles tres posiciones del pie prensatela 1 El pie siempre debe estar liberado durante la cost...

Page 82: ...ue salte el mecanismo CAMBIO DEL PIE SISTEMA MATIC SOPORTES PARA HILOS De f brica los soportes de los hilos est n replegados dentro de la m quina para evitar que sufran da os Antes de comenzar a coser...

Page 83: ...a en la posici n m s alta girando a mano el volante hacia usted 2 Baje el pie 3 Para retirar la aguja gire el tornillo del soporte de la aguja en sentido contrario a las agujas del reloj 4 Retire la a...

Page 84: ...cabezal del canillero 5 Deslice el cabezal de la canilla a la derecha 6 Sostenga el extremo del hilo y presione el pedal comenzando en bobinado Detenga la m quina tras bobinar varias bobinas y corte...

Page 85: ...nura del carrete 4 A continuaci n pase el hilo por los muelles de regulaci n de tensi n del hilo 5 hasta el orificio de salida 6 Saque el hilo un m nimo de 10 cm fuera del carrete COLOCACI N DE LA CAN...

Page 86: ...arriba por encima de los discos 2 tens ndolo firmemente hasta que salte el muelle del tensor 6 Pase el hilo del lado derecho al izquierdo a trav s del ojo de recogida del hilo 3 7 A continuaci n dirij...

Page 87: ...elas Suba la aguja a su posici n m s alta 1 Baje el enhebrador y pase el hilo a trav s del gu a hilos tir ndolo hacia la derecha 2 Presione el enhebrador tan abajo como sea possible 3 De el giro hacia...

Page 88: ...DEL HILO SUPERIOR Al coser puntadas rectas si se ha ajustado adecuadamente la tensi n el hilo superior e inferior deber an unirse en el medio de las dos capas de tejido 1 Ajuste adecuadamente la tensi...

Page 89: ...puntada en la posici n SS En este modelo el cambio de anchura de puntada se puede ajustar nicamente en la puntada zigzag y se puede elegir con fluidez entre los programas B puntada ancha y C puntada...

Page 90: ...itud de puntada en direcci n si quiere hacerla m s concentrada o si se prefiere m s separada REGULACI N DE TENSI N DEL HILO INFERIOR Normalmente la tensi n del hilo superior no necesita ser regulada s...

Page 91: ...resione la palanca de costura inversa y realice varias puntadas hacia atr s 5 Cuando termine de coser aseg rese de que la aguja se encuentra en su posici n m s alta Para retirar el tejido eleve el pre...

Page 92: ...Coloque la tela tal y como se muestra en la ilustraci n La distancia 2 debe variar entre 0 4 0 7 cm Baje el pie prensatelas afloje el tornillo bajo l para colocar la gu a de costura entre el tornillo...

Page 93: ...sobrehilar bordes o unir 2 piezas de tejido Debe colocar el tejido bajo el pie prensatelas de forma que la costura en el lado derecho sobresalga ligeramente del borde de la tela PUNTADAS DE RASO DECOR...

Page 94: ...perior 1 3 COSTURA DE BOTONES de modo que el punto C sea tangente al punto B del tejido 3 Ajuste el selector de patr n en la posici n interior del ojal Cosa por el lado izquierdo dependiendo del tama...

Page 95: ...erior dejando aprox un trozo de 20 cent metros Tire del hilo inferior hacia abajo a trav s del ojal y am rrelo varias veces alrededor del pie 7 Tire del hilo superior hacia el lado izquierdo del mater...

Page 96: ...ret relo 1 Carrete 2 Pinzas de fijaci n del anillo de la lanzadera 3 Anillo de la lanzadera 4 Lanzadera 5 Jaula de la lanzadera 6 Leng eta de posici n del anillo 7 Ranura de la jaula de la lanzadera...

Page 97: ...jo y se encuentre exactamente en la ranura de la jaula de la lanzadera 5 Gire las pinzas de fijaci n del anillo 2 hasta la posici n de partida 6 Colocar el carrete con la canilla LIMPIEZA DE LOS DIENT...

Page 98: ...Adem s de la lanzadera se deben lubricar algunos elementos m viles como p ej el volante de la aguja Retire la tapa 1 afloje el tornillo 2 y retire la cubierta 3 Limpie y lubrique las piezas marcadas e...

Page 99: ...arrete da ado 1 Enhebre de nuevo la m quina seg n las instrucciones 2 Limpie el carrete y la lanzadera 3 Sustituya el carrete La aguja se rompe 1 Aguja colocada de forma incorrecta 2 Aguja doblada o r...

Page 100: ...uperior 2 Grosor del hilo o tama o de aguja incorrecto 1 Aumente la tensi n del hilo superior 2 Elija un tama o de aguja y un tipo de hilo adecuado para el El tejido no se desliza durante la costura 1...

Page 101: ...cada correctamente 1 Coloque correctamente la canilla en el carrete 2 Limpie los dientes del transportador 3 Lea detenidamente la secci n dedicada al mantenimiento de la La l mpara LED no se enciende...

Page 102: ...onseill es par le constructeur et indiqu es dans la pr sente notice 6 Il est interdit d utiliser la machine quand le c ble ou la fiche sont endommag s ou quand il y a des perturbations dans le fonctio...

Page 103: ...casser l aiguille 17 Il est interdit d utiliser des aiguilles tordues 18 Il ne faut pas tirer le tissu ni le pousser pendant la couture Cela pourrait endommager l aiguille 19 Il faut toujours laisser...

Page 104: ...IRER LE FIL INFERIEUR 113 REGULATION DE LA TENSION DU FIL SUPERIEUR 114 TENSION DU FIL POUR LE POINT ZIG ZAG 114 CHOIX DU POINT 115 REGULATION DE LA LONGUEUR DU POINT 115 CHOIX DES POINTS EXTENSIBLES...

Page 105: ...0 Panneau de guidage du fil 21 Vis fixant l aiguille 22 Levier fixant le pied 23 Vis fixant le pied 24 Pied presseur 25 Plaque aiguille 26 Transporteur 27 Enfileur de l aiguille PARTIES COMPOSANTES DE...

Page 106: ...ments difficilement accessibles des v tements DEMARREUR A PIED PEDALE LAMPE LED BRAS LIBRE ATTENTION D brancher la machine de l alimentation lectrique en retirant la prise avant de changer lampe LED...

Page 107: ...9 Pied pour les fermetures 10 Pied presseur sp cial pour la couture des boutons Trois positions du pied presseur sont disponibles 1 Le pied presseur doit tre baiss lors de la couture 2 Le pied presseu...

Page 108: ...canisme de fermeture du pied presseur se mette en marche CHANGEMENT DU PIED SYSTEME MATIC SUPPORTS POUR LES FILS Dans la machine fabriquement emball e les supports des fils sont enfonc s rang s dans l...

Page 109: ...Placer l aiguille dans la plus haute position en tournant la roue volante vers soi 2 Abaissez le pied presseur 3 Afin de sortir l aiguille il faut tourner molette de la poign e de l aiguille dans le s...

Page 110: ...la canette 4 Poussez le pivot avec la bobine vers la droite 5 Retenir le bout du fil et appuyer sur le d marreur en commen ant l enroulement Arr ter la machine apr s avoir enrouler quelques bobines et...

Page 111: ...e la canette 3 Ensuite faire passer le fil par le ressort de r glage de la tension du fil jusqu au trou de sortie 4 Faire sortir au moins 10 cm du fil en dehors de la canette METTRE LA BOBINE SUR LE B...

Page 112: ...veur du fil 3 7 Faire ensuite passer le fil vers le bas dans la direction de l aiguille et enfiler par le guidage inf rieur du fil 4 et par le guidage suivant la hauteur du fil 5 8 Enfilez l illet de...

Page 113: ...aire sortir les deux fils sur une longueur d environ 15 cm et la faire passer en dessous du pied presseur l arri re de la machine RETIRER LE FIL INFERIEUR 4 Faites passer le fil dans la plaque de guid...

Page 114: ...nt zigzag la tension doit tre minimalement plus faible que dans le cas du point droit Le fil sup rieur doit se montrer minimalement sur le c t inverse du tissu REGULATION DE LA TENSION DU FIL SUPERIEU...

Page 115: ...C point plus large REGULATION DE LA LONGUEUR DU POINT CHOIX DES POINTS EXTENSIBLES Afin de changer la longueur du point cela concerne les points simples il faut utiliser la molette de r gulation de l...

Page 116: ...effectuez quelques points d essai sur un morceau coup du tissu 2 L aiguille doit se trouver en haut Relevez le pied presseur et placez le tissu 3 Tournez la molette vers soi et introduisez l aiguille...

Page 117: ...ur les boutons pour le point satin pour la broderie etc TRIPLE POINT ZIGZAG D doit tre utiliser pour finir les bords du tissu sur les tissus lastiques p ex maillots de bain en lasthanne ou sur des tis...

Page 118: ...e tissu ce qui emp che la d chirure des fils dans le point Il est galement 3 fois plus fort qu un point normal Il peut galement tre utilis pour coudre des pi ces rapi cer en cuir en velours c tel et d...

Page 119: ...la molette de la longueur du point sur SS et cousez les surfaces entre les points droits l aide de ce point Retirez les fils du point droit COUTURE DE BOUTONNIERES 1 Posez le bouton sur un chantillon...

Page 120: ...cez sur le pied presseur une allumette pour obtenir une colonne plus haute Il est galement possible de placer une deuxi me allumette entre le tissu et le bouton en faisant tout de m me attention ce qu...

Page 121: ...s de couture d un bouton quatre trous apr s la couture des deux premiers trous il faut d placer manuellement le bouton afin de terminer la couture des deux trus suivants 5 Effectuez environ 6 7 points...

Page 122: ...tte 2 Brides de l anneau de la griffe 3 Anneau de la griffe 4 Griffe 5 Panier de la griffe 6 Languette r glant la position de l anneau 7 Prise du panier de la griffe NETTOYAGE ET GRAISSAGE DE LA GRIFF...

Page 123: ...ubrifiant suffisent une plus grande quantit peut causer des t ches sur les tissus cousus Si la machine ne travaille pas correctement apr s une longue p riode d arr t il faut la lubrifier avec quelques...

Page 124: ...due ou mouss e 3 Trop grande tension du fil sup rieur 4 Trop grande tension du fil sup rieur 5 Le tissu ne se d place pas 6 L aiguille plac e est trop fine 7 La molette du choix du point a t tourn e l...

Page 125: ...nre de l aiguille appropri e au tissu Le tissu ne se d place pas uniform ment 1 La longueur du point est r gl e sur 0 2 Le fil inf rieur se termine dans la canette 1 Augmentez la longueur du point 2 E...

Page 126: ...a gdy przew d lub wtyczka s uszkodzone gdy wyst puj zak cenia w funkcjonowaniu gdy maszyna zosta a uderzona lub uszkodzona lub te gdy pozostawa a w kontakcie z wod W takich przypadkach nale y zwr ci s...

Page 127: ...nale y ci gn tkaniny ani jej popycha Mog oby to spowodowa uszkodzenie ig y 16 Po zako czeniu szycia zawsze pozostawia ig w najwy szym po o eniu aby zapobiec z amaniu ig y czy innemu uszkodzeniu maszy...

Page 128: ...ADANIE SZPULKI W B BENKU 136 NAWLEKANIE NITKI G RNEJ 136 NAWLEKANIE IG Y 138 WYCI GANIE NICI DOLNEJ 138 REGULACJA NAPR ENIA NICI G RNEJ 139 NAPR ENIE NITKI DLA CIEGU ZYGZAK 140 WYB R CIEGU 140 REGULAC...

Page 129: ...KONSERWACJA I CZYSZCZENIE 147 CZYSZCZENIE CHWYTACZA 148 CZYSZCZENIE I OLIWIENIE CHWYTACZA 148 CZYSZCZENIE Z BK W TRANSPORTERA 148 OLIWIENIE MASZYNY 149 PROBLEMY I ICH ROZWI ZYWANIE 150 Texi Joy 25 12...

Page 130: ...a 20 Prowadnik nitki 21 ruba mocuj ca ig 22 D wignia mocuj ca stopk 23 ruba mocuj ca stopk 24 Stopka dociskowa 25 P ytka ciegowa 26 Transporter 27 Nawlekacz CZ CI SK ADOWE MASZYNY Przed pod czeniem m...

Page 131: ...ln maszyny Aby wymieni lampk LED post puj zgodnie z poni sz instrukcj Zdejmij za lepk i odkr rub w pokrywie maszyny Zdejmij pokryw Odkr caj lampk LED w lew stron Now lampk LED wkr caj w praw stron Za...

Page 132: ...ty materia 3 Stopk mo na unie do trzeciej najwy szej pozycji przytrzymuj c d wigni w celu umieszczenia pod ni kilku warstw materia w b d przy wymianie stopki PODNOSZENIE STOPKI 1 3 2 AKCESORIA Akcesor...

Page 133: ...czy mechanizm zatrzaskowy stopki WYMIANA STOPKI SYSTEM MATIC W zapakowanej fabrycznie maszynie stojaki na nici s wci ni te schowane w obudowie aby nie uleg y uszkodzeniu Przed rozpocz ciem szycia nale...

Page 134: ...re cz sto powoduj e maszyna p telkuje lub przepuszcza ciegi a nawet mog spowodowa uszkodzenie mechanizm w maszyny Nale y r wnie pami ta o w a ciwym doborze rozmiaru ig y w zale no ci od grubo ci szyt...

Page 135: ...k b benka na trzpie szpulownika 4 Przesu trzpie ze szpulk w prawo 5 Przytrzymaj za koniec nitki i naci nij rozrusznik rozpoczynaj c nawijanie Zatrzymaj maszyn po nawini ciu kilku zwoj w i utnij nitk b...

Page 136: ...przez szczelin b benka 3 Nast pnie przeci gnij nitk przez spr ynk reguluj c napr enie nitki a to otworu wyj ciowego 4 Wyci gnij przynajmniej 10 cm nitki poza b benek Niew a ciwa kolejno nawleczenia c...

Page 137: ...apr acza nici g rnej 2 5 Podci gnij nitk do g ry nad talerzykami 2 mocno j napinaj c tak aby naskoczy a spr ynka napr acza 6 Prze nitk od prawej strony o lewej przez oczko podci gacza nici 3 7 Nast pn...

Page 138: ...ITKI DOLNEJ NAWLEKANIE IG Y Opu stopk dociskow Obracaj c ko em pasowym podnie ig do jej najwy szej pozycji 1 Opu nawlekacz i przeci gnij ni przez prowadnik wyci gaj c j w prawo 2 Doci nij nawlekacz ta...

Page 139: ...w zale no ci odgrubo ci i ilo ci warstw szytego materia u oraz rodzaju ciegu W prawid owym ciegu ni g rna i ni b benka wci gane s w r wnym stopniu do materia u a splot tworzy si po rodku zszywanych w...

Page 140: ...kr t a d ugo ci ciegu na pozycji SS W tym modelu zmienna szeroko ciegu jest ustawiona tylko dla ciegu zygzakowego i mo na j wybiera p ynnie pomi dzy programami B w szy cieg a C szerszy cieg 3 Zbyt lu...

Page 141: ...dziurek na guziki Podczas szycia zygzakiem mo emy ustawi d ugo ciegu pomi dzy 0 5 a 4 0 REGULACJA NAPR ENIA NITKI DOLNEJ Napr enie nitki dolnej generalnie nie wymaga regulacji jest ono fabrycznie usta...

Page 142: ...pewnij si e ig a znajduje si w najwy szym po o eniu Aby wyj materia podnie stopk i wyci gnij materia z ty u maszyny za stopk 6 Obetnij nitk korzystaj c np z obcinacza nici znajduj cego si po lewej str...

Page 143: ...kt re maj sk onno do marszczenia si po przeszyciu cieg ten rozci ga si razem z materia em Jest on r wnie odpowiedni do cerowania i naprawiania rozdar wszywania ta m elastycznych Przeszyj ciegiem przy...

Page 144: ...za o onego brzegu Szyj c prowad materia tak aby ig a po prawej stronie wychodzi a za brzeg materia u Stosuj stopk uniwersaln CIEG ELASTYCZNY TRAPEZOWY I szczeg lnie przydatny do wszywania szerszych g...

Page 145: ...cji lewa strona dziurki Opu ig do cz ci tkaniny gdzie dziurka ma by wykonana Szyj w d lew stron zgodnie z wymiarem dziurki a sanki przesun si do punktu A szczytu dziurki Zatrzymaj maszyn podnie ig do...

Page 146: ...w przysz o ci zapinanie guzika W tym celu zamiast szpilki mo na na stopce umie ci zapa k dla uzyskania wy szego s upka Mo na r wnie pod o y drug zapa k pomi dzy tkanin a guzik uwa aj c jednak aby w t...

Page 147: ...wej strony zamka b yskawicznego Przyszyj t stron r wnie maksymalnie blisko z bk w zamka 6 Podnie stopk i rozsu suwak zanim stopka dojdzie do uchwytu zamka PRZYSZYWANIE APLIKACJI Wybierz cieg zygzakowy...

Page 148: ...W TRANSPORTERA 1 Odkr uchwyt ig y i wyjmij ig Zdejmij stopk 2 Odkr wkr ty na p ytce ciegowej i wyjmij j 3 Oczy z bki transportera p dzelkiem i ponownie za i przykr p ytk ciegow 4 Aby przygotowa maszyn...

Page 149: ...ynnie po d u szym okresie jej nieu ywania nale y j naoliwi kilkoma kroplami przed uruchomieniem Generalnie zaleca si oliwienie maszyny co 3 4 miesi ce Opr cz oliwienia chwytacza czynno ci tej wymagaj...

Page 150: ...nie za ig zgodnie z instrukcj Nieodpowiednio dobrana grubo nici Dobierz w a ciw grubo nici Ni dolna zrywa si Dolna nitka nieprawid owo za o ona w b benku Nawlecz maszyn ponownie zgodnie z instrukcj Re...

Page 151: ...a nie przesuwa si w trakcie szycia Resztki nici i meszek z tkanin blokuj z bki transportera Oczy z bki transportera Transporter jest wy czony W cz transporter Zbyt kr tki cieg Zwi ksz d ugo ciegu Mate...

Page 152: ...mais pr xima para ser avaliada reparada ou para ajuste el trico ou mec nico 4 Nunca opere o aparelho em uma sala sem abertura de ar Mantenha ventila o da m quina de costura e do pedal para livrar do a...

Page 153: ...PT GUARDE ESTAS INSTRU ES Esta m quina de costura foi fabricada apenas para uso dom stico Texi Joy 25 153...

Page 154: ...GAR A BOBINA 161 INSER O DA BOBINA 162 COMO PASSAR A LINHA SUPERIOR 162 COMO PASSAR A LINHA NA AGULHA 164 COMO SUBIR A LINHA DA BOBINA 164 AJUSTE DA TENS O DO FIO 165 TENS O DO FIO PARA PONTO ZIGUEZAG...

Page 155: ...PT MANUTEN O 172 LIMPEZA E REMO O DA LAN ADEIRA 172 LIMPEZA DOS DENTES IMPELENTES 172 LUBRIFICA O DA M QUINA 173 DICAS TEIS 174 Texi Joy 25 155...

Page 156: ...ulha 21 Parafuso de fixa o da agulha 22 Suporte do calcador 23 Parafuso do calcador 24 Calcador 25 Placa de agulha 26 Dentes impelentes 27 Rosqueadeira PARTES PRINCIPAIS CONEX O DA M QUINA 1 2 3 4 5 6...

Page 157: ...a e remova o parafuso de fixa o Para remover empurre e tor a para a esquerda Para substituir empurre e tor a para a direita Sua m quina pode ser usada como uma maquina plana ou como um modelo de bra o...

Page 158: ...rdar 5 Lubrificador 6 Abridor de casa de bot o escova 7 Calcador para casa de bot o 8 Guia do calcador 9 Calcador para Zipper 10 Calcador para bot es Existem tr s posi es para o seu calcador 1 Abaixe...

Page 159: ...do com o pino diretamente sob a ranhura 5 Abaixe a alavanca do calcador e o calcador se encaixar no lugar MUDAN A DO CALCADOR Os pinos do carretel s o usados para segurar o carretel da linha para alim...

Page 160: ...m o lado plano para tras e empurre at o final 5 Aperte o parafuso de fixa o da agulha N o use agulhas curvadas ou sem corte Coloque a agulha sobre uma superf cie plana e verifique se est dobrada S ist...

Page 161: ...do enrolador da bobina e empurre a para a direita Com a ponta livre do fio na sua m o pressione o pedal 5 Pare a m quina quando fizer algumas voltas e corte o fio perto do buraco na bobina Pressione...

Page 162: ...enhe a linha atrav s do entalhe 3 Puxe a linha para a esquerda e ao longo da parte interna da mola at ela deslizar no entalhe tendo certeza de que a linha n o deslizara fora do entalhe 4 Puxe o fio pa...

Page 163: ...da parte de tr s do carretel 3 Desenhe a linha na guia 1 4 Passe a linha pelo disco de tens o 2 e puxe para cima 5 Desenhe a linha pela alavanca de recolha da direita para a esquerda 3 6 Em seguida pu...

Page 164: ...juste a agulha para cima 1 Abaixe o enfiador lentamente e desenhe a linha atrav s da guia e puxe o para a direita 2 Abaixe a alavanca o m ximo poss vel 3 Gire a alavanca para a parte traseira da m qui...

Page 165: ...muito apertada o ponto de liga o ocorre perto da camada superior de tecido o material fica enrugado e a costura f cil de rasgar Em tal caso reduza a tens o da linha superior movendo o mostrador para u...

Page 166: ...de pontos girando o dico do seletor de pontos 2 Para escolher o seu ponto escolha o ponto no s mbolo correcto A L que se refere tabela de pontos impressa na cabe a da m quina 3 Quando costurar tecido...

Page 167: ...ste adicional No caso de costurar materiais extremamente finos ou muito grossos pode ser ajustado um pouco apertando ou liberando o parafuso como mostrado no desenho Para aumentar a tens o do fio gire...

Page 168: ...AGULHA As linhas na placa do ponto ajudam a guiar o material uniformemente A dist ncia do ponto da posi o da agulha central borda do material est marcada no desenho Valor num rico na placa 10 15 20 3...

Page 169: ...rados perto da borda do tecido e o ziguezague deve cair na bainha e costurar na dobra 4 5 While sewing make sure that fabric is transported correctly PREGA DE CONCHAS H usado principalmente para costu...

Page 170: ...PONTO EM CURVA J K L Estes pontos s o usados para costurar uma borda decorativa em vestu rio e panos de mesa COSTURA DE CASA DE BOT O 1 Marque a posi o e o comprimento da casa de bot o no tecido 2 In...

Page 171: ...A Gire o volante em sua dire o no sentido anti hor rio para verificar se a agulha corretamente nos furos do botao 6 Comece a costurar Dicas de costura de bot es Prenda uma alavanca de haste no calcado...

Page 172: ...LAN ADEIRA CUIDADO Desconecte o cabo antes de fazer as atividades abaixo Levante a agulha at a posi o mais alta e abra a tampa do gancho Abra o trinco roscado da caixa da bobina e retire o da m quina...

Page 173: ...figuras Para a m quina em uso constante lubrifique de duas a tr s vezes por ano No caso de a m quina n o funcionar devido a ficar parada durante algum tempo aplique algumas gotas de querosene no ponto...

Page 174: ...ido el stico 1 Reinsira a agulha 2 Insira uma nova agulha 3 Escolha a agulha do tamanho correto para o tecido 4 Use agulha para tecidos el sticos Tecido enrugado 1 Linha mal passada 2 Bobina inserida...

Page 175: ...alimenta o 1 Remova a placa da agulha ea caixa da bobina e limpe a corrida do gancho eo c o de alimenta o A m quina n o funciona 1 O cabo n o est conectado tomada el trica 2 O interruptor n o est lig...

Page 176: ...RU 1 2 3 1 2 3 4 5 6 7 8 9 Texi Joy 25 176...

Page 177: ...RU 10 11 12 13 14 15 16 17 Texi Joy 25 177...

Page 178: ...RU 176 180 180 181 181 181 182 182 182 183 MATIC 183 184 184 185 186 186 188 188 189 190 190 190 191 191 191 192 192 192 194 195 195 196 197 Texi Joy 25 178...

Page 179: ...RU 197 197 198 198 198 199 Texi Joy 25 179...

Page 180: ...RU 1 2 3 4 5 6 7 8 9 10 11 12 13 14 15 16 17 18 19 20 21 22 23 24 25 26 27 2 O 6 5 1 3 I 1 2 3 4 5 6 7 8 9 10 11 12 13 14 15 16 17 18 20 19 21 22 26 25 24 27 23 Texi Joy 25 180...

Page 181: ...RU Texi Joy 25 181...

Page 182: ...RU 1 2 3 1 3 2 1 3 2 3 4 5 6 7 8 9 10 Texi Joy 25 182...

Page 183: ...RU MATIC 1 2 3 1 2 3 1 Texi Joy 25 183...

Page 184: ...RU 130 705 H 70 80 90 100 1 2 3 Texi Joy 25 184...

Page 185: ...RU 1 1 2 2 3 3 4 4 5 5 6 6 7 7 Texi Joy 25 185...

Page 186: ...RU 1 1 1 2 2 3 3 4 10 Texi Joy 25 186...

Page 187: ...RU 1 2 3 1 4 2 5 3 6 4 5 7 6 10 Texi Joy 25 187...

Page 188: ...RU 1 1 2 2 2 3 2 4 15 3 1 2 3 4 5 6 10 Texi Joy 25 188...

Page 189: ...RU 1 2 3 Texi Joy 25 189...

Page 190: ...RU 0 4 SS 0 5 4 0 1 2 A L 0 4 SS B C Texi Joy 25 190...

Page 191: ...RU A L SS Texi Joy 25 191...

Page 192: ...RU 1 2 3 4 5 6 15 10 15 20 3 8 4 8 5 8 6 8 1 0 1 5 2 0 1 0 1 3 1 6 1 9 A B B C Texi Joy 25 192...

Page 193: ...RU D E F 1 2 0 4 0 7 2 3 3 4 4 5 6 H I 3 Texi Joy 25 193...

Page 194: ...RU A B SS C SS 3 D A 4 10 D SS E F G H I SS J K L 0 5 1 Texi Joy 25 194...

Page 195: ...RU B C 0 1 3 1 2 C B 3 4 4 6 5 6 4 6 7 1 2 0 Texi Joy 25 195...

Page 196: ...RU A 1 5 4 4 6 1 2 3 3 4 4 5 6 7 10 6 20 7 Texi Joy 25 196...

Page 197: ...RU B C 0 5 1 1 4 2 1 2 3 4 2 3 4 1 2 3 4 5 6 7 Texi Joy 25 197...

Page 198: ...RU 1 3 4 2 3 4 4 3 6 5 2 6 1 2 3 4 D 1 2 3 4 Texi Joy 25 198...

Page 199: ...RU 1 2 3 Texi Joy 25 199...

Page 200: ...RU y y Texi Joy 25 200...

Page 201: ...RU 0 0 I 0 I Texi Joy 25 201...

Page 202: ...owing product Household sewing machine model Texi Joy 25 989 With this declaration relates complies with following directives Electromagnetic compatibility 2014 30 EU EN 55014 1 2006 A1 A2 EN 55014 2...

Page 203: ......

Page 204: ......

Reviews: