background image

ZIGZAG STEH

ZAJIŠŤOVACÍ STEHY

Steh

Název

Počet stehů

STITCH

Doporučená šířka 

stehu

Doporučená délka 

stehu

Druh přítlačné 

patky

ZIGZAG

03

5.0

1.0

Univerzální

Tříbodový

zigzag

08

4.5

0.5

Univerzální

Steh

Název

Počet 

stehů

Doporučená šířka 

stehu

Doporučená délka 

stehu

Druh přítlačné 

patky

Zajišťovací

steh

04

5.0

1.0

Univerzální + 

vodič

Zajišťovací

elastický steh

06

5.0

2.5

Univerzální + 

vodič

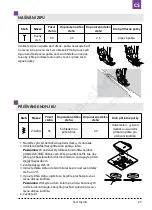
ZIGZAG (03) - druhý nejdůležitější steh. Používá se jako zajišťovací, obrubovací i dekorativní steh, 

pro našívání aplikací, atd. Šije se s univerzální přítlačnou patkou nebo speciální přítlačnou patku 

(pro saténové stehy, knoflíky a knoflíkové dírky).
Tříbodový zigzag (08) - používá se jako standardní zigzag, ale pro složitější elastické materiály, jako 

jsou například lycra. Tříbodový zigzag lze natáhnout společně s materiálem. Je také ideální pro 

látání. Použijte univerzální přítlačnou patku nebo speciální přítlačnou patku pro zigzag steh.

Zajišťovací elastický steh (06) and Zajišťovací steh (04) - používá se pro slepé lemování na šatech, 

nohavicích - tento steh je šitý bez stehů viditelných na lícové straně látky. Je třeba sladit barvu nitě 

s barvou materiálu.

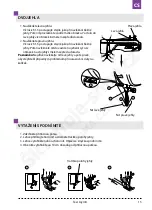
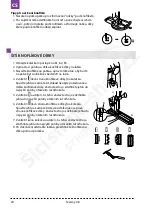
1. 

Přeložte látku dle obrázku. Vzdálenost „2” by měla být asi 0,4-0,7 cm.

2. 

Spusťte přítlačnou patku, poté uvolněte šroubek na patce pro umístění vodiče lemů mezi 

šroubek a držák patek. Utáhněte šroubek, ujistěte se, že je vodič vložen na správném místě 

uprostřed patky.

3. 

Zdvihněte přítlačnou patku a umístěte látku pod patku (3).

4. 

Spusťte přítlačnou patku a šijte velmi pomalu pro lepší kontrolu, rovné stehy šijte v blízkosti 

hrany látky a zigzag stehy by měly procházet látkou a na druhé straně zachytávat přeložený 

lem (4).

5. 

Při šití kontrolujte, zda je látka rovnoměrně podávána.

Texi Joy 48

22

CS

Summary of Contents for joy 48

Page 1: ...MULTIFUNCTION SEWING MACHINE...

Page 2: ......

Page 3: ...CS N vod k pou it 6 Bedienungsanleitung 32 DE User manual 60 EN Manual de operaci n 86 ES Mode d emploi 114 FR Instrukcja obs ugi 142 PL 170 RU...

Page 4: ...c stroj pokud je n kter z ventila n cohtv or blokov n Udr ujte ventila n otvory stroje a ped l ist od mo n ho nahromad n nit a prachu 6 Nikdy nevkl dejte dn p edm ty do otvor stroje 7 Nepou vejte venk...

Page 5: ...v robek slou pouze pro dom c pou it i podobn Toto za zen spl uje EEC na zen 2004 108 EC o elektromagnetick kompatibilit M jte pros m na pam ti e tento v robek je t eba bezpe n recyklovat v souvislosti...

Page 6: ...T 12 NAV JEN C VEK 12 ODSTRAN N I VLO EN C VKOV HO POUZDRA 13 VKL D N C VKY 13 V M NA P TLA N PATKY 14 NAVL K N HORN NIT 14 DVOJJEHLA 15 VYTA EN SPODN NIT 15 NASTAVEN NAP T HORN NIT 16 TABULKA JEHEL N...

Page 7: ...C STEHY 22 NA V N ZIP 23 P I V N KNOFL K 23 IT KNOFL KOV D RKY 24 LASTUROV STEH SAT NOV A DEKORATIVN STEHY 25 DR BA 26 I T N PODAVA E 27 MAZ N JEHELN TY E 27 PROBL MY P I IT A JEJICH E EN 28 Texi Joy...

Page 8: ...vek 16 Kol ky na pulku 17 Vodi nit p i nav jen c vek 18 Horn vodi nit 19 Dr adlo pro p en en stroje 20 P ka pro zdvih a spou t n p tla n patky 21 Z suvka pro p vodn kabel 22 Hlavn vyp na Osv tlen 23 K...

Page 9: ...e Nikdy neponech vejte stroj bez dozoru pokud je zapnut V dy po pou it a p ed prov d n m dr by vypn te hlavn vyp na stroje a odpojte p vodn kabel 1 3 c vky 2 Sada jehel 3 Multifunk n roubov k 4 Vy vac...

Page 10: ...pek t m dojde k p prav stroje Jsou t i r zn pozice p tla n patky 1 Pro it spus te p ku dol 2 Zdvihn te p ku do st edov polohy pro vlo en nebo odstran n l tky 3 Zdvihn te p ku do nejvy polohy pro v m n...

Page 11: ...u v pro zaji t n konc v Stiskn te tla tko zp tn ho chodu a u ijte 4 5 steh Stiskn te toto tla tko pro zdvih i spu t n jehly Pokud stisknete tla tko dvakr t vytvo te jeden steh 1 Oto te kole kem pro na...

Page 12: ...tla en m sm rem vlevo a odst ihn te nit P i nav jen bude na LCD viditeln n sleduj c ikonka DR KY PULEK NIT NAV JEN C VEK Kol ky se pou vaj p i dr en pulek nit aby doch zelo k jejich pravideln mu a rov...

Page 13: ...ouzdra vlo te trn c vkov ho pouzdra do v ezu v dr ze chapa e 1 Vlo te c vku do c vkov ho pouzdra tak aby se nit odv jela po sm ru hodinov ch ru i ek 2 Vyt hn te nit do z ezu na c vkov m pouzdru 3 Vyt...

Page 14: ...zep edu dozadu 6 a vyt hn te nit dozadu za patku asi 10 cm P tla nou patku je t eba m nit v z vilosti na it m materi lu nebo pou it m stehu Upozorn n P ed v m nou p tla n patky vypn te hlavn vyp na s...

Page 15: ...jeheln ty i viz obr zek 6 a do jehly sm rem zep edu dozadu Pozn mka Nejd ve navl kejte nit lev jehly a pot prav abyste p de li p padn m probl m m p i nasazov n c vky na kol ek 1 Zdvihn te p tla nou pa...

Page 16: ...100 Stre dvojit plet trikot spandex jersey Bavln 120 150 Hedv b 120 150 80 90 Nap t nit p i it zigzag steh P i it zigzag steh by m lo b t nap t nit nastaveno na tro ku ni hodnotu ne p i it rovn ch ste...

Page 17: ...proti zar ce 5 Pevn ut hn te roub jeheln svorky Pozn mka Nepou vejte tup nebo ohnut jehly Pro kontrolu polo te jehlu plochou stranou na rovny povrch mezera mezi jehlou a povrchem by m la b t rovnom rn...

Page 18: ...volbou stehu stiskn te tla tko m du pro volbu m d dvojjehly T m dojde k mo nosti automaticky m nit ku stehu aby se p ede lo p padn mu po kozen jeheln desky i stroje p i it dvojjehlou Pokud je zad na n...

Page 19: ...tla tko ipky Volba vzoru 2 Nastaven ky stehu Stiskn te tla tko M DU pro upraven m du ky stehu Pro nastaven ky stehu pou ijte Indik tor vzoru z erven jakmile bude vzor zm n n Indik tor ky stehu z erven...

Page 20: ...se jehla dotkne patky m e b t ohnut nebo jinak po kozen 2 Pokud jsou stehy sta en zvy te d lku stehu p ed dal m it m m e doj t k po kozen jehly 3 Prost ednictv m d lky stehu je tak mo n m nit program...

Page 21: ...trolujte p tla nou patku univerz ln p tla n patka 2 Stiskn te tla tko polohy jehly pro posun jehly do nejvy polohy 3 Um st te l tku pod p tla nou patku Lehce p idr ujte horn i spodn nit 4 Spus te p ku...

Page 22: ...lze nat hnout spole n s materi lem Je tak ide ln pro l t n Pou ijte univerz ln p tla nou patku nebo speci ln p tla nou patku pro zigzag steh Zaji ovac elastick steh 06 and Zaji ovac steh 04 pou v se p...

Page 23: ...y d rkov ho knofl ku nejd ve p i ijte dv d rky bl e k v m Pot posu te knofl k tak aby jehla proch zela dal mi dv ma d rkami a postupujte p i it stejn m zp sobem 3 Zvolte zigzag steh 03 4 Upravte d lku...

Page 24: ...ku Spus te jehlu a za n te t dokud neu ijte po adovanou d lku knofl kov d rky Zastavte stroj a zdvihn te jehlu do nejvy polohy ot en m ru n ho kola 5 Zvolte b2 a u ijte 4 6 steh Zastavte stroj a zdvih...

Page 25: ...i stranami nahoru a jemn zatla te ev sm rem nahoru a p e ehlete 2 Dekorativn vroubkovan hrana P elo te l tku rubov mi stranami k sob a ijte v bl zkosti hrany Odst ihn te pod l vn j hrany steh Pou ijte...

Page 26: ...dvihn te jehlu do nejvy polohy a otev ete kryt chapa e Vyjm te c vkov pouzdro ze stroje uchopen m za z klopku 2 Posu te dr ky chapa e ve sm ru ipek 3 Odstra te kryt chapa e 4 Vyjm te chapa 5 Vy ist te...

Page 27: ...1 roubek eln ho krytu 2 eln kryt Pou ijte n kolik kapek kvalitn ho oleje pro it stroje do bod vyzna en ch ipkami na obr zc ch Stroje kter jsou ast ji pou v ny je t eba mazat 2 3 x do roka Pokud stroj...

Page 28: ...e nap t horn nit Je pou ita nespr vn jehla nebo nepsr vn nit pro it materi l Zvolte spr vnou nit i jehlu viz Tabulka jehel nit a materi l Je zvolen nespr vn steh pro pou itou patku Zvolte spr vnou p t...

Page 29: ...ojen v el s ti Zapojte stroj do el s t Vyp na stroje je v pozici 0 P epn te na 1 Ru n kolo je v pozici pro nav jen c vek Posu te ru n kolo sm rem doleva V c vkov m pouzdru se zachytila nit Zkontrolujt...

Page 30: ...llen verstopft sind Die L ftungsstellen sollen immer sauber sein 5 Man soll keine Gegenst nde in die ffnungen der Maschine stecken 6 Die Maschine darf nicht im Freien benutzt werden Achten Sie darauf...

Page 31: ...DE 18 Trennen Sie die Maschine vor der Stromversorgung immer wenn Sie die Wartungsarbeiten durchf hren BEHALTEN SIE DIESE BEDIENUNGSANLEITUNG Texi Joy 48 31...

Page 32: ...9 EINSETZEN DER SPULE IN DIE SPULENKAPSEL 39 WECHSELN DES N HFUSSES MATIC SYSTEM 40 EINF DELN DES OBERFADENS 40 DOPPELNADEL 41 UNTERFADEN NACH OBEN BRINGEN 41 OBERFADENSPANNUNG 42 TABELLE MIT AUSWAHL...

Page 33: ...VERSCHLUSS 49 ANN HEN VON KN PFEN 50 KNOPFL CHER 51 MUSCHELSAUM SATIN UND ZIERSTICHE 52 REINIGUNG UND WARTUNG DER MASCHINE 53 REINIGEN VON TRANSPORTEUR 54 LEN DER MASCHINE 54 PROBLEME UND IHRE BEHEBUN...

Page 34: ...12 Hebel zum R ckw rtsn hen 13 Taste der Nadelpositionierung 14 Fadenf hrung 15 Spulerstift 16 Garnrollenstift 17 Fadenspannung f r den Spulerfaden 18 Fadenf hrung 19 Transportgriff 20 Hebel zur Fu l...

Page 35: ...die Steckdose 3 Schalten Sie den Hauptschalter ein 4 Wenn der Hauptschalter eingeschaltet ist wird eine Lampe leuchten 5 Zum Ausschalten dr cken Sie den Schalter auf die Aus Position Dann ziehen Sie d...

Page 36: ...beim N hen gesenkt werden 2 Der N hfu soll gehoben werden mittlere Position um den Stoff darunter zu legen 3 Der N hfu kann in die dritte h hste Position gehoben werden indem man den Hebel dr ckt Dies...

Page 37: ...Die Maschine wird r ckw rts n hen solange der Hebel gedr ckt gehalten wird Um wieder nach vorne zu n hen lassen Sie einfach den Hebel frei Indem man die Taste ein Mal dr ckt wird die Nadelposition obe...

Page 38: ...e voll wird die Maschine halten Den Spuler nach links verschieben und den Faden abschneiden 4 W hrend des Aufspulens wird auf der Anzeige die Information angezeigt Bei der fabrikneuen Maschine sind di...

Page 39: ...e so platzieren dass in den Ausschnitt der Bolzen reingeht 1 Die volle Spule in die Spulenkapsel einsetzen Wenn Sie am Faden ziehen muss sich die Spule im Uhrzeigersinn drehen so wie es auf der Abbild...

Page 40: ...von rechts nach links ber die Bohrung in dem Fadenheber 3 f hren 7 Den Faden nach unten in Richtung der Nadel und ihn weiter ber die untere Fadenf hrung 4 sowie ber die n chste F hrung bei der Nadel...

Page 41: ...Fadenohr ziehen von vorne nach hinten 1 Den N hfu heben 2 Den Oberfaden leicht halten und zwei Mal die Taste zur Nadelpositionierung dr cken Das Handrad dreht sich ein Mal 3 Den Oberfaden aus der Nad...

Page 42: ...en Sie die richtige Fadenspannung mithilfe von den Fadenspannungstellern je nach der St rke und Anzahl der Lagen des gen hten Stoffes sowie des ausgew hlten Stichmusters Bei dem korrekt gen hten Stich...

Page 43: ...gungsschraube gegen den Uhrzeigersinn 4 Nehmen Sie die Nadel heraus 5 Stecken Sie die Nadel bis zum Anschlag Der flache Teil davon soll nach hinten gerichtet werden 6 Schrauben Sie die Nadelbefestigun...

Page 44: ...ite berechnen und die Nadel schl gt nicht in die Stichplatte ACHTUNG Beachten Sie bitte dass Sie die Funktion der Doppelnadel immer einschalten wenn Sie an der Maschine angebracht ist Wenn Sie dies ni...

Page 45: ...ung der Standardoperation die Maschine funktioniert korrekt Doppelton BIP BIP Falsche Operation Dreifacher Ton BIP BIP BIP Falsche Einstellung der Maschine Langes Signal BIP BIP BIP BIP Maschine ist b...

Page 46: ...m Einstellen der Stichl nge drehen Sie einige Male das Handrad auf sich zu um zu pr fen ob die Nadel den N hfu nicht ber hrt Es k nnte n mlich zu ihrer Besch digung f hren Wenn die Nadel den N hfu ber...

Page 47: ...ie N hrichtung zu ndern drehen Sie den Stoff die Nadel soll im Stoff stecken 5 Senken Sie den N hfu und n hen Sie weiter 1 Pr fen Sie ob Sie den universalen N hfu montiert haben 2 Bet tigen Sie die Ta...

Page 48: ...zupassen Beim Blindstichn hen k nnen Sie entweder Standardfu und F hrung oder den Blindstichfu benutzen 1 Falten Sie den Stoff so wie es auf der Abbildung gezeigt wurde Der Abstand 2 soll zwischen 0 4...

Page 49: ...o nahe der Z hnen von Rei verschluss wie m glich befindet 5 W hrend des N hens von der rechten Rei verschlussseite muss sich der N hfu auf der linken Seite der Nadel befindet Der Stich soll sich so na...

Page 50: ...Streichholz nicht bewegt 5 Stellen Sie die Stichbreite ein und Pr fen Sie ob die eingestellte Stichbreite zu den L chern in Knopf passt Lassen Sie den N hfu herunter und drehen Sie das Handrad auf sic...

Page 51: ...ie Position b2 ein Um die Verriegelung zu machen n hen Sie 4 6 Stiche Sp ter nehmen Sie die Nadel aus dem Stoff heraus indem Sie das Handrad auf sich zu drehen Die Nadel soll sich auf der rechten Stic...

Page 52: ...kante der Naht achten Sie darauf die N hte nicht zu durchschneiden Verwenden Sie Nahtabdichtung 3 ZIERSTICHE Dienen vor allem dazu die Ziern hte zu erreichen Sie sehen am besten aus wenn die Stichl ng...

Page 53: ...werden Nach der Wartung alle Elemente wieder einsetzen 1 Die Nadel in ihre oberste Position bringen Den Anschiebtisch herausnehmen und das Greifergeh use ffnen Die Spulenkapsel herausnehmen 2 Die Mon...

Page 54: ...ausreichend Mehr l kann verursachen dass die lresten den Stoff verschmutzen Wenn die Maschine nach l ngerem Stillstand nicht gleichm ig arbeitet soll man sie mit einigen Tropfen l vor der Inbetriebna...

Page 55: ...freste begrenzen die Greiferbewegung Reinigen Sie die Spulenkapsel und den Greiferbereich Die Spulenkapsel ist besch digt Wechseln Sie die Spulenkapsel Die Nadel wird gebrochen Falsch eingesteckte Nad...

Page 56: ...l nge ist auf 0 eingestellt Vergr ern Sie die Stichl nge Der Unterfaden ist fast alle Spulen Sie auf Die Maschine funktioniert nicht Die Maschine ist nicht an Strom angebracht Stecken Sie den Stecker...

Page 57: ...DE Texi Joy 48 57...

Page 58: ...ate the appliance with any air opening blocked Keep ventilation openings of this sewing machine and foot controller free from accumulation of lint dust and loose cloth 5 Never drop or insert any objec...

Page 59: ...EN Texi Joy 48 59...

Page 60: ...OBBIN CASE 67 INSERTING THE BOBBIN 67 CHANGING THE PRESSER FOOT 68 THREADING THE UPPER THREAD 68 TWIN NEEDLE 69 DRAWING UP THE BOBBIN THREAD 69 ADJUSTING THE THREAD TENSION 70 FABRIC THREAD AND NEEDLE...

Page 61: ...FETY STITCHES 76 INSERT ZIPPERS 77 BUTTON SEWING 77 BUTTONHOLE SEWING 78 DECORATIVE STITCHES 79 MAINTENANCE AND CLEANING 80 CLEANING THE FEED DOG 81 OILING THE NEEDLE BAR 81 HELPFUL HINTS 82 Texi Joy...

Page 62: ...4 Lower thread guide 15 Bobbin winder shaft 16 Spool pins 17 Bobbin winder thread guide 18 Top thread guide 19 Carrying handle 20 Presser foot lifter 21 Cord socket 22 Power light switch 23 Stitch len...

Page 63: ...s turned on 5 To disconnect turn the power switch to the OFF position then remove plug from outlet Before connecting the power cord make sure that the voltage and frequency indicated on the machine is...

Page 64: ...it off to the left as shown the machine converts into a free arm model There are three positions for your presser foot 1 Lower the presser foot to sew 2 Raise the lifter to the middle position to ins...

Page 65: ...for reinforcing the ends of the seams Press reverse stitch button and sew 4 5 stitches Using foot control press pedal with pressing reverse stitch button Press this button to raise or lower the needl...

Page 66: ...fully wound it will stop automatically 3 Return the bobbin winder to its original position by moving the spindle to the left and cut the thread During winding the bobbin on the LCD will be shown The s...

Page 67: ...place the tip of the bobbin case into the recess of the hookrace 1 Place bobbin into bobbin holder with the thread unwinding counter clockwise 2 Draw thread into notch 3 Pull thread toward the left an...

Page 68: ...hread down 4 and slip it into the lower thread guide 5 7 Thread needle eye from front to back 6 and pull thread out under the presser foot about 10 cm The presser foot must be changed according to the...

Page 69: ...Then draw thread to right needle eye 6 from front to back 1 Raise the presser foot 2 Hold the upper thread loosely and press needle position button 3 Pull upper thread lightly Bobbin thread will come...

Page 70: ...0 Stretch double knit tricot spandex jersey Ctn 120 150 80 90 When bobbin thread appears on top side of fabric Turn the tension dial to a lower number to loosen the upper thread tension Thread tension...

Page 71: ...he handwheel toward you until the needle is at its highest point 2 Loosen the needle clamp screw 3 Remove the needle 4 Insert new needle into needle clamp with flat side to the back and push it up as...

Page 72: ...eedle plate Otherwise the needle will be broken or the machine may be damaged If an incorrect operation is made a helpful message will be displayed When a helpful message is displayed fix the problem...

Page 73: ...tree times push button Select stitch 2 Stitch width adjusting Press MODE button to stitch width adjusting mode To adjust stitch width use buttons Pattern indicator will turn red when pattern will be...

Page 74: ...e presser foot the needle will be bent or broken 2 If the stitches are sewed together please increase the stitch length before continuing to sew otherwise will cause needle bent 3 By stitch lenght dia...

Page 75: ...g 1 Check presser foot universal purpose presser foot 2 Push needle position button to move needle to its highest position 3 Place the fabric under the presser foot Hold upper and bobbin thread loosel...

Page 76: ...t stitch will stretch with working material It is also perfect for darning Use universal presser foot or special presser foot for zigzag SAFETY ELASTIC STITCH 06 and SAFETY STITCH 04 used for blind he...

Page 77: ...ing zipper BUTTON SEWING Stitch Name Number of stitch Recommended stitch width Recommended stitch lenght Type of the presser foot ZIGZAG 03 Depends on holes in the button 0 0 Universal embroidery plat...

Page 78: ...ng the hand wheel 6 Choose b3 left side of the buttonhole on the dial Lower the needle and start to sew till the point A Stop to sew and raise the needle to its highest position by turning the hand wh...

Page 79: ...rn fabric with right sides out and gently push out curved seam press 2 DECORATIVE SCALLOP EDGE Place the fabric with left sides together and stitch near the edge Trim along the outside edge of the sti...

Page 80: ...all parts 1 Raise the needle to its highest position and open the shuttle cover Open the hinged latch of the bobbin case and take it out of the machine 2 Open the shuttle race cover holders 3 Remove...

Page 81: ...You should often clean the feed dog teeth if the machine is intensively used Remove the face cover 1 Face cover screw 2 Face cover Apply a few drops of fine quality sewing machine oil to the point in...

Page 82: ...le 4 Thread tension too tight 1 Rethread machine 2 Rethread the bobbin 3 Insert new needle 4 Readjust thread tension Machine makes loose stitches or loops 1 Bobbin threaded incorrectly 2 Machine not p...

Page 83: ...winder spindle is pushed to the right 4 Presser foot is not lowered 5 Buttonhole sewing mode Buttonhole lever is not lowered completely Buttonhole foot is not attached 1 Insert plug fully into outlet...

Page 84: ...ua En caso de presentarse algunas de las situaciones citadas acuda al servicio t cnico autorizado m s pr ximo para revisarla repararla o realizar las regulaciones el ctricas o mec nicas pertinentes 4...

Page 85: ...Al realizar cualquier tipo de actividad cerca de la aguja como enhebrado de hilo cambio de aguja cambio del carrete sustituci n del pie etc debe ajustar el interruptor a la posici n 0 18 Antes de proc...

Page 86: ...LLA 93 COLOCACI N DE LA CANILLA EN EL CARRETE 93 CAMBIO DEL PIE SISTEMA MATIC 94 ENHEBRADO DE HILO SUPERIOR 94 AGUJA DOBLE 95 EXTRACCI N DEL HILO DE LA BOBINA 95 AJUSTE DE LA TENSI N DEL HILO 96 TABLA...

Page 87: ...CI N DE CREMALLERAS 103 COSER BOTONES 104 DOBLADILLO DE OJAL 105 PUNTADAS DE RASO DECORATIVAS 106 LIMPIEZA Y MANTENIMIENTO DE LA M QUINA 107 LIMPIEZA DE LOS DIENTES DEL TRANSPORTADOR 108 LUBRICACI N D...

Page 88: ...to de la aguja 14 Gu a del hilo 15 Pasador del rebobinador 16 Pasador de la bobina 17 Tensor del hilo del rebobinador 18 Gu a del hilo 19 Asa de transporte 20 Palanca elevadora del pie prensatela 21 T...

Page 89: ...e una mesa estable 1 Introduzca la clavija de la m quina en el enchufe hembra de la m quina 2 Introduzca la clavija de alimentaci n en la toma de corriente 3 Encienda el interruptor de alimentaci n 4...

Page 90: ...ederemos al brazo libre que nos permite coser elementos dif cilmente accesibles perneras mangas etc Disponibles tres posiciones del pie prensatela 1 El pie siempre debe estar liberado durante la costu...

Page 91: ...o si est presionada esta tecla Para de nuevo coser hacia adelante simplemente libere la tecla Pulsando el bot n una vez se puede ajustar la posici n de la aguja arriba abajo Pulsando el bot n dos vece...

Page 92: ...bobinado presionando el pedal de arranque Cuando la canilla est completamente rellena detenga la m quina Deslice el cabezal a la izquierda y a continuaci n corte el hilo Durante el rebobinado se mostr...

Page 93: ...l perno de la canilla en la cavidad de la lanzadera 1 Coloque la canilla previamente enhebrada en el carrete Aseg rese de que el hilo se embobina en direcci n de las manillas del reloj siguiendo la fl...

Page 94: ...ierdo a trav s del ojo de recogida del hilo 3 7 A continuaci n dirija el hilo hacia abajo en direcci n a la aguja y p selo por el gu a hilos inferior 4 y por la siguiente u a situada a la altura de la...

Page 95: ...eda de forma est ndar 5 Enhebre el hilo derecho en la aguja de adelante hacia atr s 1 Suba el pie prensatelas 2 Sujete el hilo de la aguja ligeramente y pulse dos veces el bot n de la aguja arriba aba...

Page 96: ...Algod n 50 80 Seda 50 80 90 100 Tejido de punto stretch tricot spandex jersey Algod n 120 150 Seda 120 150 80 90 Cuando el hilo de la bobina es visible en la parte superior del material Gire el bot n...

Page 97: ...guja 3 Retire la aguja de su sujeci n 4 Introduzca la aguja nueva en la pieza de sujeci n con el lado plano en sentido opuesto a usted Emp jela tanto como pueda 5 Apriete el tornillo de fijaci n de la...

Page 98: ...ja no golpea en la placa de aguja ATENCI N Recuerde siempre encender la funci n costura con aguja doble cuando la tenga instalada en la m quina Si no enciende esta funci n puede provocar un c lculo in...

Page 99: ...est ndar la m quina funciona correctamente SONIDO DOBLE Operaci n incorrecta SONIDO TRIPLE Configuraci n incorrecta de la m quina SE AL LARGA La m quina est bloqueada 1 Despu s de iniciar el dise o co...

Page 100: ...e el material debajo de ste 3 Libere el pie prensatela 4 Tire del hilo de la aguja y del hilo de la bobina de la parte trasera Cose algunas puntadas ATENCI N 1 En caso de coser en una parte engrosada...

Page 101: ...Baje el pie y contin e el trabajo 1 Compruebe el pie prensatela debe tener colocado el pie prensatela universal 2 Presione el bot n de posicionamiento de la aguja para que la aguja se encuentre en la...

Page 102: ...rcido y arreglo de rasgaduras y costura de el sticos Dirija la puntada sobre el borde del tejido y a continuaci n recorte el trozo de tela sobrante Utilice un pie prensatelas universal o un pie especi...

Page 103: ...pie prensatelas al lado izquierdo de forma que se pueda coser el lado derecho de la cremallera Cosa igualmente esta parte lo m s cerca posible de los dientes de la cremallera 6 Levante el prensatelas...

Page 104: ...en cuenta que cuando est cosiendo la aguja no choque con el perno 5 Seleccione el ancho de la puntada despu s libere el pie prensatela y compruebe si el ancho seleccionado corresponde con los agujero...

Page 105: ...n el lado izquierdo de la puntada 5 Ajuste el selector de patr n en la posici n b2 Para hacer la presilla cosa 4 6 puntadas a continuaci n girando el volante hacia usted retire la aguja de la tela dej...

Page 106: ...1 8 Haga muescas D la vuelta a las telas y empuje las costuras redondeadas 2 FEST N DECORATIVO JUNTO AL BORDE Coloque las telas una encima de otra por el lado izquierdo y cosa cerca del borde Corte l...

Page 107: ...de limpieza anteriores devuelve a su lugar todos los elementos removidos 1 Coloque la aguja en su posici n m s elevada Deslice el cajet n de la m quina y abre la tapa de la lanzadera Seguidamente reti...

Page 108: ...o autorizado 1 2 gotas de aceite son suficientes para lubricar la m quina una cantidad superior podr a manchar la tela al coser Si la m quina no funciona bien tras un largo periodo de inactividad debe...

Page 109: ...na seg n las instrucciones Los restos de hilo y hebras bloquean el balanceo de la lanzadera Limpie el carrete y la lanzadera Carrete da ado Sustituya el carrete La aguja se rompe Aguja colocada de for...

Page 110: ...lor 0 Aumente la longitud de la puntada Se termina el hilo inferior en el carrete Bobine el hilo en la canilla La m quina no funciona La m quina no est conectada a la red Coloque el enchufe en el cont...

Page 111: ...ES Texi Joy 48 111...

Page 112: ...dommag e ou quand elle restait en contact avec de l eau Dans ce cas il faut se rendre au point agr g de service le plus proche dans le but d effectuer une r vision r paration ou des r glages lectrique...

Page 113: ...oir termin de coudre afin d viter de casser l aiguille ou endommager la machine 17 En effectuant des actions quelconques pr s de l aiguille p ex enfilage changement de l aiguille changement du bobineu...

Page 114: ...21 METTRE LA BOBINE SUR LE BOBINEUR 121 CHANGEMENT DU PIED SYSTEME MATIC 122 ENFILAGE DU FIL SUPERIEUR 122 DOUBLE AIGUILLE 123 REMONTER LE FIL DE CANETTE 123 REGLAGE DE LA TENSION DU FIL 124 TABLEAU D...

Page 115: ...S A GLISSIERE 131 COUTURE DES BOUTONS 132 COUTURE DE BOUTONNIERES 133 LES POINTS DECORATIFS SATINES 134 NETTOYAGE ET ENTRETIEN DE LA MACHINE 135 NETTOYAGE DES DENTS DU TRANSPORTEUR 136 LUBRIFICATION D...

Page 116: ...ment de l aiguille 14 Panneau de guidage du fil 15 Pivot de la canette 16 Broche de la canette 17 Tendeur du fil du bobineur 18 Panneau de guidage du fil 19 Poign e pour le transport 20 Levier du soul...

Page 117: ...machine Demarreur a pied Placez la machine sur un support stable 1 Connectez le c ble d alimentation la machine en ins rant la fiche deux broches dans la prise d alimentation 2 Connectez le c ble d al...

Page 118: ...t tre baiss lors de la couture 2 Le pied presseur doit tre soulev jusqu la position du milieu afin d inserrer le tissu cousu 3 Le pied presseur peut tre soulev jusqu la troisi me et la plus haute posi...

Page 119: ...ri re aussi longtemps que le levier sera appuy Afin de coudre nouveau en avant rel cher le levier Les positions d arr t de l aiguille peuvent tre modifi es quand vous appuyez sur la touche DEMARRER AR...

Page 120: ...3 Allumez nouveau la machine en appuyant sur le d marreur pied p dale Arr tez la machine quand la bobine sera compl tement enroul e D placez le pivot vers la gauche et ensuite coupez le fil Le message...

Page 121: ...la canette placer la goupille dans la coupure de la plaquette de la griffe 1 Placez la bobine enfil e sur la canette Assurez vous que le fil se d roule dans le sens des aiguilles d une montre comme i...

Page 122: ...suite passer le fil vers le bas dans la direction de l aiguille et enfiler par le guidage inf rieur du fil 4 et par le guidage suivant la hauteur du fil 5 8 Enfilez l oeillet de l aiguille en faisant...

Page 123: ...ndard 5 Passez le fil par l aiguille de l avant vers l arri re 1 Soulevez le releveur de pied presseur 2 Tenez le fil sans le tendre et appuyez deux fois sur la touche de positionnement de l aiguille...

Page 124: ...rs c tel Coton 50 80 Sole 50 80 90 100 Tricot stretch tricot spandex jersey Coton 120 150 Sole 120 150 80 90 Quand le fil de canette appara t la du tissu Tournez la touche de r gulation sur un num ro...

Page 125: ...2 Desserrez la vis du pince aiguille 3 D gagez l aiguille en place 4 Ins rez l aiguille de votre choix dans le pince aiguille le c t plat de l aiguille vers l arri re Pousser l aiguille vers le haut...

Page 126: ...tenez de toujours allumer la fonction de couture avec la double aiguille quand elle est install e dans la machine Ne pas la mettre en marche peut causer un calcul incorrect de la largeur du point et c...

Page 127: ...ement incorrect de la machine SIGNAL LONG La machine est bloqu e 1 Apr s le d marrage le dessin r gl sera le point droit 00 Afin de choisir le dessin 03 il faut appuyer trois fois la touche Dessin cho...

Page 128: ...ture des boutons Faites attention de ne pas choisir cette fonction pendant le changement de la valeur de la longueur du point Si la touche montre le mode de couture des points la valeur b1 b2 b3 appar...

Page 129: ...uture 5 Abaissez le pied presseur et continuer le travail 1 V rifiez le pied presseur pied universel 2 Appuyez sur la touche de positionnement de mani re ce que l aiguille se trouve dans sa plus haute...

Page 130: ...de bain en lasthanne ou sur des tissus qui ont tendance plisser apr s la couture Ce point s tend avec le tissu Il convient aussi au reprisage et la r paration des d chirures pour coudre des rubans la...

Page 131: ...us pr s des dents de la fermeture clair 6 Levez le pied presseur et cartez la fermeture clair avant que le pied presseur n arrive la poign e de la fermeture clair Points p ex Nom Num ro du point Large...

Page 132: ...faisant tout de m me attention ce que l aiguille n heurte pas l allumette 5 Choisissez la largeur du bouton et ensuite baissez le pied presseur et v rifiez si la largeur choisie correspond aux trous...

Page 133: ...ition quand elle se trouvera du c t gauche du point 5 R glez la molette du choix du point en position b2 Afin de faire la boutonni re cousez 4 6 coutures ensuite en tournant la roue volante vers soi s...

Page 134: ...E PRES DU BORD Plier le tissu du c t droite vers soi et cousez pr s du bord Coupez le tissu le long de la couture en faisant attention de ne pas couper le point Utilisez le calfat des coutures ou une...

Page 135: ...nstaller nouveau tous les l ments d mont s la fin des actions ci dessus 1 Placez l aiguille dans sa plus haute position Avancer la tablette et ouvrir le couvercle de la griffe Retirer ensuite la canet...

Page 136: ...de lubrifiant suffisent une plus grande quantit peut causer des t ches sur les tissus cousus Si la machine ne travaille pas correctement apr s une longue p riode d arr t il faut la lubrifier avec quel...

Page 137: ...la notice Les restes de tissu bloquent le mouvement pendulaire de la griffe Nettoyez la canette et la griffe Canette endommag e Changez la canette L aiguille casse Aiguille incorrectement plac e Remet...

Page 138: ...gueur du point est r gl e sur 0 Augmentez la longueur du point Le fil inf rieur se termine dans la canette Enfilez le fil sur la bobine La machine ne fonctionne pas La machine n est pas branch e une s...

Page 139: ...FR Texi Joy 48 139...

Page 140: ...a w kontakcie z wod W takich przypadkach nale y zwr ci si do najbli szego autoryzowanego punktu serwisowego w celu dokonania przegl du naprawy lub niezb dnych regulacji elektrycznych lub mechanicznyc...

Page 141: ...eniu aby zapobiec z amaniu ig y czy innemu uszkodzeniu maszyny 17 W czasie wykonywania jakichkolwiek czynno ci w s siedztwie ig y takich jak nawlekanie nici wymiana ig y wymiana b benka wymiana stopk...

Page 142: ...A B BENKA 149 ZAK ADANIE SZPULKI W B BENKU 149 WYMIANA STOPKI SYSTEM MATIC 150 NAWLEKANIE NITKI G RNEJ 150 PODW JNA IG A 151 WYCI GANIE NICI ZE SZPULKI 151 REGULACJA NAPR ENIA NICI G RNEJ 152 TABELA D...

Page 143: ...WICZNYCH 159 PRZYSZYWANIE GUZIK W 160 OBSZYWANIE DZIUREK 161 CIEG MUSZELKOWY SATYNOWY I CIEGI DEKORACYJNE 162 CZYSZCZENIE I KONSERWACJA MASZYNY 163 CZYSZCZENIE Z BK W TRANSPORTERA 164 OLIWIENIE MASZYN...

Page 144: ...isk pozycjonowania ig a 14 Prowadnik nitki 15 Trzpie szpulownika 16 Trzpie szpulki 17 Napr acz nici szpulownika 18 Prowadnik nitki 19 Uchwyt do transportu r czka 20 D wignia podnoszenia stopki 21 Gnia...

Page 145: ...LED 5 Aby od czy maszyn wy cz przycisk zasilania i wyci gnij przew d z kontaktu Zanim pod czysz przew d zasilaj cy upewnij si e napi cie i cz stotliwo pr du wskazana na maszynie odpowiada warto ci w...

Page 146: ...r kaw w itp Dost pne s trzy pozycje stopki 1 Stopka powinna by opuszczona zawsze podczas szycia 2 Stopk nale y podnie do pozycji rodkowej aby wsun pod sp d szyty materia 3 Stopk mo na unie do trzeciej...

Page 147: ...ugo jak d wignia b dzie przyciskana Aby zn w szy do przodu po prostu zwolnij d wigni Naciskaj c przycisk jeden raz mo emy ustawi pozycj ig y g ra d Naciskaj c przycisk dwukrotnie maszyna wykona jeden...

Page 148: ...y szpulka b dzie w pe ni nawini ta zatrzymaj maszyn Przesu trzpie w lewo nast pnie utnij nitk Podczas nawijania na wy wietlaczu b dzie wy wietlany komunikat W zapakowanej fabrycznie maszynie stojaki n...

Page 149: ...umie bolec b benka we wg bieniu nak adki chwytacza 1 Umie nawleczon wcze niej szpulk w b benku Upewnij si e nitka odwija si zgodnie ruchem wskaz wek zegara za strza k tak jak pokazano to na rysunku 2...

Page 150: ...y do lewej przez oczko podci gacza nici 3 6 Nast pnie prowad nitk w d w kierunku ig y i przewlecz przez dolny prowadnik nici 4 oraz przez kolejny prowadnik na wysoko ci ig y 5 7 Nawlecz oczko ig y prz...

Page 151: ...standardowy spos b 5 Przewlecz nitk praw przez ig od przodu do ty u 1 Podnie stopk dociskow 2 Przytrzymaj lekko ni od ig y i naci nij dwukrotnie przycisk pozycjonowania ig y Ko o nap dowe wykona jeden...

Page 152: ...00 120 80 90 Grube gabardyna tweed denim sztruks itp Bawe niana 50 80 Jedwabna 50 80 90 100 Elastyczne dzianina stretch d ersej itp Bawe niana 120 150 80 90 Gdy ni ze szpulki jest widoczna na wierzchn...

Page 153: ...tron 2 Poluzuj rub mocuj c ig 3 Wyjmij ig z uchwytu 4 Umie now ig w uchwycie p ask stron do pr ta stopki i doci nij j maksymalnie w g r 5 Dokr rub mocuj c ig UWAGA Nie wolno u ywa wykrzywionych t pych...

Page 154: ...zycia podw jn ig gdy masz j zamontowan w maszynie Niew czenie tej funkcji mo e spowodowa niew a ciwe przeliczenie szeroko ci ciegu a co za tym idzie uszkodzenie ig y i maszyny W przypadku niekt rych p...

Page 155: ...we ustawienie maszyny D ugi sygna d wi kowy Maszyna jest zablokowana 1 Po uruchomieniu ustawionym wzorem b dzie cieg prosty 00 Aby wybra wz r 03 nale y trzykrotnie nacisn przycisk Wybrany wz r 2 Dosto...

Page 156: ...si z boku maszyny Przekr pokr t o ustawiaj c wybran warto d ugo ci ciegu w zakresie od 0 do 4 mm UWAGA 1 W przypadku przeszywania zgrubie na materiale zwi ksz d ugo ciegu aby unikn zablokowania b d us...

Page 157: ...szycia obr materia na igle 5 Opu stopk dociskow i kontynuuj prac 1 Sprawd stopk powiniene mie za o on stopk uniwersaln 2 Naci nij przycisk pozycjonowania ig y tak aby ig a znalaz a si w swojej najwy...

Page 158: ...odpowiedni do cerowania i naprawiania rozdar wszywania ta m elastycznych Przeszyj ciegiem przy brzegu materia u a nast pnie odetnij zbyteczny skrawek tkaniny Stosuj stopk uniwersaln lub stopk specjaln...

Page 159: ...zamka 5 Ustaw stopk po lewej stronie aby mo liwe by o szycie prawej strony zamka b yskawicznego Przyszyj t stron r wnie maksymalnie blisko z bk w zamka 6 Podnie stopk i rozsu suwak zanim stopka dojdz...

Page 160: ...k aby w trakcie szycia ig a nie uderza a o zapa k 5 Wybierz szeroko ciegu a nast pnie opu stopk i sprawd czy wybrana szeroko koresponduje z otworami w guziku wolno obracaj ko em pasowym a ko c wka ig...

Page 161: ...znajdowa a po lewej stronie ciegu 5 Ustaw pokr t o wyboru d ugo ci ciegu w pozycji b2 Aby zrobi rygiel przeszyj 4 6 szw w nast pnie obracaj c ko em zamachowym do siebie wyjmij ig z tkaniny pozostawia...

Page 162: ...lewymi stronami do siebie i przeszyj blisko kraw dzi Odetnij materia wzd u szwu uwa aj c by nie przeci ciegu U yj uszczelniacza szw w lub kleju do tkanin by zabezpieczy brzegi ciegu muszelkowego 3 CI...

Page 163: ...czeniu powy szych czynno ci zamontuj z powrotem wszystkie usuni te elementy 1 Ustaw ig w jej najwy szej pozycji Wysu stolik maszyny i otw rz pokryw chwytacza Nast pnie wyci gnij b benek 2 Otw rz zatr...

Page 164: ...owanym serwisie Je eli maszyna nie pracuje p ynnie po d u szym okresie jej nieu ywania nale y j naoliwi kilkoma kroplami przed uruchomieniem Do naoliwienia wystarcz 1 2 krople oleju wi ksza ilo mo e s...

Page 165: ...z maszyn ponownie zgodnie z instrukcj Resztki nici i meszek z tkanin blokuj ruch wahad owy chwytacza Oczy b benek i chwytacz Uszkodzony b benek Wymie b benek Ig a si amie Nieprawid owo za o ona ig a Z...

Page 166: ...Zwi ksz d ugo ciegu Materia przesuwa si niejednostajnie D ugo ciegu ustawiona jest na 0 Zwi ksz d ugo ciegu Ko czy si dolna nitka w b benku Nawi nitk na szpulk Maszyna nie dzia a Maszyna nie jest pod...

Page 167: ...PL Texi Joy 48 167...

Page 168: ...RU 1 2 15 3 1 2 3 4 5 6 7 8 9 10 11 12 Texi Joy 48 168...

Page 169: ...RU 13 14 15 16 17 Texi Joy 48 169...

Page 170: ...RU 168 172 173 173 173 174 174 174 175 175 175 175 176 176 177 177 MATIC 178 178 179 179 180 180 181 181 182 182 182 182 183 183 184 185 185 185 186 Texi Joy 48 170...

Page 171: ...RU 186 187 188 189 190 191 192 192 193 Texi Joy 48 171...

Page 172: ...RU 1 2 3 4 5 6 7 8 9 10 MODE 11 12 13 14 15 16 17 18 19 20 21 22 23 24 25 26 27 28 29 30 31 32 10 9 7 4 5 6 8 11 12 13 14 3 2 1 18 17 16 15 19 20 24 23 22 21 27 28 29 26 25 32 31 30 Texi Joy 48 172...

Page 173: ...RU 1 3 2 3 4 5 6 7 8 9 10 1 2 3 4 5 Texi Joy 48 173...

Page 174: ...RU 1 2 3 0 1 1 3 2 Texi Joy 48 174...

Page 175: ...RU 2 1 0 4 2 b1 b2 b3 Texi Joy 48 175...

Page 176: ...RU 1 1 2 3 2 3 1 2 3 1 2 3 1 1 2 3 Texi Joy 48 176...

Page 177: ...RU 1 1 2 2 3 3 1 1 2 2 3 3 4 10 Texi Joy 48 177...

Page 178: ...RU 1 2 3 1 4 2 5 3 6 4 5 7 6 10 1 2 3 MATIC Texi Joy 48 178...

Page 179: ...RU 1 1 3 2 4 7 3 4 5 1 2 3 4 10 Texi Joy 48 179...

Page 180: ...RU 1 120 150 120 150 70 80 100 120 100 120 80 90 50 80 50 80 90 100 120 150 120 150 80 90 2 3 Texi Joy 48 180...

Page 181: ...RU MODE 1 2 1 2 3 4 5 Texi Joy 48 181...

Page 182: ...RU 1 00 2 3 10 MODE MODE MODE 1 MODE MODE 2 0 5 Texi Joy 48 182...

Page 183: ...RU 0 4 BIP BIP BIP BIP BIP BIP BIP BIP BIP BIP BIP 1 00 03 2 MODE 3 MODE Texi Joy 48 183...

Page 184: ...RU 1 2 3 4 4 0 4 1 2 3 b1 b2 b3 5 6 7 8 Texi Joy 48 184...

Page 185: ...RU 1 2 4 5 3 4 4 5 1 2 3 4 5 1 2 3 4 5 6 3 4 7 8 01 0 0 2 5 00 2 5 2 5 02 5 0 2 5 Texi Joy 48 185...

Page 186: ...RU 03 5 0 1 0 08 4 5 0 5 04 5 0 1 0 06 5 0 2 5 06 04 1 2 0 4 0 7 2 3 3 4 4 Texi Joy 48 186...

Page 187: ...RU 1 2 3 4 5 6 00 2 5 2 5 5 6 Texi Joy 48 187...

Page 188: ...RU 1 2 03 3 0 4 5 4 6 6 7 10 7 20 8 03 0 0 Texi Joy 48 188...

Page 189: ...RU 1 b1 b2 b3 2 3 C B 4 5 4 6 6 7 4 6 8 A B C Texi Joy 48 189...

Page 190: ...RU 07 46 5 0 0 5 1 3 1 8 2 3 0 5 1 A Texi Joy 48 190...

Page 191: ...RU 1 2 2 3 4 5 6 Texi Joy 48 191...

Page 192: ...RU 1 2 3 4 1 2 1 2 3 4 Texi Joy 48 192...

Page 193: ...RU Texi Joy 48 193...

Page 194: ...RU 0 0 I 0 I Texi Joy 48 194...

Page 195: ...roduct Household sewing machine model Texi Joy 48 2100 With this declaration relates complies with following directives 2004 108 EC 2005 32 EC 2009 125 EC 2006 95 EC RoHS Directive 2002 95 EC EN 55014...

Page 196: ......

Reviews: