background image


22 

TEXI Twin MS operation manual 

9. REPLACING GAUGE PARTS 

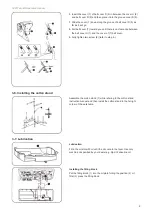
How to change gauges 

1. Turn the machine pulley to move the needle bar to its highest 

position. 

2. Remove the needle (1). 

3. Remove the slide plate (2). 

4. Remove the needle clamp (3). 

5. Raise the presser foot (5) by using the presser foot lifter (4). 

6. Remove the presser foot (5). 

7. Remove the neeedle plate (6). 

8. Remove the feed 

9. Tilt back the machine head. 

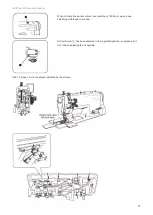
Adjust the rotary hook base 

Make the following adjustment when replacing the current gauge 
with one winder. The feed dog cannot be installed if this adjustment 
is not made. Loosen screws (A), (B), (C) and (D) and shift the rotary 
hook base right or left. 

Summary of Contents for Twin MS

Page 1: ...TEXI Twin MS operation manual Operation manual High speed two needle lockstitch sewing machine Twin MS...

Page 2: ...TEXI Twin MS operation manual...

Page 3: ...ING 5 1 Sewing 5 2 Backtacking 6 THREAD TENSION 6 1 Adjusting the thread tension 6 2 Adjusting the presser foot pressure 7 CLEANING 8 STANDARD ADJUSMTNETS 8 1 Adjusting the feed dog height 8 2 Adjusti...

Page 4: ...In the event of an electrical storm turn off the power and disconnect the power cord from the wall outlet Lightning may cause problems with correct operation NOTES ON SAFETY Thank you very much for bu...

Page 5: ...ched off as a result of the motor s inertia Wait until the motor stops fully before starting work The machine may operate if the treadle is pressed by mistake Attach all safety devices before using th...

Page 6: ...ions on the labels at all when using the machine Moving parts may cause injury Operate with safety devices Turn off main switch before threading changing bobbin and needle cleaning etc Be sure to conn...

Page 7: ...height 1 mm Needle DPX5 135x5 Needle feed mechanism Yes Single needle stop mechanism Yes 3 INSTALLATION CAUTION Machine installation should only be carried out by a qualified technician Contact your...

Page 8: ...head Hold section B with your foot so that the table does not move and then push the arm with both hands to tilt back the machine head Returning the machine head to the upright position Clear away an...

Page 9: ...ow securely into the table hole If the pillow is not pushed in as far as it will go the machine head will not be sufficiently stable when it is tilted back Remarks Supprt pin must be installed reliabl...

Page 10: ...9 8 N 3 5 Installing the belt cover 1 Tilt back the machine head 2 Attach the screw 2 and washers 3 to the ruber cushions on the inside of the belt cover U 1 in four places 3 Place belt cover U 1 ont...

Page 11: ...7 belt cover 9 Fully tighten two screw 6 refer to step 5 3 6 Installing the cotton stand Assemble the cotton stand 1 while refering to the cotton stand instruction manual and then install the cotton...

Page 12: ...orks normal runs machine at 1000 rpm we can see splashing oil through oil window Notice Screw 1 has been adjusted to the regulated position so please don t turn it when adjusting the oil quantity Add...

Page 13: ...y matches the direction of the arrow 1 If the direction of rotary is reserved change the direction of rotation to the correct direction while referring to the instruction manual for the motor 4 2 Remo...

Page 14: ...the shape of the cap being used 1 Pass the thread through slot A and under the tension spring 3 2 Pass the thread through slot B and C and then through the thread loosening prevention spring 3 Pass t...

Page 15: ...ce threading has been completed Pass the thread correctly between the tension discs Cotton thread Arm thread guide Felt Arm thread guide Synthetic thread Pass the thread through the needle eyes from i...

Page 16: ...le one of the needle bars been stopped To stop operation of the left needle bar move the stop lever 1 to the L position To stop operation of the right needle bar move the stop lever 1 to the R positio...

Page 17: ...ill change back to normal 6 THREAD TENSION 6 1 Adjusting the thread tension Good even stitches Upper thread tension is too strong or lower thread tension is too weak Upper thread tension is too weak o...

Page 18: ...e material dose not slip 1 Loosen the adjustment nut 1 2 Turn the adjustment screw 2 to adjust the presser foot presssure 3 Tighten the adjustment nut 1 7 CLEANING The following cleaning operations sh...

Page 19: ...e machine head 3 Loosen screw 2 and raise or lower the feed dog holder 3 so that the feed dog 1 will rise to about 1 mm above the needle plate 4 Tighten the screw 2 8 2 Adjusting the presser foot high...

Page 20: ...of thread take up spring The standard operating range for thread take up spring L 1 and thread take up spring R 2 is 5 10 mm for both springs 1 Loosen the left and right screws 3 and then turn the ri...

Page 21: ...y touching the thread guide plate 6 Furthermore tighten screw C without moving it from its screw stop 8 4 2 Needle bar height and lift amount 1 Remove the left and the right suide plates 2 Tilt back t...

Page 22: ...n the screws 16 7 The distance from the upper edge of the needle hole to the rotary hook tip 15 must be 1 1 5 mm when the rotary hook tip 15 is aligned with the center of the needle 8 Loosen the set s...

Page 23: ...over 3 Tilt the machine head back and remove the timming belt 1 4 Turn the machine pulley until the A mark is aligned with the red dot 5 While holding the upper shaft so that it won t move align he ma...

Page 24: ...e clamp 3 5 Raise the presser foot 5 by using the presser foot lifter 4 6 Remove the presser foot 5 7 Remove the neeedle plate 6 8 Remove the feed 9 Tilt back the machine head Adjust the rotary hook b...

Page 25: ...rotary hook tip 4 1 Loosen screws A B C and D 2 Move the rotary hook base 5 to the left hole or right so that the clearance between the needle 3 and the rotary hook tip 4 is 1 3 mm 3 Tighten screw D...

Page 26: ...threaded If it is incorrect thread the thread correctly Is the rotary hook properly lubricated If the oil level is below the lower reference line in the oil sight glass add more oil Is dust or thread...

Page 27: ...ases reduce the operating speed be selecting a motor pulley that is one size smaller 5 Poor threas tightening Is the machine properly threaded If it is incorrect thread the thread correctly Is the thr...

Page 28: ...26 TEXI Twin MS operation manual Notes...

Page 29: ...27 TEXI Twin MS operation manual Notes...

Page 30: ...ska 54 62 080 Tarnowo Podg rne Poland We declare that the following product High speed two needle lockstitch sewing machine model Twin MS ZJ8450A With this declaration relates complies with following...

Page 31: ...TEXI Twin MS operation manual...

Page 32: ...TEXI Twin MS operation manual Dealer...

Reviews: