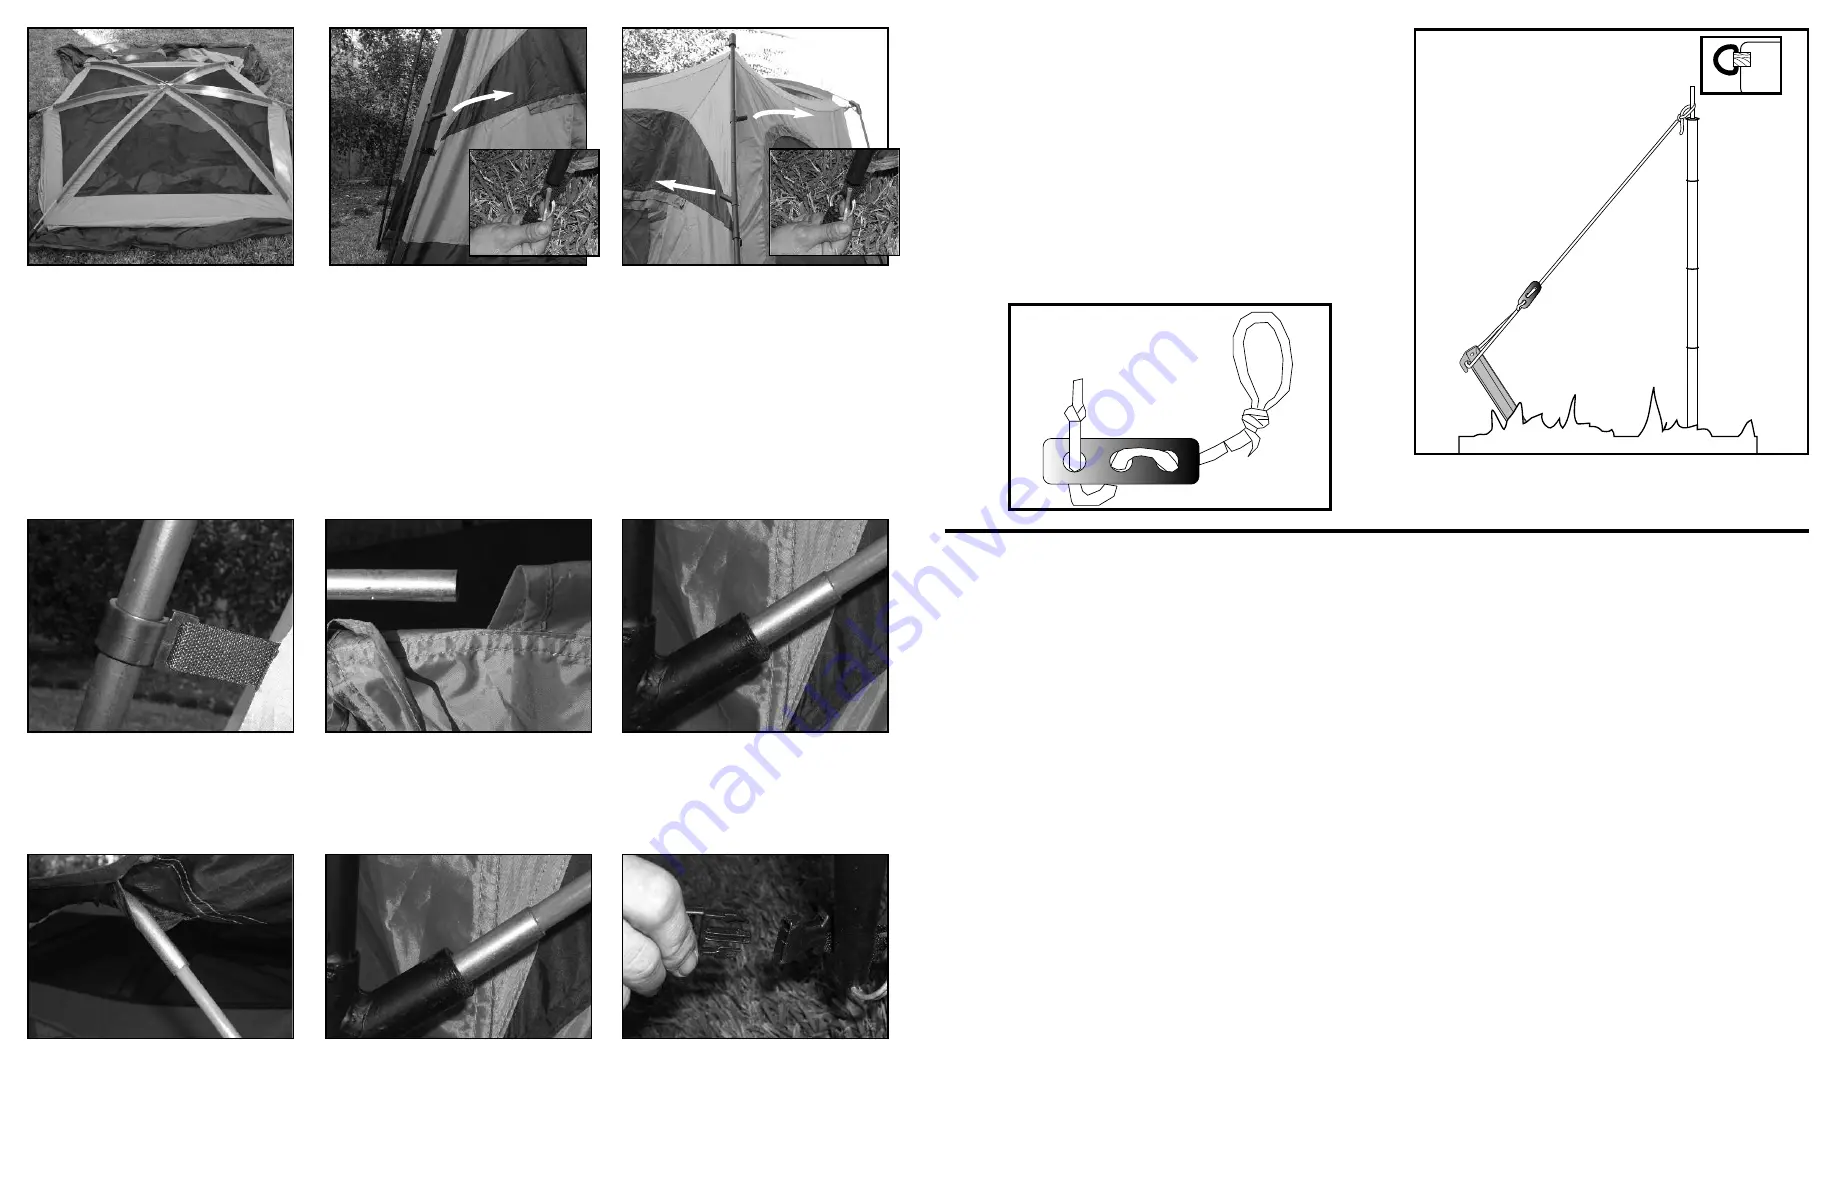
GUY ROPE ASSEMBLY INSTRUCTIONS
STEP 1 Tie a loop with a knot to fit over the pin on the
top of the pole system or tie the rope to a “D”
ring, depending on which product you have.
STEP 2 Tie the other end of the rope to the metal clew.
STEP 3 Loop the guy rope around the stake and inter-
twine the clew and guy rope. Make sure you
have tension on the guy rope after you are
done. If there is not enough tension, just slide
the clew up the guy rope towards the top of the
pole or “D” ring to tighten.
SOME ADDITIONAL INFORMATION:
Make sure you stake the tent (with the tents stakes included) in windy weather, or if you anticipate afternoon winds coming up while
you are away from your campsite. Stake one corner, then stake each consecutive corner in a clockwise rations. Make sure the tent
floor remains tight. After staking the corners return and stake any other stake loop positions if applicable. Always place your tent a
safe distance from your campfire - unstaked tents placed upwind of the fire can be blown into the fire. Tents placed downwind of the
fire are often showered with tiny sparks that can burn holes into the lightweight fabrics of your tent. The frame system on this tent
was designed to collapse during high winds. By collapsing in the wind the frame will not break, offering you years of continued use.
We recommend that you practice setting your tent at home before taking it into the wilderness.
WATERPROOFING YOUR TENT:
Texsport tents are made form coated water-repellent fabrics. However, the sewing process, necessary in all tent fabrication, can
cause water leakage where the sewing needles have perforated the fabric in the seams. Without treatment the tent will leak. Every
new tent needs to be seam sealed to make it water tight. We recommend using Texsport Spray Waterproofing/Seam Sealer which
may be found at your local outdoor outfitter or camping store.
WARNING:
Texsport tent fabrics are flame retardant treated per C.P.A.I.-84 specification. However, for your safety, we recommend that NO
OPEN FLAME BE USED IN OR NEAR YOUR TENT.
TENT STAKES:
All tents should be staked down. The stakes supplied with your tent are effective for most conditions; however, specialized stakes are
recommended in certain cases:
a.
Sand Stakes:
Long broad stakes designed to hold in loose sand.
b.
Steel Stakes:
Most effective in hard, rocky or frozen soil. These can rust and their sharp edges could damage the tent if
stored with the tent. In extremely hard soil a steel rod can be used to make the starter hole.
c.
Skewer Stakes: Lightweight, but less holding power that the standard stakes.
d.
Snow Stakes:
The most common method is to bury objects with a great deal of surface area in the snow i.e. branches,
aluminum pie plates, stuff sacks or tent bags filled with snow and buried: (this may be referred to as the
dead man method). Tents can also be secured to snow skis or poles which are stuck into the snow.
Rope
Lo
op
t
he
r
op
e
up
th
ro
ug
h
an
d
ba
ck
un
de
r
ag
ai
n
Pole
Ground
Stake
Loop
Tie Loop
Rope and
Adjuster
Plastic
Clew
“D” Ring
Tent
Stake
STEP 4 - This is what your tent
should look like so far.
NOTE: ATTACHING THE LEGS TO
THIS TENT IS EASIER WITH THE
HELP OF ANOTHER PERSON.
STEP 5 - REAR CORNER LEG
POLES: Insert the leg poles into
the top plastic corner joint. Angle
each of the side window awning
joints towards the front of the
tent. Insert the pin into the bot-
tom of each leg that is attached
to the tent skin.
STEP 6 - FRONT CORNER LEG
POLES: Insert the leg poles into
the top plastic corner joints. the
front leg poles have two angled
joints. The lower is for the side
window awning joint. The top is
for the front fly awning joint.
Insert the pin into the bottom of
each leg that is attached to the
tent skin.
STEP 7 - Insert the center plain
poles into plastic top joint. Pin
the bottoms and now attach all
speed clips to the tent onto the
black leg poles.
STEP 10 - For the fly assembly,
spread fly out and find the
sleeve for the awning. Push fly
awning pole through. Flip the fly
so the pole in underneath.
STEP 11 - Insert awning poles
into the front leg joints on both
sides.
STEP 12 - Snap fly buckles
together at the bottom of the
tent. to secure fly. Once you have
your tent assembled and you are
sure where you want to keep it,
stake it down.
STEP 8 - To assemble the side
window awnings, you must push
through the thinner fiberglass
poles through the sleeves.
STEP 9 - Insert window poles
into the back leg joint and front
lower leg joint. Do this to the
other window awning.


