background image

EK1230L and EK1230CL Crimping Tools

Greenlee / A Textron Company

4455 Boeing Dr. • Rockford, IL 61109-2988 USA • 815-397-7070

7

Operation

 (cont’d)

Procedure

  1.  Clean the die seat area.
  2.  Install the proper size and type of crimping dies.
  3.  Press the release button on the C-head and slide 

one of the die halves into the jaw. Release the 

button and slide the die half until the retainer snaps 

and locks the die into place.

  4.  Press the release button on the ram body (located  

in the cutout) and slide the other die half in. Release 

the button and slide the die half until the retainer 

snaps and locks the die into place.

 5. Follow the connector manufacturer’s instructions for  

appropriate cable strip length and surface  preparation.

  6.  Insert cable fully into connector and center the con-

nector between the dies.

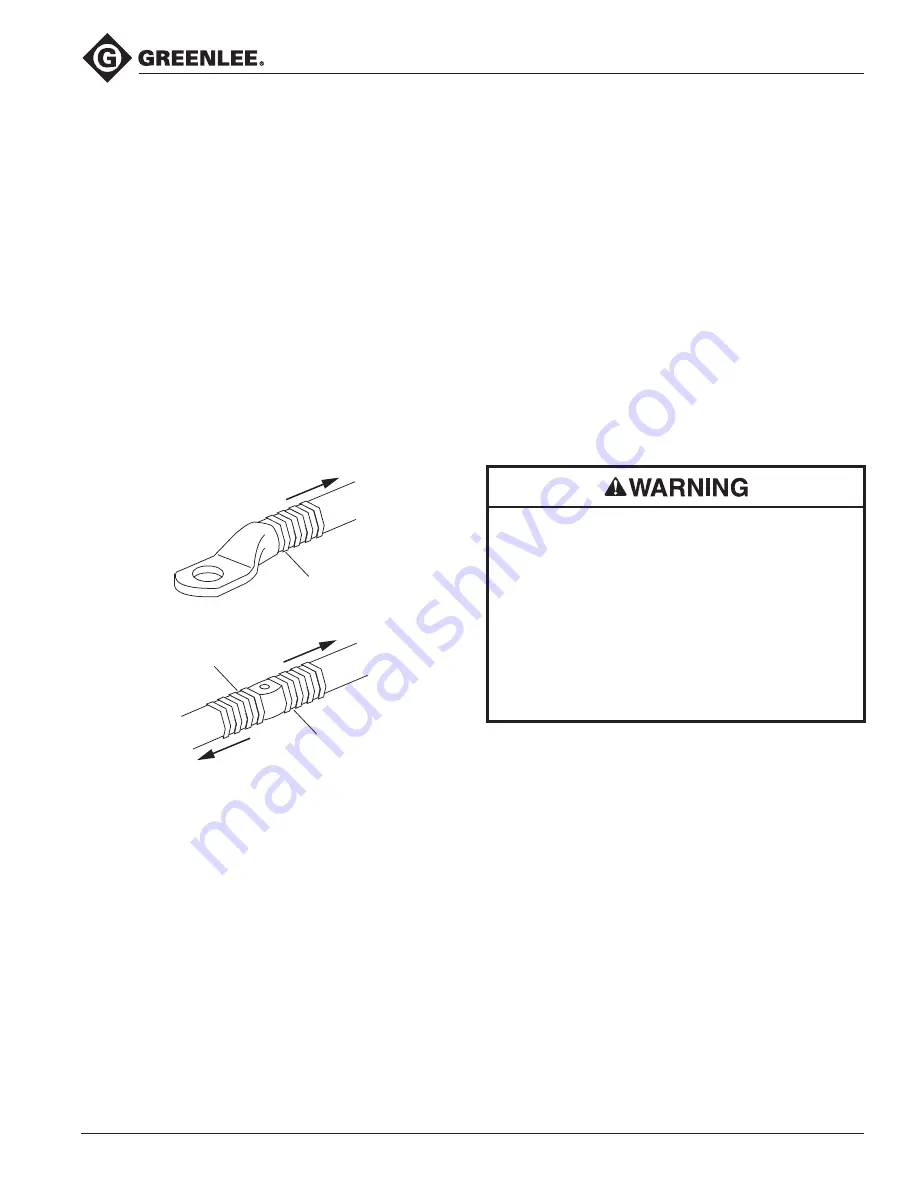
CRIMPING DIRECTION

1ST COMPRESSION

CRIMPING DIRECTION

SIDE A

CRIMPING DIRECTION

SIDE B

1ST COMPRESSION

SIDE A

1ST COMPRESSION

SIDE B

  7.  Using the sequence illustrated here, press the 

trigger to advance the dies. Continue to crimp until 

the pressure relief valve activates.

Note:  Pressure relief occurs at approximately  

106 kN (12 tons) and is indicated by an audible “pop.”

 8. After achieving pressure relief, the ram automatically 

returns to the start position and the dies retract.

  9.  To stop the ram from returning fully, activate the 

trigger for a brief moment. This activation will close 

the retraction valve and stop the retraction motion.

10.  When using KC12-type dies, complete the number 

of crimps listed on the “Connector Selection” chart 

in this manual. For other dies, complete the number 

of crimps specified by the manufacturer.

11.  Remove the connector from the crimping tool.

Note:  After completing the last crimp on an aluminum 

connector, wipe off the excess oxide inhibitor.

An incomplete crimp can cause a fire.
•  Use proper die, connector, and cable combina-

tions. Improper combinations can result in an 

incomplete crimp.

•  The relief valve sounds and the ram automatically 

retracts to indicate a completed crimp. If you do 

not hear the sound of the relieve valve or the ram 

does not automatically retract, the crimp is not 

complete.

Failure to observe these warnings could result in 

severe injury or death.

Summary of Contents for EK1230L

Page 1: ...CL Battery powered Crimping Tools 52047657 REV 5 2016 Greenlee Textron Inc 7 16 Read and understand all of the instructions and safety information in this manual before operating or servicing this tool Register this product at www greenlee com ...

Page 2: ... cable The EK1230CL has a PVC covered crimping head This tool has a retraction stop feature which allows the operator to stop the retraction motion of the ram to shorten cycle time This tool is protected by U S Patent No 6 206 663 6 276 186 6 401 515 and 6 718 870 Safety Safety is essential in the use and maintenance of Greenlee tools and equipment This manual and any markings on the tool provide ...

Page 3: ...ng this unit on or near energized electrical lines use proper personal protective equipment Failure to observe this warning could result in severe injury or death Wear eye protection when operating or servicing this tool Failure to wear eye protection could result in serious eye injury from flying debris or hydraulic oil Skin injection hazard Do not use hands to check for oil leaks Oil under press...

Page 4: ... thorough drying when electrical components are soaked Use this tool for the manufacturer s intended purpose only Failure to observe these precautions may result in injury or property damage Do not allow anything to contact the battery terminals Do not immerse the batteries in liquid Liquid may create a short circuit and damage the battery If batteries are immersed contact your service center for ...

Page 5: ...2 F 15 C to 50 C Crimping Capacities Crimping Range 8 AWG to 750 kcmil Battery Charger Read the instructions supplied with the battery charger EK1230L and EK1230CL 1 LED Work Light white 2 Crimping Head 3 Die Release Buttons 4 Lanyard Ring 5 Housing 6 Retract Button 7 LED Indictor red 8 Battery 9 Trigger 9 8 2 3 4 7 6 5 1 52047087 120 VAC corded adapter 52047088 230 VAC corded adapter 52049189 18 ...

Page 6: ...ough drying when electrical components are soaked Use this tool for the manufacturer s intended purpose only Failure to observe these precautions may result in injury or property damage Charging the Battery Read the instructions supplied with the battery charger LED Work Light white This LED automatically turns on when the trigger is pulled It remains on for 10 seconds after the trigger is release...

Page 7: ...ce the dies Continue to crimp until the pressure relief valve activates Note Pressure relief occurs at approximately 106 kN 12 tons and is indicated by an audible pop 8 After achieving pressure relief the ram automatically returns to the start position and the dies retract 9 To stop the ram from returning fully activate the trigger for a brief moment This activation will close the retraction valve...

Page 8: ...ONNECTOR TYPE Copper Splices Copper Lugs 8 to 1 0 AWG 1 crimp 2 0 AWG to 350 kcmil 2 crimps 400 to 750 kcmil 3 crimps NUMBER OF CRIMPS ANDERSON VACS VACL BLACKBURN ASP ATL BURNDY YS A YA A YA ATN ILSCO AS ASN ACL ACN 2ACL 2ACN ALNS ALNN ALND PANDUIT SA LAA LAB T B 60501 to 60578 60101 to 60176 60230 to 60278 PENN UNION PIK BLUA CONNECTOR TYPE Dual rated Aluminum Splices Dual rated Aluminum Lugs 95...

Page 9: ... an authorized service center Daily Before use 1 Inspect the tool for wear or damage such as cracks gouges or chips 2 Inspect the tool for damage or leaks 3 Inspect the rotation of the head assembly Fully retract the ram The head should rotate no more than 360 If damage is detected send the tool to a Greenlee Authorized Service Center for inspection After use 1 Use a damp cloth and mild detergent ...

Page 10: ... warm oil Store tool in warm area Dies stop during operation Oil level low Return tool to a Greenlee Authorized Service Center Air in hydraulic system Pull trigger and hold retract button simultaneously Hold for approximately 10 seconds LED glows for 20 seconds Battery charge low Charge or replace battery Tool loses oil Damaged internal seal Return tool to a Greenlee Authorized Service Center Note...

Reviews: