background image

GASOLINE UTILITY VEHICLES

Page 19

Owner’s Manual and Service Guide

Read all of manual to become thoroughly familiar with this vehicle. Pay particular attention to all Notes, Cautions and Warnings

AIR INTAKE AND COOLING FINS

To prevent possible burns,
engine parts should be kept
clean to reduce risk of over-

heating and ignition of accumulated debris.

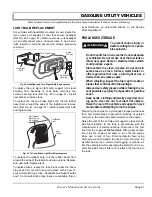
Every 20 hours, check for a build up of debris in the air
intake and cooling fins. Blow or brush out debris from
these areas (Ref Fig. 37 on page 19).   

SPARK PLUGS

Tool List

Qty. Required

Spark plug wrench, 13/16" .......................................... 1

Plug gauge, wire type ................................................. 1

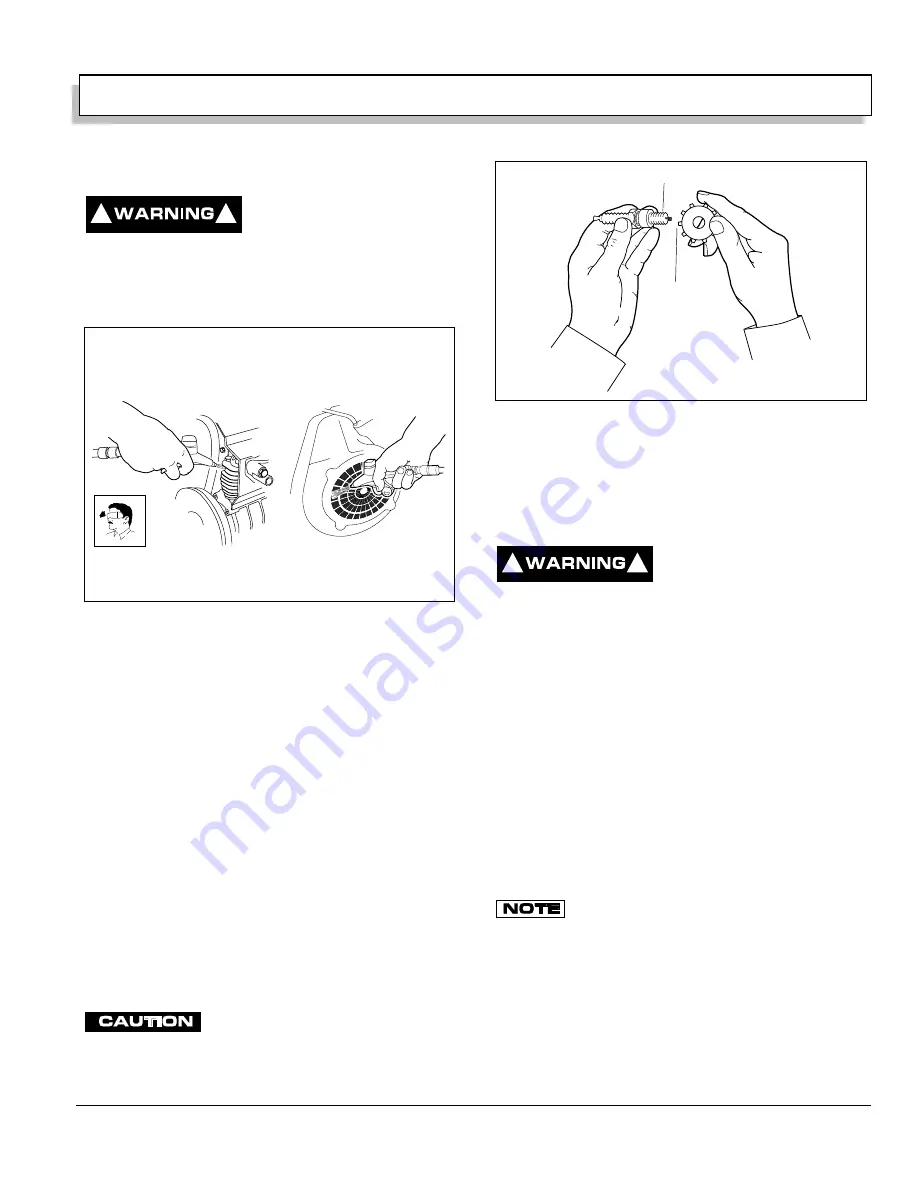
Using a 13/16" spark plug wrench, remove the spark
plugs at 250-300 hours or annually and inspect. Clean
and gap to .028-.030" (.71-.76 mm). If a plug has been
burned beyond .035" (.89 mm), it should be replaced
(Ref Fig. 38 on page 19).

Fouled spark plugs are indicated by a wet, black appear-
ance. This could be caused by a dirty air filter element or
other restrictions in the air intake system. Incorrectly
adjusted valves, spark plug wires which are in poor con-
dition or poor quality fuel could also contribute to the
problem. All new spark plugs should be properly gapped
to .028-.030" (.71-.76 mm) (NGK P/N BPR5ES). 

Tighten to 18 ft. lbs. (25 Nm) torque. 

Use care not to overtighten the plug. Over-
tightening can cause damage to the alumi-

num cylinder head threads.  

DAILY BRAKE TEST

After the vehicle has been put into service, it is recom-
mended that the brakes be checked daily by performing
the following test:

To prevent severe injury or
death resulting from operat-
ing a vehicle with improper-

ly operating brake system, the braking system must
be properly maintained. All driving brake tests must
be done in a safe location with regard for the safety of
all personnel.

Determine the braking performance of the vehicle by
latching the parking brake at a common point on a flat,
dry, clean paved surface while traveling at maximum
speed. Observe the vehicle stopping location. If the vehi-
cle stops in a significantly greater distance than normal
or pulls to one side, it should be tested again. If the vehi-
cle fails the second test, it should immediately be
removed from service. The vehicle needs to be inspected
by a qualified mechanic.

TIRES

Standard tires for this vehicle are uni-directional
and should never be moved from one side of

vehicle to the other.

This vehicle comes standard with uni-directional tires.
Left side tires should always remain on the left side of the
vehicle. Right side tires should always remain on the
right side of the vehicle. Uni-directional tires have an
arrow on the sidewall indicating direction of rotation when
moving forward. Tire condition should be inspected and
inflation pressures checked per the Periodic Service

Fig. 37  Cleaning Air Intake and Cooling Fins

!

!

Air Intake

Cooling Fins

Fig. 38  Gap Spark Plugs

.028" - .030"

(.71 - .76 mm)

Gap

Spark Plug

!

!

Summary of Contents for Jacobsen 3500

Page 1: ...GASOLINE POWERED UTILITY VEHICLE ISSUED APRIL 2005 OWNER S MANUAL AND SERVICE GUIDE 28835 G01...

Page 2: ...and understand all labels located on the vehicle For any questions on any of the information contact a represen tative for clarification Always replace any damaged or missing labels On steep hills it...

Page 3: ...bject to change without notice Jacobsen Turf Commercial and Specialty Equipment is not liable for errors in this manual or for incidental or consequential damages that result from the use of the mater...

Page 4: ...oid the warranty Tampering with or adjusting the governor to permit vehicle to operate at above factory specifications will void the vehicle warranty When servicing engines all adjustments and replace...

Page 5: ...Page iii Owner s Manual and Service Guide A fully charged battery will not freeze in winter temperatures unless the temperature falls below 75 F 60 C...

Page 6: ...Page iv NOTES Owner s Manual and Service Guide...

Page 7: ...ig 7 Never Operate Winch with Less Than Five Turns Around Drum 6 Fig 8 Do Not Hook Cable to Itself 6 Fig 9 Use a Nylon Sling and Install a Damper when Winching 6 Fig 10 Do Not Pull at Angle 7 TOWING A...

Page 8: ...y Chart 16 Fig 27 Cleaning Top of Engine 16 Fig 28 Remove Oil Filter 16 Fig 29 Clean the Oil Filter 17 Fig 30 Blow Out Oil Filter 17 Fig 31 Add Engine Oil 17 AIR CLEANER INSPECTION REPLACEMENT 17 Clea...

Page 9: ...TORQUE SPECIFICATIONS 23 Fig 42 Torque Specifications 23 PERIODIC SERVICE SCHEDULE 23 Fig 43 Periodic Service Schedule 23 GENERAL SPECIFICATIONS 25 Fig 44 Vehicle Dimensions 27 Fig 45 Vehicle Turning...

Page 10: ...Page vi Owner s Manual and Service Guide TABLE OF CONTENTS...

Page 11: ...SES AND IN ACCORDANCE WITH APPLICABLE STATE REQUIREMENTS This restriction is important to the SAFE USE AND OPERATION of the product On behalf of E Z GO I am directing that E Z GO Branch personnel Dist...

Page 12: ...e environment Additionally speed should be further moderated by the environmental conditions terrain and common sense GENERAL OPERATION Always Use the vehicle in a responsible manner and maintain the...

Page 13: ...ea that is free of both vehicular and pedestrian traffic Replace damaged or missing warning caution or information labels Keep complete records of the maintenance history of the vehicle The manufactur...

Page 14: ...Owner s Manual and Service Guide SAFETY INFORMATION Page x Notes...

Page 15: ...user shall not perform any modification or addition which affects capacity or safe operation or make any change not in accordance with the owner s manual without the manufacturer s prior written autho...

Page 16: ...l be presented in its entirety to all new operators and not condensed for those claiming previous experience 5 2 3 The user should include in the operators train ing program the following a instructio...

Page 17: ...and then enter squarely after the elevator car is properly leveled Once on the elevator neutralize the controls shut off power and set parking brakes It is advisable that all other personnel leave the...

Page 18: ...kage of fuel battery electrolyte or coolant Do not use open pans of fuel or flammable cleaning fluids for cleaning parts j Properly ventilate the work area k Handle LP gas cylinders with care Physical...

Page 19: ...a one hour drive may take many hours to walk out should you run out of fuel or be stranded by becoming stuck on unsuitable terrain Hydrogen gas is generated as a natural part of the lead acid battery...

Page 20: ...r s Manual before operating vehicle WARNING Do not drink or use drugs when operating vehicle WARNING Do not drive across slopes in excess of 14 WARNING Do not drive up slopes in excess of 14 WARNING O...

Page 21: ...bed as far forward as possible its center of gravity must not be higher than 5 12 cm above the bed floor and securely fastened down Failure to follow these instruc tions could cause personal injury d...

Page 22: ...ntal hazards such as steep slopes overhanging limbs etc Be aware of the danger of fire when the vehicle is operated over dry com bustible organic material OPTIONAL WINCH Read understand and follow all...

Page 23: ...erential The differential is the round bulge in the center of the axle It contains gears to trans mit power to the drive wheels When a vehicle turns the outside wheel must travel farther than the insi...

Page 24: ...h keep the entire area in view Never release the free spool clutch while the cable is under load Never work around the winch drum or the winch cable while it is under tension Unplug the winch switch b...

Page 25: ...n the discharge of the battery even though the engine is run ning and the generator operating Discharging the bat tery is known as deep cycling The battery is not a deep cycle model but is a starting...

Page 26: ...eck oil level Ref Fig 25 on page 16 If oil level is between ADD and FULL mark on dipstick a mechani cal problem exists within the engine and the vehicle must not be driven Contact a local distributor...

Page 27: ...the brake pedal to operate the service brake system Horn The horn is an electric powered unit that is activated by a push button located on the upper floorboard to the left of the brake pedal Ref Fig...

Page 28: ...g warnings must be observed Drive the vehicle only as fast as terrain and safety considerations allow Consider the terrain traffic conditions and the environmental factors which effect the terrain and...

Page 29: ...sition Move the direction selector to the direction desired Release the parking PARK brake by depressing and holding the ser vice brake pedal Slowly depress the accelerator pedal to start the engine w...

Page 30: ...ems which could produce a spark Always wear safety glasses while refueling to prevent possible eye injury from gasoline or gasoline vapor When refueling inspect the fuel cap for leaks or breaks that c...

Page 31: ...e batteries without adequate ventila tion Do not permit open flame or anyone to smoke in an area that is being used for charging batteries A concentration of 4 hydrogen gas or more is explosive Engine...

Page 32: ...the chocks in front and behind each wheel not being raised in order to stabilize the vehicle Lower the vehicle by reversing the lifting sequence ROUTINE MAINTENANCE This vehicle will give years of sat...

Page 33: ...e Oil Level Do not overfill engine Too much oil may cause smoking and or allow oil to enter the air intake system The oil should be checked with the engine warm The vehicle should be on a level surfac...

Page 34: ...th the old oil left in the engine The oil should be changed as part of spring mainte nance This will remove any moisture that has accumulated during storage To Change The Oil Be aware that engine flui...

Page 35: ...ine Too much oil may cause smoking and or allow oil to enter the air intake system Inspect O rings and replace if necessary Ref Fig 31 on page 17 Install the oil fill cap Run the vehicle for one or tw...

Page 36: ...cket 3 4 3 8 drive 1 The starter generator belt tension should be checked after the first 15 20 hours of operation and set to 75 80 lbs 34 36 kg A loose belt can cause audible vibration and squeal Tig...

Page 37: ...ads DAILY BRAKE TEST After the vehicle has been put into service it is recom mended that the brakes be checked daily by performing the following test To prevent severe injury or death resulting from o...

Page 38: ...re tubeless tires mounted on one piece rims When removing wheels with an impact wrench use only impact sockets Regular sockets are not designed for impact pressures exerted by power tools Generally th...

Page 39: ...ilated Do not smoke near the fuel tank or refuel near open flame or electrical items which could produce a spark Store vehicle in a clean dry area Do not store in same area as a stove furnace water he...

Page 40: ...hance the appearance and durability of the painted surfaces Corrosive materials can collect on the underbody of the vehicle These materials will accelerate corrosion of underbody parts It is recommend...

Page 41: ...55 75 80 108 110 149 170 230 280 380 460 624 680 922 BOLT SIZE Class 5 8 Grade 2 M4 M5 M6 M8 M10 M12 M14 1 2 2 3 4 6 10 14 20 27 35 47 55 76 4 Class 8 8 Grade 5 2 3 4 6 7 10 18 24 35 47 61 83 97 131...

Page 42: ...STEM Check for leaks at tank cap lines filters pump carburetor Check fuel lines for cracks deterioration THROTTLE GOVERNOR LINKAGE Check operation and governed speed SEMI ANNUAL 125 HOURS includes ite...

Page 43: ...Page 25 GENERAL SPECIFICATIONS Owner s Manual and Service Guide GENERAL SPECIFICATIONS...

Page 44: ...g Fuel Weight BRAKES Dual Rear Wheel Self Adjusting Mechanical Drum Brakes PARKING BRAKE Automatic Parking Brake Release with Self Compensating System FRONT SUSPENSION Leaf Springs with Hydraulic Shoc...

Page 45: ...r s Manual and Service Guide Fig 44 Vehicle Dimensions 32 in 81 cm 6 in 15 cm 110 in 280 cm 49 in 125 cm 77 in 196 cm Rear 38 in 96 cm Front 38 5 in 97 cm 76 in 193 cm 11 5 in 29 cm 18 in 46 cm 42 5 i...

Page 46: ...SPECIFICATIONS Fig 45 Vehicle Turning Clearance Diameter Fig 46 Vehicle Incline Specifications TURNING CLEARANCE DIA Approx 23 5 ft 7 2 m Ref Tur 7S Maximum Recommended Side Tilt 25 or 14 Max Maximum...

Page 47: ...Page 29 Owner s Manual and Service Guide VEHICLE WARRANTIES VEHICLE WARRANTIES...

Page 48: ...LE WARRANTIES DOMESTIC WARRANTY U S AND CANADA To obtain a copy of the limited warranty applicable to the vehicle call or write a local distributor authorized Branch or the Warranty Department with ve...

Page 49: ...TY OR FITNESS FOR A PARTICULAR PURPOSE TGTSP WILL FURTHER DISCLAIM ANY LIABILITY FOR INCIDENTAL OR CONSEQUENTIAL DAMAGES TO INCLUDE BUT NOT BE LIMITED TO PERSONAL INJURY OR PROPERTY DAMAGE ARISING FRO...

Page 50: ...Page 32 Owner s Manual and Service Guide VEHICLE WARRANTIES...

Page 51: ...GO Division of Textron Augusta Georgia herein E Z GO to which FUJI supplies the engine as soon as a problem exists The warranty repairs should be completed in a reasonable amount of time not to ex ce...

Page 52: ...any emission related part is found to be defective during the warranty period you should notify E Z GO Warranty Department at 1 800 241 5855 and you will be given the appropriate warranty service fac...

Page 53: ...mes recommended in the 2004 and later Owner s Manual and to retain proof that inspection and maintenance services are performed at the times when recommended FUJI will not deny a warranty claim solely...

Page 54: ...Page 36 Owner s Manual and Service Guide VEHICLE WARRANTIES CALIFORNIA 2004...

Page 55: ...ere fore should be considered potentially hazardous Use extreme care when working on any vehicle When diag nosing removing or replacing any components that are not operating correctly take time to con...

Page 56: ...nications Department Jacobsen Turf Commercial and Specialty Equipment 1451 Marvin Griffin Road Augusta Georgia USA 30906 3852 TO CONTACT US North America Technical Assistance Warranty Phone 1 800 774...

Reviews: