LYCOMING OPERATOR’S MANUAL
SECTION 5
O-360 AND ASSOCIATED MODELS
MAINTENANCE PROCEDURES
SECTION 5
MAINTENANCE PROCEDURES
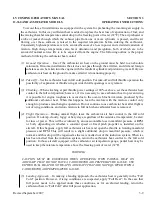
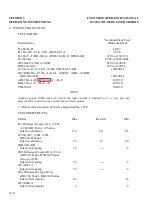
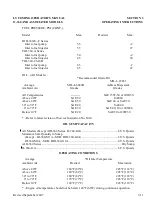
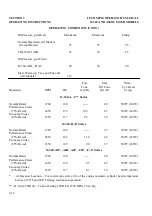
The procedures described in this section are provided to guide and instruct personnel in performing such
maintenance operations that may be required in conjunction with the periodic inspections listed in the
preceding section. No attempt is made to include repair and replacement operations that will be found in the
applicable Lycoming Overhaul Manual.
1. IGNITION AND ELECTRICAL SYSTEM.
a. Ignition Harness and Wire Replacement –
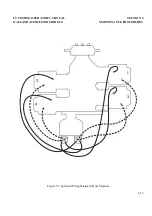
In the event that an ignition harness or an individual lead is
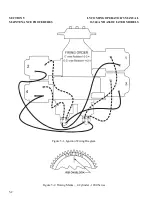
to be replaced, consult the wiring diagram to be sure harness is correctly installed. Marklocation of
clamps and clips to be certain the replacement is clamped at correct locations.
b. Timing Magnetos to Engine.
(1) Remove a sparkplug from No. 1 cylinder and place a thumb over the sparkplug hole. Rotate the
crankshaft in direction of normal rotation until the compression stroke is reached, this is indicated
by a positive pressure inside the cylinder tending to push the thumb off the spark plug hole.
Continue rotating the crankshaft until the advance timing markon the front face of the starter ring
gear is in alignment with the sm
all hole located at the two ocloc
kposition on the front face of
the starter housing. (Ring gear may be marked at 20°and 25°. Consult specifications for correct
timing markof your installation.) At this point, the engine is ready for assembly of the magnetos.
(2)
Single Magneto –
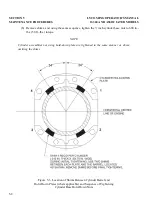
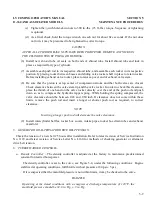
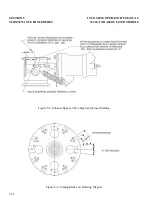
Remove the inspection plugs from both magnetos and turn the drive shaft in
direction of normal rotation until (-20 and -200 series) the first painted chamfered tooth on the
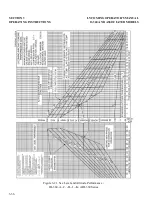
distributor gear is aligned in the center of the inspection window;(-1200 series) the applicable
timing mark on the distributor gear is approximately aligned with the mark on the distributor
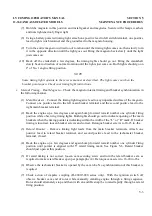
block. See Figure 5-2. Being sure the gear does not move from this position, install gaskets and
magnetos on the engine. Note that an adapter is used with impulse coupling magneto. Secure
with (clamps on -1200 series) washers and nuts;tighten only finger tight.
(3) Using a battery powered timing light, attach the positive lead to a suitable terminal connected to
the switch terminal of the magneto and the negative lead to any unpainted portion of the engine.
Rotate the magneto in its mounting flange to a point where the light comes on, then slowly turn it
in the opposite direction until the light goes out. Bring the magneto backslowly until the light
just comes on. Repeat this with the second magneto.
(4) Back off the crankshaft a few degrees, the timing lights should go out. Bring the crankshaft
slowly back in direction of normal rotation until the timing mark and the hole in the starter
housing are in alignment. At this point, both lights should go on simultaneously. Tighten nuts to
specified torque.
(5)
Dual Magnetos –
Remove the timing window plug from the most convenient side of the housing
and the plug from the rotor viewing location in the center of the housing.
(6) Turn the rotating magnet drive shaft in direction of normal rotation until the painted tooth of the
distributor gear is center in the timing hole. Observe that at this time the built in pointer just
ahead of the rotor viewing window aligns with either the L or R (depending on rotation).
5-1

