background image

25

1. Place the seat belt across your lap as

low as possible without twisting the

belt  making  sure  the  shoulder  strap

is  below  the  neck  and  across  the

chest.

2. Push  the  latch-plate  into  the  buckle

slot  until  it  “clicks”  and  latches

securely.  The  belt  will  retract  when

the buckle is released. 

Occupant Side Restraints

In addition to the seat belts, there are left-

and  right-side  restraints  to  restrict  arms

or legs from extending outside the vehi-

cle.  The  restraints  should  always  be

secured when the vehicle is moving.
To  secure  the  restraint,  connect  the

restraint buckle to the receiving latch on

the  front  ROPS  tube.  To  release  the

restraint, squeeze the locking tabs of the

restraint buckle.

PK013A

Tailgate Latch

PK022

1. To open the tailgate, pivot the latch

levers outward.

2. To close the tailgate, lift up and push

forward  firmly;  then  pivot  the  latch

levers inward

Cargo Box Latch Handles

PK023

1. To  raise  the  cargo  box,  pivot  the

latch  forward;  then  raise  the  cargo

box.

2. To lower the cargo box, push down

firmly  on  the  front  of  the  box.  The

box  will  automatically  lock  into

position.

Speedometer/LCD 

(Digital)

WT103D

1. Left  Button  -  Shifts  top  display

through  speedometer,  RPM,  and

clock.

! WARNING

Only appropriate-sized passengers
may ride in this vehicle. Passengers
must be able to place both feet flat on
the floor while keeping their back
against the back of the seat and hold-
ing on to the hand holds.

! WARNING

Falling outside a moving vehicle could
result in serious injury or death.
Always fasten your seat belt securely
and ensure the passenger seat belt is
properly and securely fastened prior
to operating or riding in this vehicle.

Summary of Contents for PROWLER 500 2018

Page 1: ......

Page 2: ...EE ROV TRAINING Free training is available for Recreation Off Highway Vehicles ROV operators and passengers from Recreational Off Highway Vehicle Association ROHVA The manufacturer recommends that you complete this course before you first use your new ROV This web based course takes approximately two hours to complete and presents you with a certificate of accomplishment as soon as you complete th...

Page 3: ...le service Be sure as the owner operator of this vehicle to become thoroughly familiar with its basic opera tion maintenance and storage proce dures Read and understand the entire Operator s Manual before operating this vehicle to ensure safe and proper use Always operate the vehicle within your level of skill and current terrain condi tions Division II of this manual covers opera tor related main...

Page 4: ...intenance Schedule 33 Liquid Cooling System 34 Shock Absorbers 34 General Lubrication 35 Hydraulic Brake 36 Gas Hoses 37 Protective Rubber Boots 37 Battery 38 Spark Plug 41 Air Filter Housing Drain 41 Draining V Belt Cover 42 Tires 43 Wheels 43 Muffler Spark Arrester 43 Light Bulb Replacement 44 Checking Adjusting Headlight Aim 45 Fuses 46 Electrical Output Terminals 46 Storage Compartments Tools ...

Page 5: ... you feel the vehicle may tip over Always use proper procedures if you stall or roll backward when climbing a hill To avoid stalling maintain a steady speed when climbing a hill If you stall or roll backwards follow the special procedure for braking described in this manual Always check for obstacles before operating in a new area Never attempt to operate over large obsta cles such as large rocks ...

Page 6: ...ng with other vehicles Never operate this vehicle without an approved motorcycle helmet eye protection boots gloves long pants and a long sleeved shirt or jacket Never consume alcohol or drugs before or while operating this vehi cle Never operate this vehicle at exces sive speeds Go at a speed which is proper for the terrain visibility con ditions and your experience Never attempt to do wheelies j...

Page 7: ... if not avoided could result in death or serious injury 5 Warning Labels Pour commander des Étiquettes de Mise en Garde gratuites voyez votre concessionnaire agréé pour le numéro de pièce 1436 444 PK015B 4411 964 A 4411 883 B 4411 965 C 3411 970 D ...

Page 8: ... WARNING Indicates a hazardous situation which if not avoided could result in death or serious injury 6 Warning Labels TXR003B 4411 961 A 4411 960 B 4411 963 C 4411 962 D ...

Page 9: ...8 Headlight Switch 9 Shift Lever 10 Headlights 11 Passenger Side Restraint Latch 12 Operator s Manual Location 13 Passenger Seat Belt 14 Passenger Side Restraints 15 Gas Tank Cap 16 Outboard Passenger Hand Hold 17 Battery 18 Under Hood Storage Compartment 19 Fuses 20 Cargo Box Latch Handle 21 Driver Seat Belt 22 Tilt Steering Lever 23 Tool Kit 24 Driver Side Restraint 25 Driver Side Restraint Latc...

Page 10: ...ous accident HOW TO AVOID THE HAZARD Only people 16 years of age or older with a valid driver s license should operate this vehicle WARNING POTENTIAL HAZARD Operating or riding in the vehicle without wearing a properly secured seat belt WHAT CAN HAPPEN Serious injury or death Occupants can strike objects in the passenger compart ment fall out of the vehicle during maneuvers or be crushed or otherw...

Page 11: ...n approved helmet that fits properly You should also wear Eye protection goggles or face shield Gloves Boots Long sleeved shirt or jacket Long pants WARNING POTENTIAL HAZARD Operating this vehicle after or while consuming alcohol or drugs WHAT CAN HAPPEN Could seriously affect your judgment Could cause you to react more slowly Could affect your balance and perception Could result in an accident HO...

Page 12: ...your body inside the passenger compartment during operation WHAT CAN HAPPEN Serious injury or death Body parts could strike objects outside of vehicle or be crushed in the event of a rollover or accident HOW TO AVOID THE HAZARD Do not place your head arms hands legs or feet outside of the passenger com partment during operation Stay seated with your seat belt and helmet on and occupant side restra...

Page 13: ...ion and maintenance procedures and schedules described in this Operator s Manual WARNING POTENTIAL HAZARD Failure to use extra care when operating this vehicle on unfamiliar terrain WHAT CAN HAPPEN You can come upon hidden rocks bumps or holes without enough time to react Could result in the vehicle overturning or going out of control HOW TO AVOID THE HAZARD Go slowly and be extra careful when ope...

Page 14: ...ills WHAT CAN HAPPEN This vehicle can overturn more easily on steep hills than on level surfaces or small hills HOW TO AVOID THE HAZARD Never operate the vehicle on hills too steep for the vehicle or for your abilities Practice on smaller hills before attempting larger hills WARNING POTENTIAL HAZARD Operating with the ROPS removed WHAT CAN HAPPEN Could lead to serious injury or death HOW TO AVOID ...

Page 15: ... could be on the other side of the hill WARNING POTENTIAL HAZARD Crossing hills or turning on hills WHAT CAN HAPPEN Could cause loss of control or cause the vehicle to overturn HOW TO AVOID THE HAZARD Avoid crossing the side of a hill or turning on a hill whenever possible Never attempt to turn the vehicle around on any hill If you must cross the side of a hill drive slowly and stop or turn downhi...

Page 16: ...you When it is safe to proceed go slowly WARNING POTENTIAL HAZARD Skidding or sliding WHAT CAN HAPPEN You could lose control of the vehicle You could also regain traction unexpectedly which may cause the vehicle to over turn HOW TO AVOID THE HAZARD Learn to safely control skidding or sliding by practicing at slow speeds and on level smooth terrain On extremely slippery surfaces such as ice go slow...

Page 17: ... accident HOW TO AVOID THE HAZARD Always use the size and type tires specified in this Operator s Manual for this vehi cle Always maintain proper tire pressure as described in this Operator s Manual WARNING POTENTIAL HAZARD Operating this vehicle with improper modifications WHAT CAN HAPPEN Improper installation of accessories or modification of the vehicle may cause changes in handling which could...

Page 18: ... vehicle due to physical size WHAT CAN HAPPEN Serious injury or death Occupant could strike objects in the passenger compart ment fall out of the vehicle during maneuvers or be ejected and crushed in the event of an accident HOW TO AVOID THE HAZARD Always make sure a passenger can sit with both feet flat on the floor and their back against the seat while being able to reach any provided hand holds...

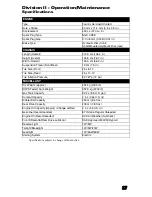
Page 19: ...nt Rear 19 cm 7 5 in Tire Size Front 25 x 8 12 Tire Size Rear 25 x 10 12 Tire Inflation Pressure 82 7 kPa 12 psi MISCELLANY Dry Weight Approx 497 kg 1095 lb ROPS Tested Curb Weight 997 9 kg 2200 lb Gas Tank Capacity 32 2 L 8 5 U S gal Coolant Capacity 2 5 L 2 64 U S qt Differential Capacity 250 ml 8 5 fl oz Rear Drive Capacity 230 ml 7 8 fl oz Engine Oil Capacity Approx Change w filter 2 4 L 2 5 U...

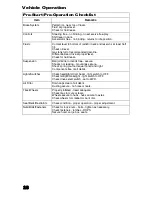
Page 20: ...rod ends free secure Shocks not leaking mountings secure Shock spring pre load equal on left and right Components free of all debris Lights Switches Check headlight HI LO beam light switch to OFF Check taillight brakelight light switch to OFF Check drive select switch set to 2WD Air Filter Drain caps clear of all debris Ducting secure no holes or tears Tires Wheels Properly inflated tread adequate...

Page 21: ...omatic and shifts as a function of engine RPM and vehicle loading PK059 1 To select reverse gear from park move the shift lever forward one position until the letter R is dis played on the LCD gauge 2 To select neutral from reverse move the shift lever forward one position until the letter N is displayed on the LCD gauge 3 To select high range from neutral move the shift lever forward one position...

Page 22: ...t into park 2 Turn off the ignition 3 If you have to park on a hill block the wheels on the downhill side Basic Turns Steering effort is at its lowest in two wheel drive 2WD Greater effort is needed when in four wheel drive 4WD The greatest effort is needed when in four wheel drive and the differential if equipped is locked Slow down before entering a turn The basic turning technique is to drive a...

Page 23: ...believe you can cross the obstacle safely select four wheel drive 4WD NOTE Selecting the LOCK posi tion on the differential lock control may be beneficial however steering effort will be increased 2 Approach the obstacle as close as possible to 90 to minimize vehicle tipping 3 Keep speed slow enough to maintain control but fast enough to maintain momentum 4 Use only enough power to cross the obsta...

Page 24: ...speed slow while maintaining momentum 3 Make sure you have a way out on the other side of the water 4 Once you ve cleared the water briefly apply the brakes to make sure they work NOTE Light pedal pressure or pumping the brakes for a short dis tance will aid in drying the brakes Crossing Roads It may be necessary to cross a road or highway If so note the following guide lines 1 Stop completely on ...

Page 25: ...when the transmission is not in neutral Depress and hold the brake pedal to engage starter when the transmis sion is not in neutral Shift Lever This vehicle has a dual range Constant Variable Transmission CVT with reverse and park PK059 Drive Select Switch PK019 This switch allows the operator to oper ate the vehicle in either two wheel drive rear wheels or four wheel drive all wheels as well as m...

Page 26: ...Press down on the pedal to increase engine RPM and vehicle speed release the pedal to decrease engine RPM and vehicle speed NOTE This vehicle is equipped with an RPM limiter that retards igni tion timing when maximum RPM is approached When the RPM limiter is activated it could be misinterpreted as a high speed misfire Seat Latches 1 To remove the seat raise the front of the seat and slide it forwa...

Page 27: ...22 1 To open the tailgate pivot the latch levers outward 2 To close the tailgate lift up and push forward firmly then pivot the latch levers inward Cargo Box Latch Handles PK023 1 To raise the cargo box pivot the latch forward then raise the cargo box 2 To lower the cargo box push down firmly on the front of the box The box will automatically lock into position Speedometer LCD Digital WT103D 1 Lef...

Page 28: ...set To reset the trip meter select the Trip Meter then press and hold the Middle Button until the trip meter display reads 0 NOTE The engine hour meter will not activate until engine speed exceeds 500 RPM NOTE An item can only be dis played in this position if it is not already being displayed in the top display To set the clock when the clock is in this position press and hold the Middle Button t...

Page 29: ...as soon as possible 9 Drive Select Indicator Displays 4WD when selected by the drive select switch 10 Seat Belt Reminder Indicator Each time the ignition switch is turned ON the indicator will illuminate until the driver s seat belt is fas tened WARNING The seat belt indicator does not indi cate that all seat belts are properly secured It is the operator s responsi bility to ensure all vehicle occ...

Page 30: ... injector Circuit High P0263 Cylinder 1 Fuel injector Balance Open P0264 Cylinder 2 Fuel injector Circuit Low SG P0265 Cylinder 2 Fuel injector Circuit High P0266 Cylinder 2 Fuel injector Balance Open P0336 Crankshaft Angle Sensor Synchroni zation P0337 Crankshaft Angle Sensor Circuit SG P0339 Crankshaft Angle Sensor Intermittent Erratic P0340 Camshaft Angle Sensor Synchroniza tion P0341 Camshaft ...

Page 31: ...d Capacity rating ever be exceeded Vehicle Load Capacity Total weight of operator passenger trailer tongue weight accessories cargo and storage compartments Tongue Weight Weight on trailer tongue Accessory Weight Winch gun scab bard brackets snow plow etc Rear Tongue and Cargo Weight Total weight on trailer tongue and cargo box Towing Capacity Total weight of trailer and all cargo in the trailer T...

Page 32: ...lable from your authorized dealer Ordinary rope is not recom mended because it can stretch under load WARNING Make sure that the load in the trailer is properly secured and will not shift while moving Also do not overload the trailer WARNING Never exceed any of the vehicle weight restrictions WARNING Driving this vehicle without extra cau tion when towing a trailer will be haz ardous Trailer towin...

Page 33: ...t necessary to add a gasoline anti freeze since ethanol will prevent the accumulation of moisture in the fuel sys tem Recommended Engine Transmission Oil The recommended oil to use is ACX All Weather synthetic engine oil which has been specifically formulated for use in this engine Although ACX All Weather synthetic engine oil is the only oil recom mended for use in this engine use of any API cert...

Page 34: ...e components to load aiding the engine transmission compo nent mating process and then unload allowing components to cool Although it is essential to place some stress on the engine components during break in care should be taken not to overload the engine too often Do not pull a trailer during the break in period When the engine starts allow it to warm up properly Idle the engine several min utes...

Page 35: ...es Every 100 miles Every 300 miles Every 500 miles Battery 38 I I Engine nuts and bolts I I Valve clearance I I Spark plug 41 I I 41 Replace every 4000 miles 6436 km or 18 months Liquid cooling system 34 I Inspect every time before operating Gas Hoses 29 I Inspect every time before operating Engine transmission oil and filter 35 R R Air filter 41 I I Gear lubricant front differential rear drive 35...

Page 36: ... Absorbers Each shock absorber should be visibly checked weekly for excessive fluid leak age some seal leakage may be observed but it does not indicate the shock is in need of replacement cracks or breaks in the lower case or a bent shock rod If any one of these conditions is detected replacement is necessary NOTE When the vehicle is oper ated in extremely cold weather 23 C 10 F or colder a small ...

Page 37: ... the oil filter wrench and a ratchet handle or a socket or box end wrench remove the old oil fil ter and dispose of properly Do not re use oil filter NOTE Clean up any excess oil after removing the filter 6 Apply oil to the new filter O ring and check to make sure it is posi tioned correctly then install the new oil filter Tighten securely 7 Install the engine drain plug and tighten it securely Po...

Page 38: ...ust be bled NOTE Take the vehicle to an authorized dealer for this service Brake Hoses Carefully inspect the hydraulic brake hoses for cracks or other damage If found take the vehicle to an authorized dealer to have the brake hoses replaced Brake Pads The clearance between the brake pads and brake discs is adjusted automatically as the brake pads wear The only mainte nance that is required is repl...

Page 39: ...wheels 3 Inspect the four ball joint boots for cracks tears or perforations 4 Check the ball joint for free play by grasping the steering knuckle and turning it from side to side and up and down 5 If boot damage is present or ball joint free play seems excessive con tact an authorized dealer for service Tie Rod Boots Inner and Outer Right and Left 1 Secure the vehicle on a support stand to elevate...

Page 40: ...e batteries 2 Clean the battery terminals with a solution of baking soda and water 3 Be sure the charger and battery are in a well ventilated area and ensure the battery charger cables will not contact any battery acid Be sure the charger is unplugged from the 110 volt electrical outlet 4 Connect the red terminal lead from the charger to the positive terminal of the battery then connect the black ...

Page 41: ...tor D illuminates If the bat tery becomes hot to the touch stop charging Resume after it has cooled 7 Once the battery has reached full charge unplug the charger from the 110 volt electrical outlet NOTE If after charging the bat tery does not perform to operator expectations bring the battery to an authorized dealer for further trouble shooting Jump Starting NOTE Jump starting a vehicle with a dea...

Page 42: ...the other clamp of the negative black jumper cable 4 to an unpainted metal surface A on the engine or frame well away from the dead battery and fuel system components 8 Stand well away from the dead bat tery and start the vehicle with the good battery Allow the vehicle to run for several minutes applying some charge to the dead battery 9 Start the vehicle with the dead bat tery and allow it to run...

Page 43: ...r head A used spark plug should be tightened 1 8 1 4 turn once the washer contacts the cylinder head Air Filter Housing Drain The air filter inside the air filter housing must be kept clean to provide good engine power and gas mileage If the vehicle is used under normal conditions service the filter at the intervals speci fied If operated in dusty wet or muddy conditions inspect and service the fi...

Page 44: ...s screw 15 Install the air filter cover and secure with the clamp Install the air filter cover and secure with the spring clips Install the seat and make sure it is securely latched Draining V Belt Cover NOTE If the vehicle has been driven through water the V belt cover must be drained of any water 1 Place the vehicle on a level surface 2 Remove the drain bolt from the cover located on the bottom ...

Page 45: ...s strongly rec ommended to carry a plug type repair kit and a tire pump along Wheels 1 Park the vehicle on level ground and engage the differential lock 2 Loosen the lug nuts on the wheel to be removed 3 Elevate the vehicle 4 Remove the lug nuts 5 Remove the wheel 6 Install the wheel and install the lug nuts 7 Install the wheel and tighten the wheel nuts in 20 ft lb increments to a final torque of...

Page 46: ...ss and discard the bulb PK062A 2 Connect the new headlight bulb to the wiring harness and insert into headlight assembly Turn clockwise to secure the bulb 3 Adjust the headlight see Checking Adjusting Headlight Aim in this sub section To replace the taillight brakelight or reverse light bulb use the following pro cedure 1 Disconnect the taillight brakelight connector 2 Remove the two nuts and cap ...

Page 47: ... headlights can be adjusted vertically The geometric center of the HIGH beam light zone is to be used for aiming 1 Position the vehicle on a level floor so the headlights are approximately 6 1 m 20 ft from an aiming surface wall or similar aiming surface 0748 733 NOTE There should be an average operating load on the vehicle when adjusting the headlight aim 2 Measure the distance from the floor to ...

Page 48: ... Tools A basic tool kit located in the glove box is provided with this vehicle Maintain the tool kit with the vehicle at all times NOTE There are a total of five storage compartments 1 To access the front storage compart ment lift up firmly on the front of the cover to remove To install align the tabs of the storage cover into the front panel slots PK084 2 To open the glove box if unlocked squeeze...

Page 49: ...Check that the latch plate locks securely in place in the buckle and releases when the button is pressed Wash off any dirt and make sure the retractors are free of debris Do not grease or oil the retractors Occupant Side Restraints Inspect the occupant side restraints for frayed edges cuts or separation of seams Wash off any dirt and make sure the latch straps lock securely into the receiver locat...

Page 50: ...y light oil to the plungers of the shock absorbers 7 Tighten all nuts bolts cap screws and screws Care must be taken that all calibrated nuts cap screws and bolts are tightened to specifications 8 Fill the cooling system to the bottom of the stand pipe in the radiator neck with properly mixed coolant 9 Disconnect the battery cables nega tive cable first then remove the bat tery clean the battery p...

Page 51: ... Con nect the battery cables making sure to connect the positive cable first 7 Check the entire brake systems fluid level pads etc all controls headlights taillights brakelights and headlight aim adjust or replace if necessary 8 Check the tire pressure Inflate to recommended pressure as necessary 9 Tighten all nuts bolts cap screws and screws making sure all cali brated nuts cap screws and bolts a...

Page 52: ...50 Maintenance Record DATE MILEAGE SERVICE PERFORMED NOTES ...

Page 53: ...51 Maintenance Record DATE MILEAGE SERVICE PERFORMED NOTES ...

Page 54: ...ive Driven Clutch Wear Parts Light Bulbs Spark Plug s Windshield Shock Absorber s Limited to one 1 year of normal riding conditions replace for defective or leaking shock corroded or pitted shaft peeling chrome NOTE Vehicles that are factory equipped with Fox Elka or JRI shocks and experience a shock failure of workmanship or material within the factory warranty period must not be tampered with On...

Page 55: ...the Limited Warranty in the event the selling dealer has ceased to do business you have moved or you are in a location away from your selling dealer warranty may be performed by any authorized dealer The authorized dealer will examine the vehicle or part to determine if in his opinion a warrantable condition exists If a warrantable condition appears to exist the dealer will repair or replace at ou...

Page 56: ...for 30 months 5000 kilometers 3107 miles or 500 hours whichever comes first COMPONENTS COVERED I For exhaust emissions emission related components include any engine parts related to the following systems Air induction system Fuel system Ignition system Exhaust gas recirculation systems II The following parts are also considered emission related components for exhaust emissions Aftertreatment devi...

Page 57: ...e is only available in the country in which the original retail purchase occurs to the original retail purchaser resident in that country or to a transferee resident in that country of the balance of the remaining warranty Address Change Ownership Change Warranty Transfer CHANGE OF ADDRESS OWNERSHIP WARRANTY TRANSFER TO Name ________________________________________ Address ________________________...

Page 58: ...Fold Back CHANGE OF ADDRESS OWNERSHIP TEXTRON OFF ROAD PRODUCT SERVICE AND WARRANTY DEPT P O BOX 810 THIEF RIVER FALLS MN 56701 Place Stamp Here ...

Page 59: ...laced ask the dealer to notify the manufacturer for correct registration information Record the Vehicle Identification Number and Engine Serial Number in the spaces provided to assist you in ordering parts from your authorized dealer or for reference in case this vehicle is stolen 1 KEY IDENTIFICATION NUMBER The key identification number is stamped on the key as shown in the illustration Record th...

Page 60: ...p n 2261 468 Vehicle Capacity 1 Operator 1 Passenger with seat belts 2017 Textron Specialized Vehicles a division of Textron Inc Trademarks of Textron Specialized Vehicles ...

Reviews: