background image


22

4. 

The month digit will be flashing. Use the 

+

 button to increase or 

MIN/MAX

 button to decrease the 

value. 

5. 

Press the 

SET

 button to enter day setting. 

6. 

The day digit will be flashing. Use the 

+

 button to increase or 

MIN/MAX

 button to decrease the value. 

Keep holding the button allows the value to advance faster. 

7. 

Press the 

SET 

button to enter the “

Relative air pressure reference value setting

”, or exit the setting 

mode by pressing the 

ALARM 

button or 

SUN

 button.  


Note: 

The corresponding weekday is displayed above the time in short form (from Monday to Sunday): 

MO / TU / 

WE / TH / FR / SA / SU


RELATIVE AIR PRESSURE REFERENCE VALUE SETTING 

Relative air pressure is referred as sea level’s pressure and has to be adjusted first to your local altitude.


Ask for the present atmospheric pressure of your home area (local weather service, www, optician, 
calibrated instruments in public buildings, airport). 
The default relative pressure value is 1013 hPa (29.92 inHg). This can be manually set to another value 
within the range of 960 – 1040 hPa (28.35 – 30.72 inHg) for a better reference.  


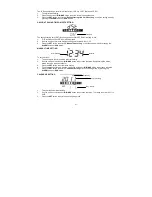
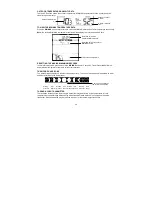
1. 

The current relative pressure value will start flashing 

2. 

Use the 

+

 button or 

MIN/MAX

 button to increase or decrease the value. Keep holding the button will 

allow the value to change faster. 

3. 

Press the 

SET

 button to exit the setting mode. 


LOCATION SETTING FOR SUNRISE/SUNSET TIME 

The weather station will automatically update the sunrise, sunset and sun duration time at 00:00, based on 
the city location, the date, time and DST settings.  
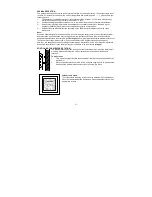
1. 

Press and hold the 

SUN

 button for 3 seconds to enter the

 Location setting mode

2. 

The short form of country name will start flashing. Use the 

+

 button or 

MIN/MAX

 button to select the 

country.  


Note:

 It can be chosen from among 26 European countries and 150 cities. Every country/city is displayed in 

short code. See the list at the beginning of this handbook for all the country/ city codes.  


3. 

With the desired country selected, press the 

SUN

 button to enter City setting mode.  

4. 

The City code will start flashing. Use the 

+

 button or 

MIN/MAX

 button to select the City. Keep holding 

the button allows the value to advance faster. 

flashing 

c

ountry 

c

ode


(flashing)


Summary of Contents for 35.1121.IT

Page 1: ...uture reference SCOPE OF SUPPLY Weather station basic unit Outdoor transmitter Instruction manual FIELD OF OPERATION AND ALL OF THE BENEFITS OF YOUR NEW WEATHER STATION AT A GLANCE 24 hour time displa...

Page 2: ...anged as soon as possible to prevent damage caused by a leaking battery Never use a combination of old and new batteries together or batteries of different types Wear chemical resistant protective glo...

Page 3: ...w battery icon appears above the outdoor humidity display of the weather station Note In the event of changing batteries in any of the units all units need to be reset by following the setting up proc...

Page 4: ...nd relative air pressure reference value To stop the alarm sound To exit alarm setting mode and country city setting mode To toggle between relative and absolute air pressure display button To increas...

Page 5: ...LCD contrast Daylight saving time DST ON OFF Manual time Calendar Relative air pressure reference value Press and hold the SET button for about 3 seconds to advance to the setting mode LCD CONTRAST SE...

Page 6: ...he Manual time setting or exit the setting mode by pressing the ALARM button or SUN button MANUAL TIME SETTING To set the clock 1 The hour digit in the time section will start flashing 2 Use the butto...

Page 7: ...nother value within the range of 960 1040 hPa 28 35 30 72 inHg for a better reference 1 The current relative pressure value will start flashing 2 Use the button or MIN MAX button to increase or decrea...

Page 8: ...ay ALARM SETTING To set the daily alarm 1 Press the ALARM button ALM and the alarm time appear in the display 2 Press and hold ALARM button The hour digits are flashing Set the hour with the or MAX MI...

Page 9: ...ccuracy level of about 75 due to the varying areas the weather station has been designed for use In areas that experience sudden changes in weather for example from sunny to rain the weather station w...

Page 10: ...expected to get worse from the present time 0h Note For accurate barometric pressure trends the weather station should operate at the same altitude for recordings i e it should not be moved from the g...

Page 11: ...ICONS The weather station displays 8 different moon phase icons The current moon phase is indicated with a bar segment according to the set calendar THERMO HYGRO TRANSMITTER The reception distance of...

Page 12: ...es may spring free from the contacts and force a false reset Should this happen accidentally then reset all units see Setting up above otherwise transmission problems may occur The transmission range...

Page 13: ...with a soft damp cloth Do not use solvents or scouring agents Protect from moisture Remove the batteries if you do not use the product for a lengthy period TROUBLESHOOTING Problems Solutions No indica...

Page 14: ...with 1 resolution Display if temperature is OF L display 19 if 20 and 96 if 95 Outdoor 1 to 99 with 1 resolution Display if outside temperature is OF L display 1 if 1 and 99 if 99 Data checking interv...

Reviews: