
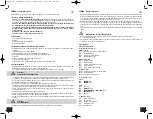

SPRING –
Wireless weather station
18
19
• Check the transmission of the signal from the outdoor transmitter to the base station (transmission
range of up to 60 m free field). Within ferro-concrete rooms (basements, superstructures), the received
signal is naturally weakened.
• If necessary choose another position for the outdoor transmitter and/or base station.
9. Care and maintenance
• Clean the instruments with a soft damp cloth. Do not use solvents or scouring agents.
• Remove the batteries and pull out the plug of the socket, if you do not use the products for a long period
of time.
• Keep the instruments in a dry place.
9.1 Battery replacement
• Change the batteries of the outdoor transmitter when the battery symbol appears on the display of the
outdoor values.
• Change the batteries of the base station when the battery symbol appears on the display of the indoor
values.
•
Please note:
When the batteries are changed, the contact between outdoor transmitter and base station
must be restored – so always insert new batteries into both units or start a manual outdoor transmitter
search.
10. Troubleshooting
Problems
Solution
No indication
Operation with mains plug:
on the weather station
➜
Connect the base station to mains adapter
➜
Backlight is activated permanently
➜
Control the power adapter
Operation with batteries:
➜
Ensure that the batteries polarity are correct
➜
Press any button to activate the backlight briefly
➜
Change the batteries
No reception of
➜
No outdoor transmitter is installed
the outdoor transmitter
➜
Check batteries of external transmitter
Display “---“
(do not use rechargeable batteries!)
➜
Restart the outdoor transmitter and the base station according to
the manual
➜
Start the outdoor transmitter search manually according to the
manual
➜
Choose another place for the outdoor transmitter and/or the base
station
➜
Reduce the distance between the outdoor transmitter and the base
station
➜
Check if there is any source of interference
Incorrect indication
➜
Change the batteries
11. Waste disposal
This product has been manufactured using high-grade materials and components which can be recycled
and reused.
Never dispose of empty batteries and rechargeable batteries in household waste. As a con-
sumer, you are legally required to take them to your retail store or to an appropriate collection
site depending on national or local regulations in order to protect the environment.
The symbols for the heavy metals contained are: Cd=cadmium, Hg=mercury, Pb=lead
SPRING –
Wireless weather station
7.4 Weather forecast symbols
• There are 6 different weather symbols (sunny, slightly cloudy, cloudy, rainy, stormy and snowfall).
• The weather forecast relates to a range of 12 hours and indicates only a general weather trend. For
example, if the current weather is cloudy and the rain symbol is displayed, it does not mean the product
is faulty because it is not raining. It simply means that the air pressure has dropped and the weather is
expected to get worse but not necessarily rainy.
• The sun symbol also appears at night if there is a starry night.
Important note!
• Please note that the forecast symbol will become more defined in the course of operation. The forecast
symbol is active right from the start, however, the reliability of the forecasts increases with the amount
of data collected. To begin with, the sensor must adapt initially to the reference level at the site. The fore-
cast symbol will become at its most reliable after about 30 days.
7.5 Setting of the outdoor temperature and indoor temperature alarm
• Press the
ALERTS
button in normal mode.
• HIGH and 60 °C (default) or the last adjusted upper temperature limit appear on the display.
• Press and hold the
ALERTS
button.
• The temperature display will be flashing .
• Press the
▲
or
▼
button to set the desired upper limit.
• Confirm with the
ALERTS
button.
• LOW and -40°C (default) or the last adjusted lower temperature limit appear on the display.
• The temperature display will be flashing.
• Press the
▲
or
▼
button to set the desired lower limit.
• Confirm with the
ALERTS
button.
• Set the upper and lower limit for the indoor temperature in the same way.
(Measuring range: 0°C…+50°C / +32°F…+122°F)
7.5.1 Activate and deactivate the outdoor and indoor temperature alarm
• To activate or deactivate the respective alarm functions, press the
ALERTS
button in normal mode.
• HIGH and the last adjusted upper temperature limit is indicated.
• Press the
▲
button to activate the alarm function.
• Press the
▼
button to deactivate the alarm function.
• The alarm symbol appears/disappears on the display above HIGH.
• Press the
ALERTS
button again to go to the next alarm function and to return to normal mode.
7.5.2 Case of alarm
• In the case of an alarm the corresponding symbol will be flashing and an alarm sound is activated.
• You can stop the alarm by pressing any button.
7.6 Display of the dew point
• Press the
HEAT/DEW
button, to show the current dewpoint temperature.
• On the display appears DEW-POINT and the temperature.
• The display automatically switches back to the current display of temperature and humidity.
•
This interdependency of temperature and relative humidity is expressed by means of the dew-point:
If the air is cooled continuously at constant absolute humidity, then the relative humidity will steadily
increase up to a maximum of 100%. If the air is cooled further, then the excess water vapour is sepa-
rated out in the form of water droplets.
8. Positioning and fixing of the base station and the outdoor transmitter
• With the foldable leg at the back of the base station, the base station can be placed onto any flat surface.
• With the hanging holes at the back of the base station, the base station can be wall mounted at the
respective location. Avoid the vicinity of any interfering field like computer monitors or TV sets and solid
metal objects.
• The outdoor transmitter can be placed onto any flat surface or wall mounted at the respective location by
the hanging hole at the back of the unit. Choose a shady and dry position for the transmitter. (Direct sun-
shine falsifies the measurement and continuous humidity strains the electronic components needlessly).
TFA_No. 35.1129_Anleit_12_20 22.12.2020 11:13 Uhr Seite 10


