23
22
PRIMAVERA
- Wireless weather station
PRIMAVERA
- Wireless weather station
7.3 Backlight
•
Attention:
Backlight in continuous operation only works with power adapter.
• Press and hold the LIGHT HOLD ON/OFF button for three seconds until a beep tone is
heard to deactivate or activate the backlight.
• Press the LIGHT HOLD ON/OFF button once to dim the backlight.
• Press the SNOOZE/LIGHT button or any button to activate the backlight for a few sec-
onds.
8. USB output
• With the USB output you can charge your mobile phone or other USB enabled devices.
The output power is 5 Volts - 1 Ampere. The weather station cannot be operated via
the USB output.
9. Weather forecast symbols
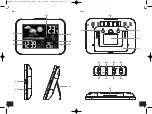
(Fig. 4)
• The weather station has five different weather symbols (sunny, slightly cloudy, cloudy,
rainy and stormy).
• The weather forecast relates to a range of 12 hours and indicates only a general weath-
er trend. The accuracy is about 70 %.
• For example, if the current weather is cloudy and the rain symbol is displayed, it does
not mean the product is faulty because it is not raining. It simply means that the air
pressure has dropped and the weather is expected to get worse but not necessarily
rainy. The accuracy is about 70 to 75%.
• The sun symbol also appears at night if there is a starry night.
Note:
Please note that the forecast symbol will become more defined in the course of opera-
tion. The forecast symbol is active right from the start, however, the reliability of the
forecasts increases with the amount of data collected. The sensor must adapt initially
to the reference level at the site.
10. Thermometer and hygrometer
10.1 Maximum/Minimum function
• The maximum and minimum values are automatically reset at midnight.
• Press the MAX/MIN button in normal mode.
• MAX appears on the display.
• You can now get the highest values for the indoor and outdoor temperature and
humidity since the last reset.
• Press the MAX/MIN button again.
• MIN appears on the display.
• You can now get the lowest values for the indoor and outdoor temperature and humi-
dity since the last reset.
• Press the MAX/MIN button once more, to go back to the present values display.
• The device will automatically quit the MAX/MIN mode if no button is pressed.
• Press and hold the MAX/MIN button for two seconds while the maximum or minimum
values are displayed to clear the recorded readings.
• The setting sequence is shown as follows: 12 or 24 hours system (24H default), the
hours, the minutes, the year (YEAR appears on the display), the month and the day.
Press the +/RCC or -/°C/°F to adjust it.
• The weekday (MON, TUE, WED, THU, FRI, SAT or SUN appears on the display) will be
calculated automatically after setting the date.
• Confirm the setting with the SET button.
• The manually set time will be overwritten by the DCF time when the signal is received
successfully.
7.1.1 Setting of the time zone
• In the setting mode you can make the time zone correction (-12/+12).
• The time zone correction is needed for countries where the DCF signal can be received
but the time zone is different from the German time (e.g. +1=one hour later).
7.1.2 Setting of the 12 and 24 hours display
• In the setting mode you can choose between the 12 - and 24 hour system.
• In the 12 HR system AM or PM (after 12 o'clock) appears on the display.
7.2 Setting of the alarm time
• Press and hold the ALARM button.
• ALARM, the alarm symbol and 00:00 (default) or the last adjusted alarm time appear
on the display.
• The hour digit will be flashing.
• Press the +/RCC or -/°C/°F button to adjust the hours.
• Press the ALARM button again and you can adjust the minutes with the +/RCC or -
/°C/°F button.
• Confirm the setting with the ALARM button.
• TIME, the current time and the alarm symbol appear on the display. The alarm function
is activated.
• When the adjusted alarm time is reached, the alarm will ring.
• The alarm symbol will be flashing.
• Press any button and the alarm will stop.
• If the alarm is not stopped manually, the increasing alarm will automatically turn off
after certain minutes and will be reactivated at the same time.
• When the alarm rings, press the SNOOZE/LIGHT button and the snooze function will be
activated.
• Once the snooze function is activated, Zz will be flashing on the display.
• The alarm will be interrupted for 10 minutes.
7.2.1 Activate and deactivate the alarm function
• Press the ALARM button in normal mode.
• ALARM and the last adjusted alarm time appear on the display.
• Press the ALARM button again, to deactivate or activate the alarm function.
• The alarm symbol disappears or appears on the display.
• Press the SET button to return to normal mode.
• TIME and the current time appear on the display.
TFA_No. 35.1136_Anleitung_04_20 09.04.2020 14:08 Uhr Seite 12


