background image

18

19

Getting started

Insert the batteries


y

Place the base station and the transmitter on a table at a distance of about 
1.5 meters from each other. Avoid being close to possible sources of interfer-
ence such as electronic devices and radio equipment. 


y

Open the battery compartment of the transmitter and insert two new  
AA 1.5 V batteries, polarity as illustrated. All LCD segments will be displayed  
for a short moment. 


y

The transmitter’s display shows the current temperature and humidity.  
The switch is set to channel 1.


y

Close the battery compartment. 


y

Insert the two new batteries 1,5 V AA into the battery compartment of the base 
station. Make sure the polarities are correct.


y

All LCD segments will be displayed for a short moment. 


y

The indoor temperature and humidity appear on the display.

Reception of outdoor values


y

After the batteries are inserted, the outdoor values will be transmitted to the 
base station. The reception symbol for the transmitter flashes.


y

If the reception of the outdoor values fails, “- -“ appears on the base  
station display. Check the batteries and try it again. Check if there is any  
source of interference. 


y

You can also start the outdoor transmitter search manually later (e.g. if the 
transmitter is lost or if the batteries are changed). Press and hold the  
CHANNEL button for three seconds. The last registered transmitter (channel) 
will be cancelled. 


y

Press the TX button in the transmitter’s battery compartment. 


y

The reception symbol of the transmitter flashes and the base station will scan 
the outdoor values.

Reception of the DCF frequency signal


y

After the reception of the outdoor values, the clock will now scan the DCF 
frequency signal and the DCF symbol flashes on the display. 


y

When the time code is successfully received after 3-10 minutes, the radio-con-
trolled time and the DCF symbol will be shown steadily on the display.


y

The DCF reception always takes place at 1:00, 2:00 and 3:00 o’clock in the 
morning. If the reception was not successfully received, further attempts will be 
taken at 4:00 and 5:00 o’clock. 


y

You can also activate the DCF reception manually. Press the -/MIN button for 3 
seconds. The DCF reception symbol will be flashing.


y

Press and hold the -/MIN button again for 3 seconds to stop the reception 
process. The DCF reception symbol disappears.    


y

There are 3 different reception symbols:


y

 flashing symbol - reception is active


y

 solid - reception is successful


y

no symbol - no DCF reception 


y

If the clock cannot detect the DCF-signal (e.g. due to interference, transmitting 
distance, etc.), the time can be set manually.


y

The clock will then work as a normal quartz clock (see: “Manual settings”).

Note on radio-controlled time


y

The time is transmitted from an atomic clock near Frankfurt am Main by a 
DCF-77 (77.5 kHz) frequency signal with a range of about 1,500 km. Your 
radio-controlled clock receives the signal, converts it and always shows the 
exact time. The adjustment of Daylight Saving Time and Standard Time is also 
automatic. 


y

During night-time, the atmospheric interference is usually less severe. A single 
daily reception is adequate to keep the accuracy deviation under 1 second. In 
extreme cases, please place the unit close to a window to improve reception.

Operation 


y

The device will automatically quit the setting mode if no button is  
pressed for 20 seconds.


y

Press and hold the MAX/+ or -/MIN button in setting mode for fast mode.

Manual settings 


y

Press and hold the SET button for three seconds to enter the setting mode.


y

The first adjustable value flashes on the display. 


y

Use the MAX/+ or -/MIN button to make the desired setting, while the value 
flashes. 


y

Confirm with the SET button and go to the next setting.


y

The sequence is shown as follows: 


y

DCF reception ON/OFF (default: DCF ON)


y

Time zone -12/+12 (default: 0H)


y

Auto-reset ON/OFF (default AUTO MIN MAX OFF)


y

Hour, minute


y

Year, month, day

DCF reception


y

By default, the DCF reception is activated (DCF ON) and after successful  
reception of the DCF signal no manual time setting is necessary. 


y

In the setting mode, you can deactivate (DCF OFF) or activate again the  
DCF reception using the MAX/+ or -/MIN button.


y

Once the DCF time reception is deactivated the clock must be manually set.  
No time zone will appear.


y

If the DCF reception is activated, the manually set time will be overwritten by 
the DCF time when the signal is received successfully.

Summary of Contents for 35.1162.54

Page 1: ...XENA Bedienungsanleitung Instruction manual Mode d emploi Istruzioni per l uso Gebruiksaanwijzing Instrucciones de uso Kat Nr 35 1162 54...

Page 2: ...nstrucciones de uso Las instrucciones de uso se adjuntan al dispositivo o pueden descargarse de www tfa dostmann de en service downloads instruction manuals No emplee el dispositivo de modo distinto a...

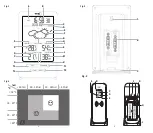
Page 3: ...4 5 Fig 1 Fig 4 Fig 2 Fig 3 A F G A B C B C H D E J A B C D E F G H J K L M N T1 T2 T3 C rH 19 C 19 25 C 30 rH 60 rH 30 39 rH 40 60 rH 25 30 C 30 C T4 O P Q R S...

Page 4: ...legen der Batterien Verwenden Sie nie gleichzeitig alte und neue Batterien oder Batterien unterschiedlichen Typs Entfernen Sie die Batterien wenn Sie das Ger t l ngere Zeit nicht verwenden Beim Hantie...

Page 5: ...ichen blinkt y Halten Sie noch einmal die MIN Taste f r 3 Sekunden gedr ckt ist der Empfangsvorgang beendet Das DCF Empfangszeichen verschwindet y Es gibt drei verschiedene Empfangssymbole y blinkt Em...

Page 6: ...r MAX Taste zur Abfrage der H chstwerte MAX blinkt im Display Zur ckstellung der H chst und Tiefstwerte a Manuelle Zur ckstellung y Dr cken und halten Sie die SET Taste f r 3 Sekunden w hrend die maxi...

Page 7: ...ieb oder starten Sie die manuelle Sendersuche y W hlen Sie mit der CHANNEL Taste den gew nschten Kanal aus y Halten Sie die CHANNEL Taste f r drei Sekunden gedr ckt Der registrierte Sender Kanal wird...

Page 8: ...m nationalen oder lokalen Bestimmungen abzugeben Die Bezeichnungen f r enthaltene Schwermetalle sind Cd Cadmium Hg Quecksilber Pb Blei Dieses Ger t ist entsprechend der EU Richtlinie ber die Entsorgun...

Page 9: ...batteries together nor batteries of different types Remove the batteries if the device will not be used for an extended period of time Wear chemical resistant protective gloves and safety glasses whe...

Page 10: ...ate the DCF reception manually Press the MIN button for 3 seconds The DCF reception symbol will be flashing y Press and hold the MIN button again for 3 seconds to stop the reception process The DCF re...

Page 11: ...maximum values MAX flashes on the display Reset of maximum and minimum values a Manual reset y Press and hold the SET button for 3 seconds during the highest or lowest values are displayed The values...

Page 12: ...ss the CHANNEL button on the base station to change between the channels 1 to 3 y You can also choose an alternating channel display Press CHANNEL button After the last registered channel 1 to 3 a cir...

Page 13: ...al regulations in order to protect the environment The symbols for the contained heavy metals are Cd cadmium Hg mercury Pb lead This product is labelled in accordance with the EU Waste Electrical and...

Page 14: ...s avec des piles neuves ou des piles de types diff rents Retirez les piles si vous n utilisez pas votre appareil pendant une dur e prolon g e Pour manipuler des piles qui ont coul utilisez des gants d...

Page 15: ...dant 3 secondes le pro cessus de r ception est termin Le symbole de r ception DCF dispara t y Il y a trois symboles de r ception diff rents y Clignote r ception en cours y Allum en continu la r ceptio...

Page 16: ...tialisation des valeurs maximales et minimales a R initialisation manuelle y Appuyez sur la touche SET pendant 3 secondes lorsque les valeurs maximales ou minimales s affichent Les valeurs mesur es se...

Page 17: ...nt la recherche de l metteur y Appuyez sur la touche CHANNEL et s lectionnez l metteur correspondant y Maintenez la touche CHANNEL appuy e pendant trois secondes L metteur enregistr canal est effac et...

Page 18: ...e votre domicile conform ment la r glementation nationale et locale Les m taux lourds sont d sign s comme suit Cd cadmium Hg mercure Pb plomb Cet appareil est conforme aux normes de l UE relatives au...

Page 19: ...ate Non utilizzate mai contemporaneamente batterie usate e batterie nuove n batterie di tipi diversi Rimuovere le batterie se non si utilizza l apparecchio per un periodo prolungato Quando si maneggia...

Page 20: ...ere premuto di nuovo il tasto MIN per 3 secondi il processo di ricezione terminato Il simbolo della ricezione DCF scompare y Ci sono tre differenti simboli di ricezione y Simbolo lampeggiante Ricezion...

Page 21: ...ggio dei valori massimi e minimi a Resettaggio manuale y Tenendo premuto il tasto SET per 3 secondi durante la visualizzazione dei valori massimi e minimi I valori vengono cancellati e viene ripristin...

Page 22: ...te polarit Ponete in funzione la stazione base o avviate la sintonizzazione manuale y Selezionate con il tasto CHANNEL il corrispondente trasmettitore y Tenere premuto per tre secondi il tasto CHANNEL...

Page 23: ...isposizioni nazionali o locali ai fini di uno smaltimento ecologico Le sigle dei metalli pesanti contenuti sono Cd cadmio Hg mercurio Pb piombo Questo apparecchio etichettato in conformit alla Diretti...

Page 24: ...en Gebruik nooit tegelijkertijd oude en nieuwe batterijen of batterijen van een verschillend type Verwijder de batterijen als u het apparaat langere tijd niet gebruikt Draag chemisch bestendige handsc...

Page 25: ...t y Als u de MIN toets nogmaals 3 seconden lang ingedrukt houdt is het ont vangstproces gestopt Het DCF ontvangstsymbool verdwijnt dan y Er zijn drie verschillende ontvangstsymbolen y Knippert ontvang...

Page 26: ...toets om de maximumwaarden op te vragen Op het display knippert MAX Terugstelling van maximum en minimumwaarden a Handmatige terugstelling y Druk op de SET toets en houd deze 3 seconden ingedrukt wann...

Page 27: ...handmatig zenderzoeken y Kies met de CHANNEL toets de desbetreffende zender y Houdt de CHANNEL toets drie seconden ingedrukt De geregistreerde zender kanaal wordt gewist en het zenderzoeken begint y D...

Page 28: ...lingen te brengen om een milieuvriendelijk verwijderen te garanderen De benamingen van de zware metalen zijn Cd cadmium Hg kwik Pb lood Dit apparaat is gemarkeerd in overeenstemming met de EU richtlij...

Page 29: ...o pilas de diferente tipo Extraiga las pilas si no va a usar el dispositivo por un largo per odo de tiempo Utilice guantes protectores resistentes a productos qu micos y gafas protecto ras si manipul...

Page 30: ...y 5 00 de la ma ana y Tambi n puede activar la recepci n de la se al DCF manualmente Mantenga pulsada la tecla MIN durante 3 segundos El s mbolo de recepci n DCF parpadea y Mantenga pulsada la tecla...

Page 31: ...este procedimiento con la tecla MAX para consultar los valores m ximos MAX parpadea en la pantalla Reposici n de valores m ximos y m nimos a Reposici n manual y Mantenga pulsada la tecla SET durante...

Page 32: ...ueda manual del emisor y Con la tecla CHANNEL puede seleccionar el emisor deseado y Mantenga pulsada la tecla CHANNEL durante 3 segundos El emisor canal registrado se borrar y comenzar la b squeda del...

Page 33: ...os de recogida y reciclaje previstos para ello seg n el reglamento nacional o local Las denominaciones de los metales pesados que contienen son Cd cadmio Hg mercurio Pb plomo Este dispositivo est iden...

Page 34: ...Kat Nr 35 1162 54 TFA Dostmann GmbH Co KG Zum Ottersberg 12 97877 Wertheim Germany...

Reviews: