background image

D3: “

°

C/

°

F” button                                  D4: Channel Selecting Switch 

D5: “TX” button                                    D6: Wall Mount Hole 

D7: Battery Compartment                   


Set Up: 

Ÿ


Insert batteries. 

Ÿ


Use a pin to press the RESET (B11) button


Radio Controlled Clock: 

l


The clock automatically starts scanning the RF 433MHz signal to register new 

Thermo Sensor Unit after new batteries inserted. After registered new channels or 

press “CHANNEL” button (B10) to stop scanning, the clock will then scan the 

DCF time signal ( “

” flashes on the LCD ). Buttons will not function while 

scanning for DCF or Thermo sensor’s signal unless they are well received or 

stopped manually. 

l


The clock automatically scans the time signal at 3.00 a.m. everyday to maintain 

accurate timing. For failed reception, scanning stops ( “

  ” on the LCD 

disappear ) and repeats again at 4.00 a.m. 5.00a.m. and 6.00a.m.     

l


The clock manually scans the DCF time signal by holding “ -

  ” button (B8) for 

3 seconds. For failed reception, scanning stops. ( “

  ” on the LCD disappear ). 

l


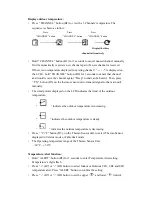
Press “HOLD 

” button (B9) to stop scanning when receiving DCF time signal. 

” flashes indicate now is receiving DCF time signal   

” turns on indicate signal received successfully 


Manual Time Setting: 

l


Hold “MODE/SET” button (B1) for 3 seconds to enter Clock/Calendar setting 

Mode . 

l


Press “+” (B7) or “-” (B8) buttons to adjust the setting and press “MODE/SET” 

button (B1) to confirm each setting. 

l


The setting sequence is shown as follow: Hour, Minutes, Second, Year, 

Month/Day sequence, Month, Day, Time Zone, Day-of-week language. 

Summary of Contents for AMBIENTE II

Page 1: ...temperature 0 C 50 C Humidity 20 99 Outdoor temperature 20 C 50 C l Temperature Alert function l Max Min Memory for Humidity Indoor and Outdoor Temperature l Moon Phase Display l High Tide Medium Tide...

Page 2: ...dio Controlled Time Display Part B Buttons B1 MODE SET button B2 SNOOZE button B3 ALARM ON OFF button B4 MAX MIN button B5 ALERT button B6 WEATHER button B7 12 24 button B8 C F button B9 HOLD button B...

Page 3: ...s the time signal at 3 00 a m everyday to maintain accurate timing For failed reception scanning stops on the LCD disappear and repeats again at 4 00 a m 5 00a m and 6 00a m l The clock manually scans...

Page 4: ...r than the German time for 1 hr the zone should be set to 1 Then the clock will automatically set 1 hour faster from the signal time received l The Time Setting Mode will automatically exit in 5 secon...

Page 5: ...n the weather forecast means Sunny means Slightly Cloudy means Cloudy means Rainy means Cloudburst l If there is any inconsistency of weather forecast between Local Weather Station and this unit the L...

Page 6: ...or Unit Registration Procedure l The main unit automatically starts receiving transmission from Outdoor Thermo Sensor for outdoor temperature after new batteries are inserted l The thermo sensor will...

Page 7: ...5 on the thermo sensor unit to transmit signal to the main unit manually l The trend pointer displayed on the LCD indicates the trend of the outdoor temperature indicates the outdoor temperature is in...

Page 8: ...cator Low battery icon appear at outdoor temperature row in particular channel indicating the external transmitter of the channel in low battery status The batteries should be replaced Note l Use a pi...

Reviews: