background image

D27

A8

180

A6

P13

C11

C12

C10

C9

P13

C11

C12

C10

C9

P13

C11

C12

C10

C9

P13

C11

C12

C10

C9

P13

8

7

6

C11

C12

C10

C9

P13

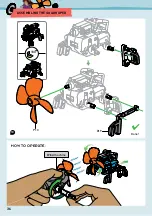
Pilot module

Foot module

Foot module

Wind machine

Done!

28

HOW TO OPERATE:

ASSEMBLING THE WALKER BOT

Summary of Contents for 550047

Page 1: ...eel the Wind B uild 6 awesome model s That move with the win d Franckh Kosmos Verlags GmbH Co KG Pfizerstr 5 7 70184 Stuttgart Germany 49 0 711 2191 0 www kosmos de Thames Kosmos 89 Ship St Providence RI 02903 USA 1 800 587 2872 www thamesandkosmos com ...

Page 2: ... will also need Diagonal cutters or scissors nail file small Phillips head screwdriver size PH1 hammer tissue paper cotton swab cup Checklist Cut the plastic parts when they are required Do not cut them in advance Plastic Parts D C P11 P12 P15 4 pcs 2 pcs Round Shaft Sponge P13 Fan Blade P14 1 pc 1 pc Sponge 1 1 1 1 1 1 1 1 2 2 2 3 3 3 3 3 3 3 3 3 3 4 4 4 4 4 5 5 5 5 5 5 Spare Parts Oil Bag B 7 6 ...

Page 3: ...ies which can reduce urban air pollution Because these methods use the wind instead of fossil fuels to generate energy they are much more climate friendly energy from Wind Power Learning From Nature Humans aren t the only ones who have been using the wind for transportation plants and animals have used wind power to get around for millions of years Think of birds that can glide through the air for...

Page 4: ... no need to file them down If you don t have these pliers at home you can use scissors and a nail file Normal scissors do not cut as precisely as a diagonal cutter so you may have to file some of the rough edges down with the nail file THE RIGHT TOOL WARNING Burr Burr Burr Not suitable for children under 3 years Choking hazard small parts may be swallowed or inhaled WARNING This kit contains funct...

Page 5: ...cutter or a nail file Supervise your child when they are using the sharp tools until you trust that they can handle the tools independently ASSEMBLY AND DISASSEMBLY Some components are needed for all of the models but some are only needed for one or two models If your child wants to build a new model help ensure that no parts get lost during disassembly by providing a container to collect parts Wh...

Page 6: ...f the energy we need in our city I love to design new devices and bring them to life I would like to share MY newest inventions with you Surf Bot This buoyant machine lets me explore the sea The wind drives a fin that lets me swim like a fish Quadruped This vehicle moves on four legs and is my first choice when I am taking a trip onto rough terrain p 23 p 33 ...

Page 7: ...s machine can t really fly but it imitates the flapping of a bird s wings I like to sit up here and dream of flying Drill Dozer The wind powers the drill and drives the dozer forward at the same time It s a big help on the construction site Walker Bot This two footed robot uses wind energy to walk The more headwind blows against me the more progress I make p 26 p 29 p 45 p 37 ...

Page 8: ... Learn how to use it on the following page SCREWS There are screws included in the set for assembling the modules To tighten them you will need a small Phillips head screwdriver preferably size PH1 Make sure that you tighten the screws all the way down Loose screws may lead to malfunctions WIND The most important thing your models need to move is wind You have different options to generate wind A ...

Page 9: ... D28 P13 D28 D28 D31 1 2 D27 D17 D31 PULL PULL D28 P13 D28 D28 D31 1 2 D27 PULL PULL D28 P13 D28 D31 1 2 7 HOW TO USE PART D28 LOOSENING D27 UPPER PART LOOSENING D27 LOOSENING P13 LOOSENING D27 BOTTOM PART Pull Pull Press Assembly Tips ...

Page 10: ...he models you will build various modules These modules make it easier for you to build the models later and they are very useful when you want to convert one model into another as the modules will not have to be taken apart again Yay Let s start building ...

Page 11: ...Tool PUSH P11 P11 D9 P7 Yellow P5 White P6 Gray P11 round axle Actualsize x3 D5 Actualsize P11 P2 White P11 B13 B13 Remove all burrs before assembling Rubriktitel Blindtext 9 ASSEMBLING THE WIND MACHINE 1 2 Actual size Actual size Actual size Assembling the Wind Machine Press or lightly tap with the handle of the screwdriver ...

Page 12: ...Swab D5 P7 Yellow B13 P5 White P2 White P6 Gray 1 1 2 2 2 D8 P1x3 6 10 4 3 ASSEMBLING THE WIND MACHINE When you see this symbol oil the parts as shown Do not put oil on other parts Place a cup on top of a piece of tissue paper Pour the contents of the oil packet into the cup Use a cotton swab to apply oil to the indicated parts Apply oil ...

Page 13: ... Blindtext 11 6 5 7 8 Turn the handle clockwise to create wind Wind Machine Done Assembling the Wind Machine P1 To avoid injuries never allow the fan blades to come into contact with people or objects when turning the crank Please note that holding the fan blades while cranking the handle can cause the wind machine to malfunction ...

Page 14: ...1 P13 C4 C8 A5 B11 P1 P13 C4 C8 A5 B11 P1 A P13 C4 C8 A5 B11 P1 B Do not cut off this part After the test use D28 to loosen P13 as shown on page 7 12 3 1 2 ASSEMBLING THE MODULES GEAR MODULE A TEST GEAR MODULE A Gear module A Side view Done ...

Page 15: ... White A9x2 P10 A9 PUSH C20 C1 P10 P3 White D28 Tool C1 P10 P3 White A9x2 P10 A9 Remove all burrs before assembling Rubriktitel Blindtext 13 GEAR MODULE B Press Top view Actual size Actual size Actual size Actual size 1 2 Assembling the Modules ...

Page 16: ...C1 P2 White P2 White P9 D28 Tool C1 PUSH C1 P9 C1 P2 White P2 White P9 D28 Tool C1 PUSH C1 P9 C1 P2 White P2 White P9 D28 Tool C1 14 Press Actual size Actual size Top view 3 5 4 Actual size ASSEMBLING THE MODULES ...

Page 17: ...C21 P13 P1 C21 P13 P1 C21 P13 P1 A B C21 P13 P1 Gear module B After the test use D28 to loosen P13 as shown on page 7 Rubriktitel Blindtext 15 6 TEST GEAR MODULE B Done Assembling the Modules ...

Page 18: ...Tool 2 1 A9 PUSH PUSH P2 White P8 A9 A9 A9 P10 P10 P3 White P3 White P4 Orange D28 Tool P2 White P8 A9 P4 Orange D28 Tool 2 1 A9 Remove A9 and save it for the next step Remove all burrs before assembling 16 GEAR MODULE C Actual size Actual size Actual size Press Press Actual size 1 2 ASSEMBLING THE MODULES ...

Page 19: ...C1 P10 P2 White C26 C25 A11 PUSH 90 C1 P10 P2 White C1 P10 P2 White C26 C25 A11 PUSH 90 C1 P10 P2 White C1 P10 P2 White C26 C25 A11 Rubriktitel Blindtext 17 Top view Press 5 4 3 6 Assembling the Modules Actual size Actual size ...

Page 20: ...P13 P1 C17 C18 C1 P13 P1 C17 C18 C1 P13 P1 C17 C18 C1 P13 P1 C17 C18 C1 P13 P1 C17 C18 C1 Gear module C After the test use D28 to loosen P13 as shown on page 7 A B 18 7 9 8 TEST GEAR MODULE C Done ASSEMBLING THE MODULES ...

Page 21: ... D29 C5 D30 90 Burr Burr Burr Burr B17 C5 B17 D3 P1 P13 D29 C5 D30 90 Burr Burr Burr Burr B17 C5 B17 D3 P1 P13 D29 C5 D30 Gear module D Done After the test use D28 to loosen P13 as shown on page 7 A B Remove all burrs before assembling Remove all burrs before assembling Rubriktitel Blindtext 19 GEAR MODULE D 2 1 TEST GEAR MODULE D Assembling the Modules ...

Page 22: ... 3 3 3 3 3 3 3 3 3 4 4 4 4 4 P15 Foam sticker sheet P15 Foam sticker sheet P15 4 P15 3 P15 3 x4 C19 C23 C22 P1 D33 D32 C15 A21 3 3 3 3 3 3 3 3 3 3 4 4 4 4 4 P15 Foam sticker sheet P15 Foam sticker sheet P15 4 P15 3 P15 3 x4 C19 C23 C22 P1 D33 D32 C15 A21 3 3 3 3 3 3 3 3 3 3 4 4 4 4 4 Pilot module Cockpit module Wheel Foot module 2x 4x Done Done Done Done 20 PILOT MODULE COCKPIT MODULE WHEELS FOOT ...

Page 23: ...7 000 years ago Sailboats and wind power eventually enabled humans to travel across the globe The principle of a sail can also be applied to land vehicles For sails to function properly you need enough wind and a relatively large amount of open space around the sail Bodies of water therefore offer ideal conditions for moving with sails On land it looks a bit different As you might imagine a car wi...

Page 24: ...an start building your models The assembly steps are shown for one model after another Be sure to read the helpful tips on pages 6 and 7 before you start Wow Moving with the wind Step by step model assemblies 22 ...

Page 25: ...4 A15 A20 A8 D4 D27 x3 D6 D13 D16 D23 A6 D27 C3 A20 D6 P13 C3 D27 D4 A14 A15 A20 A8 D4 D27 x3 D6 D13 D16 D23 A6 D27 C3 A20 D6 P13 C3 D27 D4 A14 A15 A20 A8 D4 D27 x3 D6 D13 D16 D23 A6 D27 C3 A20 D6 P13 C3 D27 D4 A14 A15 A20 A8 D4 D27 x3 D6 D13 D16 D23 A6 D27 23 3 1 2 ASSEMBLING THE SURF BOT Assembling the Surf Bot Actual size ...

Page 26: ...D27 A8 180 A6 P13 D27 A8 180 A6 P13 Gear module A Pilot module D27 A8 180 A6 P13 D27 A8 180 A6 P13 24 ASSEMBLING THE SURF BOT 5 6 4 ...

Page 27: ...A15 A14 D16 D23 D13 A15 A14 D16 D23 Wind machine Done Put the Surf Bot in water Warning Only to be used in water in which the child is within its depth and under adult supervision 25 7 8 HOW TO OPERATE Assembling the Surf Bot ...

Page 28: ... C12 B7 x2 A8 A24 x4 B10 D27 A24 B10 A8 B10 P13 C9 D27 x8 C10 C11 C12 B7 x2 A8 A24 x4 B10 Foot module Pilot module Gear module B 4x Gear module B 2 1 Actual size Actual size Actual size x4 Actual size D27 A24 B10 A8 B10 P13 C9 D27 x8 C10 C11 C12 B7 x2 A8 A24 x4 B10 26 ASSEMBLING THE WALKER BOT Actual size ...

Page 29: ...Actual size Actual size B7 B7 D27 D27 D27 D27 B7 B7 B7 B7 D27 D27 D27 D27 B7 B7 B7 B7 D27 D27 D27 D27 B7 B7 5 3 4 180 A6 P13 27 Assembling the Walker Bot ...

Page 30: ...A6 P13 C11 C12 C10 C9 P13 C11 C12 C10 C9 P13 C11 C12 C10 C9 P13 C11 C12 C10 C9 P13 8 7 6 C11 C12 C10 C9 P13 Pilot module Foot module Foot module Wind machine Done 28 HOW TO OPERATE ASSEMBLING THE WALKER BOT ...

Page 31: ... D10 D11 A16x2 D24 D27 x2 D20 90 D10 D11 A8 P13 A8 Actual size Pilot module Wheel Gear module C x2 Gear module C A3 A17 B5 B19 B20 x2 B21 C16 D1 D2 D10 D11 A16x2 D24 D27 x2 D20 90 D10 D11 A8 P13 A8 29 ASSEMBLING THE DRILL DOZER A3 A17 B5 B19 B20 x2 B21 C16 D1 D2 D10 D11 A16x2 D24 D27 x2 D20 90 D10 D11 A8 P13 A8 Assembling the Drill Dozer ...

Page 32: ...5 4 3 B20 B20 B5 D20 C16 D24 B20 B20 B5 D20 C16 D24 B20 B20 B5 D20 C16 D24 2x Wheel 30 ASSEMBLING THE DRILL DOZER ...

Page 33: ...Foam sticker sheet 1 1 1 1 1 1 4 4 4 4 4 2 1 A17 D1 D2 A16 P15 1 P15 1 D27 A3 B19 B21 P15 Foam sticker sheet 1 1 1 1 1 1 4 4 4 4 4 2 1 A17 D1 D2 A16 P15 1 P15 1 D27 A3 B19 B21 P15 Foam sticker sheet 1 1 1 1 1 1 4 4 4 4 4 2 1 A17 D1 D2 A16 P15 1 P15 1 D27 A3 B19 B21 180 A6 P13 31 Assembling the Drill Dozer ...

Page 34: ...P13 90 2 1 P13 90 2 1 11 10 P13 90 2 1 P13 90 2 1 P13 90 2 1 Pilot module Wind Machine HOW TO OPERATE Done 32 ASSEMBLING THE DRILL DOZER ...

Page 35: ... A22 A23 D14 x2 D18 D19 D31 B9 x2 B12 x2 B12 B12 P13 A1 A2 A14 A15 A22 A23 D14 x2 D18 D19 D31 B9 x2 B12 x2 B12 B12 Pilot module Cockpit module Gear module C Gear module C P13 A1 A2 A14 A15 A22 A23 D14 x2 D18 D19 D31 B9 x2 B12 x2 B12 B12 33 ASSEMBLING THE QUADRUPED Assembling the Quadruped ...

Page 36: ...B9 B9 A15 A14 A1 A2 D31 4 5 6 B9 B9 A15 A14 A1 A2 D31 3 B9 B9 A15 A14 A1 A2 D31 Pilot module Cockpit module 34 ASSEMBLING THE QUADRUPED ...

Page 37: ...ad 11 180 180 P12 Foam Pad D18 D14 P12 P12 A22 D14 A23 P12 Foam Pad 180 180 P12 Foam Pad D18 D14 P12 P12 A22 D14 A23 P12 Foam Pad 180 180 P12 Foam Pad D18 D14 P12 P12 A22 D14 A23 P12 Foam Pad 180 180 P12 Foam Pad D18 D14 P12 P12 A22 D14 A23 P12 Foam Pad 180 A6 P13 D27 A8 180 A6 P13 9 12 7 8 10 35 Assembling the Quadruped ...

Page 38: ...P13 D19 P13 D19 13 Wind machine HOW TO OPERATE 180 A6 P13 Done 36 ASSEMBLING THE QUADRUPED ...

Page 39: ...Actual size Actual size A18 A19 B3 B4 B6 x2 B15 B14x2 B16 x2 C2 D7 C12 C11 D14 x2 D12 x2 D15 D22 D25 D26 D27 x4 A6 P13 A8 Note Pay attention to the orientation of the foot modules See next page B15 A10 x2 A13 x2 B10 x4 Foot module A18 A19 B3 B4 B6 x2 B15 B14x2 B16 x2 C2 D7 C12 C11 D14 x2 D12 x2 D15 D22 D25 D26 D27 x4 A6 P13 A8 Note Pay attention to the orientation of the foot modules See next page...

Page 40: ...3 D26 P15 2 A6 D7 P15 Foam sticker sheet 2 2 2 D26 P15 2 A6 D7 P15 Foam sticker sheet 2 2 2 D26 P15 2 A6 D7 P15 Foam sticker sheet 2 2 2 2 Gear module A 38 ASSEMBLING THE FLYING MACHINE ...

Page 41: ...Gear module B C2 D25 B16 B16 C2 D25 B16 B16 C2 D25 B16 B16 6 5 4 Front view Side view Press Press 39 Assembling the Flying Machine ...

Page 42: ...9 8 7 A10 D27 D15 D27 D22 B3 B4 D27 A10 D27 D15 D27 D22 B3 B4 D27 A10 D27 D15 D27 D22 B3 B4 D27 40 ASSEMBLING THE FLYING MACHINE ...

Page 43: ...B6 D12 B14 D12 B14 D14 A18 A13 C12 B6 D12 B14 D12 B14 D14 A18 A13 C12 B6 D12 B14 D12 B14 D14 A18 A13 C12 B6 D12 B14 D12 B14 D14 A18 A13 C12 Actual size Actual size Left wing module 41 Assembling the Flying Machine ...

Page 44: ...B14 D12 D12 B6 B14 D14 17 14 15 16 Actual size Actual size C11 A19 A13 B14 D12 D12 B6 B14 D14 C11 A19 A13 B14 D12 D12 B6 B14 D14 C11 A19 A13 B14 D12 D12 B6 B14 D14 Right wing module 42 ASSEMBLING THE FLYING MACHINE ...

Page 45: ...20 18 19 P13 180 2 B10 A8 1 P13 180 2 B10 A8 1 P13 180 2 B10 A8 1 Pilot module D27 A8 180 P13 Right wing module Left wing module 43 Assembling the Flying Machine ...

Page 46: ...17 21 Wind machine HOW TO OPERATE Done Pick up the flying machine from the base not the top 44 ASSEMBLING THE FLYING MACHINE ...

Page 47: ...lot module Wheel Gear module D C2 B8 B18 B20 x2 B21 C2 C6 C13 x2 C14 D21 D17 P13 A3 A4 A7 A12 x2 A8 B1 B2 B1 D31 D31 x2 Actual size 1 Cockpit module C2 B8 B18 B20 x2 B21 C2 C6 C13 x2 C14 D21 D17 P13 A3 A4 A7 A12 x2 A8 B1 B2 B1 D31 D31 x2 45 ASSEMBLING THE BIG WHEEL TRICYLE Assembling the Big Wheel Tricycle ...

Page 48: ...4 180 C14 B20 B20 D17 B18 C6 B21 A3 180 C14 B20 B20 D17 B18 C6 B21 A3 180 C14 B20 B20 D17 B18 C6 B21 A3 180 C14 B20 B20 D17 B18 C6 B21 A3 2 3 Wheel Wheel 46 ASSEMBLING THE BIG WHEEL TRICYCLE ...

Page 49: ...rr Burr Burr Burr D21 A4 1 2 Remove all burrs before assembling Remove all burrs before assembling 47 A7 A8 A7 A8 Burr Burr Burr Burr D21 A4 1 2 A7 A8 A7 A8 Burr Burr Burr Burr D21 A4 1 2 Assembling the Big Wheel Tricycle ...

Page 50: ... B2 P15 5 5 5 5 5 5 5 A12 A12 burr burr P15 Foam sticker sheet A12 P15 5 x5 B2 P15 5 5 5 5 5 5 5 A12 A12 burr burr P15 Foam sticker sheet 8 9 Remove all burrs before assembling 48 ASSEMBLING THE BIG WHEEL TRICYCLE ...

Page 51: ...10 49 Assembling the Big Wheel Tricycle ...

Page 52: ...Front View C13 B8 11 12 Gear module D 50 ASSEMBLING THE BIG WHEEL TRICYCLE ...

Page 53: ...P13 P13 13 Pilot module Wind machine HOW TO OPERATE Done 51 Assembling the Big Wheel Tricycle ...

Page 54: ... of years Think of birds that can glide through the air for hours on end barely flapping their wings to stay in flight They re not the only ones Some spiders engage in a process called ballooning in which they use the wind and Earth s electric fields to travel many miles Plants and fungi have also developed sophisticated ways to reproduce and scatter their seeds with the wind This principle is cal...

Page 55: ...h artist Theo Jansen is the inventor and designer of the Strandbeests which is Dutch for beach animals These are complex art objects that can walk or crawl on their own Their movement makes the Strandbeests look almost like living creatures They are usually driven by wind or compressed air Some of the Strandbeests are as big as donkeys while others are larger than a house Jansen mimics nature in t...

Page 56: ...p 51mr shutterstock com ScottZona p 51mr underCreativeCommons2 0 Mühlstein p 52tr BitzerMühle LoekvanderKlis p 52 AnimarisUmerus TheoJansen Packagingconceptanddesign PeterSchmidtGroup Hamburg Packaginglayout StudioGibler Stuttgart Packagingimages CICComponentsIndustriesCo Ltd Taiwan BackgroundgraphicU1 StudioGibler Thepublisherhasmadeeveryefforttoidentifytheownersoftherightstoallphotosused Ifthere...

Reviews: