5
GETTING STARTED
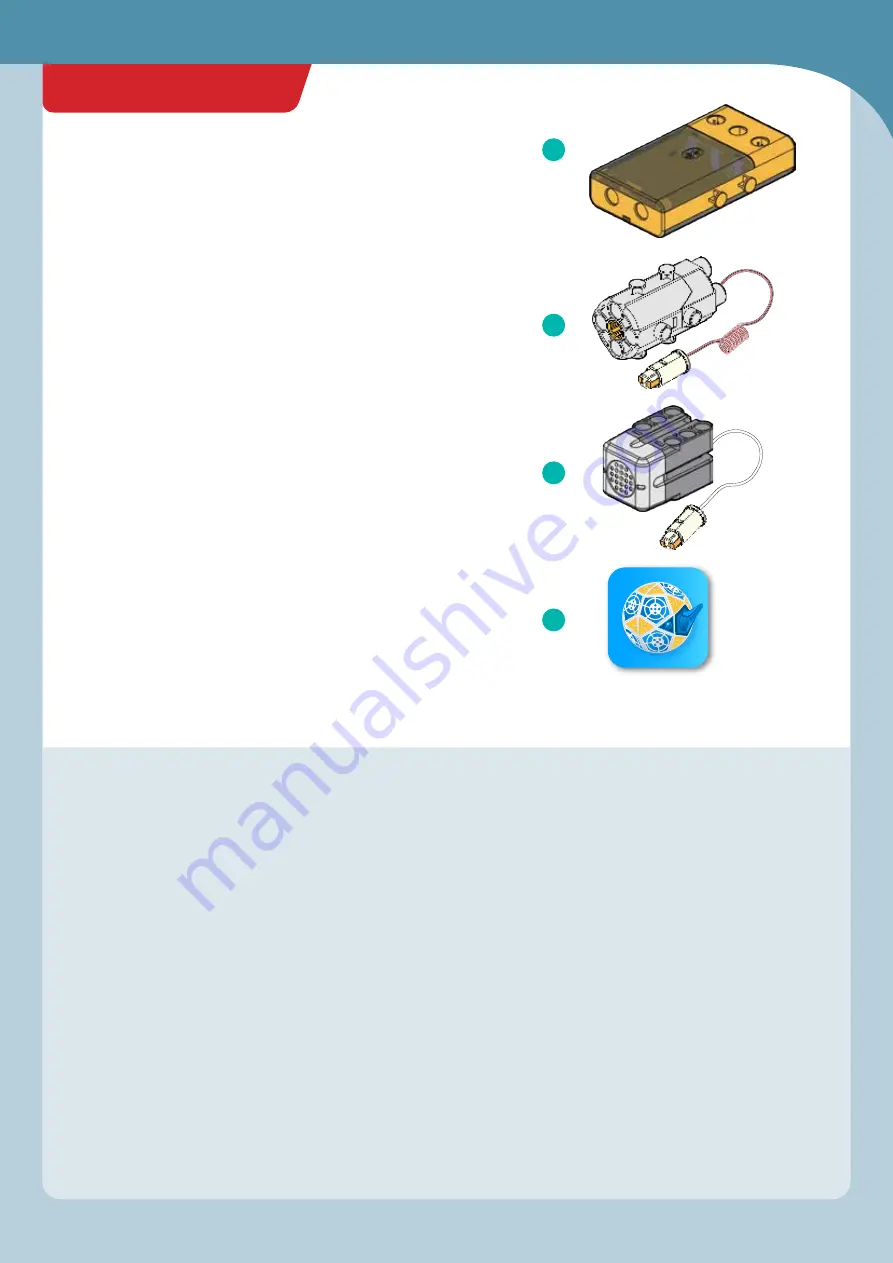
There are four primary types of functional components in this kit
that enable the robots to work:
A. The Bluetooth battery box connects to the app on your tablet or
smartphone via a wireless Bluetooth connection. It provides
power to the motors and receives input from the sound sensor
via wires.
B. The motor units connect to axles and motor shafts to turn gears
and wheels, activating your models. They are powered by the
battery box.
C. The sound sensor — like an ear — has a membrane inside it that
allows it to convert vibrations in the air (sound) into electrical
signals. Specifically, it is an omni-directional electret condenser
microphone. It is calibrated to receive a specific intensity
(loudness) of sound. When it detects sound in this range (hands
clapping), it triggers the programmed action.
D. The app is the “brain” of your robotic models. It uses the input
from the sound sensor and the program instructions to control
the models.
These four elements, in combination with all the mechanical parts
— rods, gears, axles, shell pieces, and so on — allow you to build
and program mechanical robots that can perform different actions
based on the number of high-decibel (loud) sounds that the sound
sensor detects when a program is running.
A
B
C
D
Super Sphere
Getting started with the Super Sphere:
We suggest you read and follow the instructions in this
manual
in order. But here is an overview of the
instructions for building and using the Super Sphere to get
you oriented:
1.
Download the app following the instructions on
page 7.
2. Follow the assembly instructions on page 14 to
build
the first model, the Super Sphere. Make sure you have
inserted the batteries into the Bluetooth battery box
correctly according to the instructions on page 2.
3. Shake the model until the blue light on the Bluetooth
battery box turns on, indicating that the module is on.
The module automatically turns off after about a
minute of inactivity to save battery power. You simply
have to jiggle the model when you want to turn it on
again. It’s a
movement-activated on-off switch!
4. Now you can
connect the tablet or smartphone to the
model via the free app. Follow the instructions at the
bottom of page 7.
5. To drive the Super Sphere in
remote control mode,
follow the instructions on page 8 and the
driving tips on
pages 22–23.
6. To run a
program on the Super Sphere, follow the
instructions on page 24. For detailed explanations of
how the
programming mode of the app works, refer to
pages 9–13. Try editing the program for Super Sphere, or
writing your own from scratch.
7. Now, proceed with building the
other models, one at a
time, and running the
sample programs given on the
programming page found after the assembly
instructions for each model.
Getting Started
Summary of Contents for SUPERSPHERE
Page 33: ...18 12 13 14 15 16 17 31 Bigfoot Bot x4 x2...
Page 34: ...19 20 19 32 x2 BIGFOOT BOT Feetdone Fold and connect the shell pieces at the joints...
Page 41: ...39 Front body Back body Penguin Bot 28 29 Side view Side view Frontbodyassemblydone...
Page 42: ...40 PENGUIN BOT 31 x2 motor A motor B Done 30...
Page 45: ...43 30 mm axle 30 mm axle 6 7 8 9 10 11 12 Dancing Bot Front view...
Page 46: ...44 13 x2 13 14 DANCING BOT Wheels done Fold and connect the shell pieces at the joints...
Page 50: ...48 30 mm axle x2 5 9 10 11 6 7 8 HORSESHOE CRAB BOT...
Page 52: ...50 15 16 14 HORSESHOE CRAB BOT...
Page 53: ...51 Horseshoe Crab Bot 18 19 17 Shelldone...
Page 54: ...52 20 motor A motor B Done HORSESHOE CRAB BOT...
Page 57: ...55 Cornhole Bot 9 10 7 8...
Page 58: ...56 CORNHOLE BOT 11 12...
Page 62: ...fold and link the joint Solutions 60 GEOMETRIC SHAPES LESSON 1 2 3 4 5 x4...
Page 64: ...620384 03 190620...


