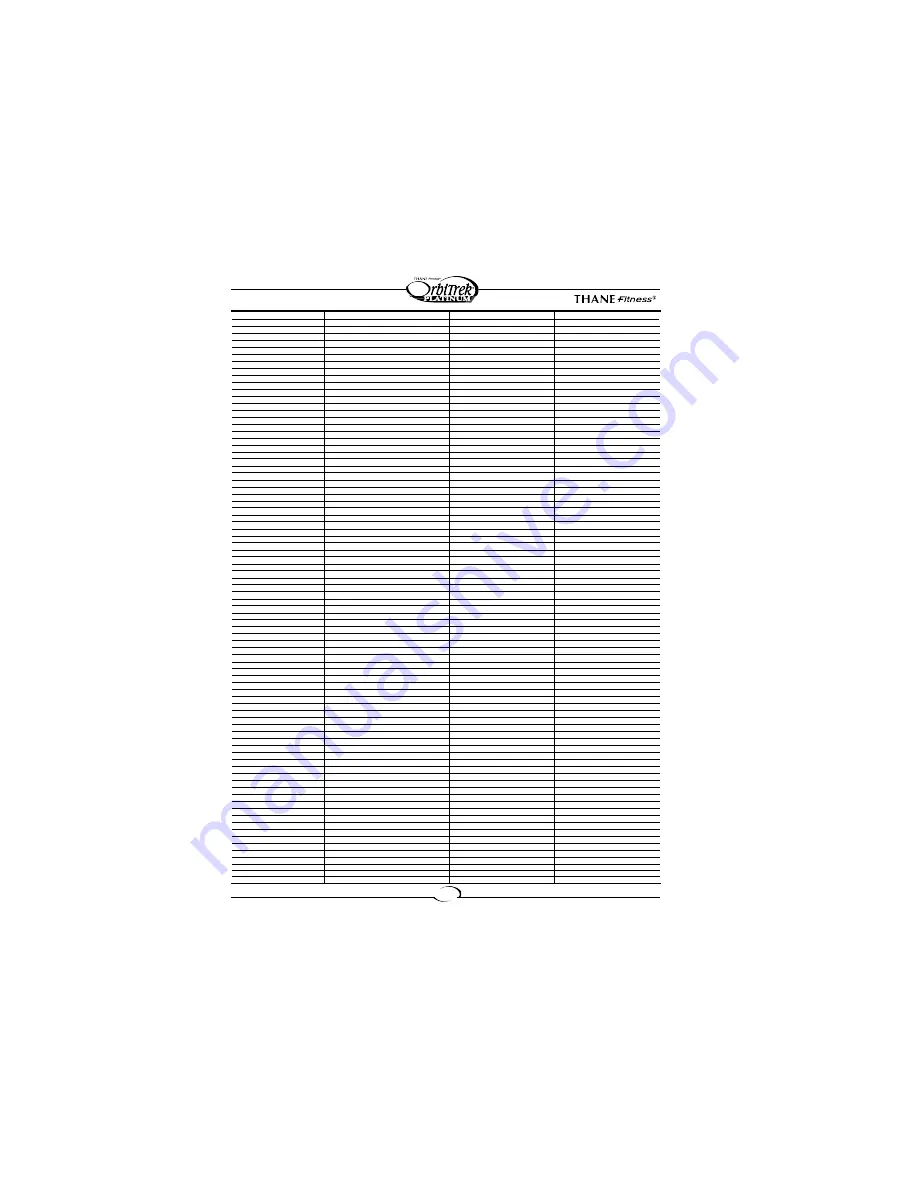
background image

Owner’s Manual

8

PART NO.

DESCRIPTION

SPECIFICATION

QUANTITY

1

Main frame

1

2

Front bottom tube

1

3

Back bottom tube

1

4

Left coupler bar

1

5

Right coupler bar

1

6L

Left pedal tube

1

6R

Right pedal tube

1

7L

Left handle bar

1

7R

Right handle bar

1

8L1

Left bottom chain cover

1

8L2

Left upper chain cover

1

8R1

Right bottom chain cover

1

8R2

Right upper chain cover

1

9

Left fan wheel hub

1

10

Right fan wheel

1

11L

Left pedal  

1

11R

Right pedal  

1

12A

Handle bar shaft

1

12BL

Left hinge bolt

1/2"

1

12BR

Right hinge bolt

1/2"

1

13

Adjustable cap

2

14

Foam grip

2

15

Round cap

2

16

Plastic sleeve

4

17

Knob bolt

2

18

Plastic roller

2

19

Bushing 3

10

20

Bushing 1

4

21

Bushing 2

2

22

Fan wheel axle

1

23

Nut

5

24

Aluminum bar

1

25

Nut

2

26

Sensor

1

27 (L, R)

(Left, Right) Crankshaft

1

28

Chain wheel

1

29

Washer 2

1

30L

Ball collar 1

1

30R

Ball collar 2

1

31

Ball collar bearing

2

32

Ball collar brace

2

33

Nut

1

34

Chain

1

35

Friction belt

1

36

Tension adjustment knob

1

37

Nut

M6

2

38

Screw

ST4.2*10F

8

39

Screw

ST4.8*15

2

40

Screw

ST4.8*25

6

41

Screw

M5*18

1

42

Screw

ST4.2*25

16

43

Screw

M6

2

44

Hex head bolt

3/8"*55

2

45

Lock nut

3/8"

2

46

Carriage bolt

3/8"*60

4

47

Acorn nut

3/8"

4

48L

Left lock nut

1/2"

1

48R

Right lock nut

1/2"

1

49

Computer bracket

1

50

Computer

1

51

Spring washer

1/2"

2

52

Spring washer

3/8"

2

53

Arc washer

3/8"

4

54

Screw

ST4.2*15

4

55

Washer 1

7/8"

1

56

D shape washer

2

57

Hinge screw

3/8"*20

2

58

Spring washer

6

2

59

Hex head bolt

3/8"*50

4

60

Washer

3/8"

4

61

Spring washer

3/8"

4

62

Nut

3/8"

4

63

Plastic sleeve

2

64

"U" bracket

2

65

Plastic washer

2

66

Big washer

10

2

67

Lock nut

M10*1

2

68

Shaft

1

69

Nut

M10*1.25

2

70

Round Cap

2

71

Washer

2

Summary of Contents for OrbiTrek Platinum

Page 1: ...r s Manual This Product is Brought to You by Thane Direct Canada Inc Toronto Ontario www thane ca Thane Direct UK Limited Admail 68 PL1 1AD www thanedirect co uk www thanefitness com Making Fitness Fun 9 02 ...

Page 2: ...tions carefully before using this product Retain this manual for future reference Safety Notice 2 Assembly Usage 3 6 Exploded View 7 Parts List 8 Thane Direct Canada Inc Toronto Ontario www thane ca Thane Direct UK Limited Admail 68 PL1 1AD www thanedirect co uk ...

Page 3: ... required 6 Use the OrbiTrek Platinum only for its intended use as described in this manual DO NOT use any other accessories not recommended by the manufacturer 7 DO NOT place any sharp objects around the OrbiTrek Platinum 8 Handicapped or disabled persons should not use the OrbiTrek Platinum without the presence of a qualified health professional or physician 9 Before exercising always do stretch...

Page 4: ...once its assembly is complete 2 It s a good idea to flatten out the shipping carton and use it as a work surface when you assemble the OrbiTrek Platinum Keep a few paper towels handy since some of the components are lightly pre greased ASSEMBLY USAGE 46 3 8 x 60 Carriage Bolt 4X 47 3 8 Acorn Nut 4X 62 3 8 Nut 4X 53 3 8 Arc Washer 4X 60 3 8 Washer 4X 17 Knob Bolt 2x 12A Handle Bar Shaft 1X 56 D Sha...

Page 5: ...ow the same procedure for attaching the rear tube Fig 1 Attach the pedals 11L and 11R to their respective pedal tubes 6L and 6R using 4 3 8 hex head bolts 59 4 3 8 washers 60 4 3 8 spring washers 61 4 3 8 nuts 62 Line up the holes in the pedal with the holes on the pedal tube Insert the hex head bolt 59 through the holes Slide the washer 60 the spring washer 61 and the nut 62 over the hex head bol...

Page 6: ...ck nuts 48L and 48R to the hinge bolts 12BL and 12BR using the wrench and the Allen wrench IMPORTANT The hinge bolt 12BL 12BR must fully penetrate the nylon ring inside the spring nut 66R 66L This will ensure the stability and durability of your OrbiTrek Platinum In order to install the hinge bolt properly keep it perfectly straight as the bolt goes through the pedal tubing and the crankshaft If t...

Page 7: ...t and secure them with knob bolts 17 Assembly is complete 7L 17 4 Fig 4 Step 4 Attaching the handle bars 16 Tension adjustment The assembly of your OrbiTrek Platinum is now complete As you try it for the first time you should adjust the tension to a desirable level before you begin a full workout To increase tension turn the tension knob to the right and to decrease tension turn the tension knob t...

Page 8: ...rts are pre assembled This diagram is not intended as an instruction for assembling the OrbiTrek Platinum but simply as a reference in case certain parts need service or replacement Thane Fitness reserves the right to alter the details of the OrbiTrek Platinum as depicted in this owner s manual without prior notice ...

Page 9: ...t 2 26 Sensor 1 27 L R Left Right Crankshaft 1 28 Chain wheel 1 29 Washer 2 1 30L Ball collar 1 1 30R Ball collar 2 1 31 Ball collar bearing 2 32 Ball collar brace 2 33 Nut 1 34 Chain 1 35 Friction belt 1 36 Tension adjustment knob 1 37 Nut M6 2 38 Screw ST4 2 10F 8 39 Screw ST4 8 15 2 40 Screw ST4 8 25 6 41 Screw M5 18 1 42 Screw ST4 2 25 16 43 Screw M6 2 44 Hex head bolt 3 8 55 2 45 Lock nut 3 8...

Page 10: ......

Reviews: