background image

EAT SMART Nutritional Guide 

with 6 Week Step By Step Training Program

18

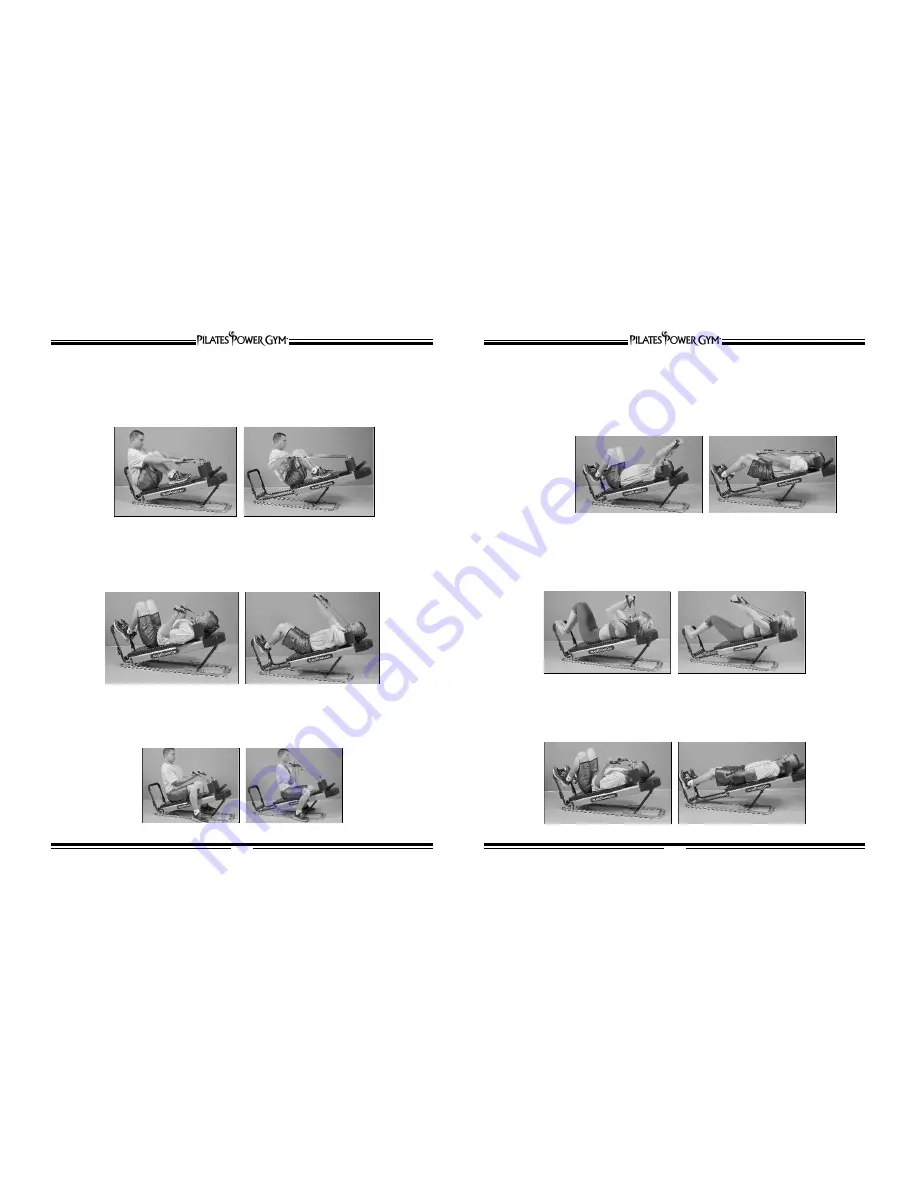
Bench Press

Lie on the glide board. Place the balls of your feet, approximately 10 inches apart, on the foot bar.
Grab the handle holders with your palms facing forward. Inhale slowly and extend the handles upward,
keeping your palms facing forward. Inhale and slowly and extend your arms upward, being careful not
to lock your elbows. Exhale as you pull your arms back. Slowly bring your arms back to the beginning
position as you inhale. 

Works the chest, shoulders, triceps, and abdominals.

Start

Finish

Arm Pullover

Lie flat on the glide board and place your feet approximately 6 inches apart on the foot grip bar. 
Grab the handle holders and with your palms facing upward fully extend your arms over your head.
Inhale and pull your arms, in an arc-like motion to your side until they touch your thighs. Your palms 
will now be facing downwards. Lift your head and shoulders, using your abdominals, as you pull your
arms over your head. Exhale as you pull your arms back. Slowly bring your arms back to the beginning
position as you inhale. 

Great for 
strengthening 
your shoulders,
upper back, 
triceps, upper 
abs, chest, 
and lats.

EAT SMART Nutritional Guide 

with 6 Week Step By Step Training Program

17

Seated Upright Row

Elevate the glide board to your comfort level. Sit on the glide board, facing the headrest, and bend
your knees. Reach out and grab the handle holders. With your palms facing down, pull your hands
back towards your chest in a rowing motion. Inhale as you pull back. Exhale as you pull your arms back.
Slowly bring your arms back to the beginning position as you inhale. 

Works the calves, legs, hips, abdominals, lower and upper back, and shoulders.

Start

Finish

Start

Finish

Seated Curls

Sit on the glide board, facing the handle holders, with your legs straddling the glide board. Grab the
handle holders with your palms up. Arms should be extended out in front of you. Keeping your elbows
tight against your sides, inhale and  bring your palms towards your shoulders. Keep your back straight
at all times. Exhale as you pull your arms back. Slowly bring your arms back to the beginning position
as you inhale. 

Start

Finish

Tricep Extension

Lie flat on the glide board and place your feet approximately 3 inches apart on the foot grip bar. Grab
the handle holders with your palms up, and extend them upward. Keep your upper arms in a stationary
position, inhale, and extend the handles toward your knees. Your palms will now be facing downward
and your arms will be fully extended. Exhale as you pull your arms back. Slowly bring your arms back to
the beginning position as you inhale. 

Great workout for your triceps and forearms.

Start

Finish

Lying Tricep Curls

Lie flat on the glide board and place your feet approximately 3 inches apart on the foot grip bar. 
Grab the handle holders, fully extend your arms, and bring them to your sides. Keep your upper arms
stationary against your sides, inhale, and bend your elbows,  bringing your arms down towards your
shoulders. Exhale as you pull your arms back. Slowly bring your arms back to the beginning position as
you inhale. 

Start

Finish

Focus on 
working 
your biceps, 
forearms, 
and shoulders.

Summary of Contents for Pilates Power Gym

Page 1: ...ep By Step Training Program A Quality Thane Fitness Product Distributed by Thane Direct Canada Inc Toronto ON www thane ca Thane Direct UK Ltd Admail ADM3996 London W1T 1ZU www thanedirect co uk Copyright 2005 Thane International Inc All Rights Reserved Model AB 7620 ...

Page 2: ...cep Curls 14 Mermaid 15 Pelvic Tilt 15 Knee Stretch 15 Prance 16 EXERCISES FOR STRENGTH TRAINING 16 Seated Row 16 Seated Upright Row 17 Bench Press 17 Seated Curls 17 Arm Pullover 18 Triceps Extension 18 Lying Triceps Curls 18 Decline Abdominal Crunch 19 Pulley Ab Crunch 19 Lying High Pull 19 Side Deltoid Raises 20 Squat 20 One Legged Squat 20 Twisting Squat 21 Gluteus Kickbacks 21 Lunges 21 6 WEE...

Page 3: ...xisting health problems Read all instructions and watch instructional videotapes before using The manufacturer and the marketing companies assume no responsibility for personal injury or property damage sustained by or through the use of this product SAVE THESE INSTRUCTIONS Thank you and congratulations for making the Pilates Power Gym your choice in all over body strength and aerobic training The...

Page 4: ...ndle and raise the glide board to your desired position of elevation Resistance can be increased or decreased in two ways By removing or inserting one two three or four power cords and or raising and lowering the glide board to any of its five positions of incline you can achieve 20 different resistance levels The Pilates Power Gym is light and easy to store Lower the glide board to its flat posit...

Page 5: ...h 6 Week Step By Step Training Program 7 1 Remove the lock knobs 58 turn the cross bar 21 to the position as shown in the left drawing and then lock it by the lock knobs 58 2 Insert the foot rest frame 24 into the cross bar 21 and fix it by the pins 22 ASSEMBLY INSTRUCTION EXPLODED DIAGRAM 1 Fig 1 Fig 2 ...

Page 6: ...Screw 6 ST4 2 10 29 Lock Nut 25 M8 30 Washer 23 º8 31 Roller 2 º40 16 32 Bolt 2 M8X30 33 Bolt 4 M8X45 34 Base Frame 1 35 Adjustment Frame 1 36 Adjustment Tube 1 37 U Handle 1 º8 38 Foam Pad 2 Ê95 Ê23 135 39 Plastic Protection Cover 1 40 Bearing 26 41 Sliding Wheel 5 Ê64 16 42 Bolt 2 M8X50 43 Foam Tube Frame 2 44 Bolt 8 M5 10 45 Bearing Cover 2 46 Bearing 2 47 Axis l 5 M8 45 48 Lock Nut 8 M5 49 Fix...

Page 7: ... movements Keep your back neck and shoulders relaxed As you work out don t lock your knees Locked knees can cause hyperextension and injury Keep your spine in a soft curve and not arched All of the Pilates exercises will require the machine to be in the flat position and you should use all tension cords during the foot workout The strength training exercises require that the glide board be used at...

Page 8: ...legs making sure not to lock your knees Exhale and slowly return to the beginning position Start Finish Start Finish Bicep Curls Sit on the glide board with your back near the foot grip bar and your feet on the headrest Grab the handles and lean back using your abdominal muscles for support Keeping your elbows tight against your waist bring your arms up towards your chest while inhaling and back d...

Page 9: ...our entire body The glide board may be positioned at your desired resistance level throughout the strength training program One two three or four power cords may be added giving you 20 levels of resistance For more resistance increase the ingle of the guide board The steeper the angle of the guide board the greater the resistance will be The power cords also offer additional resistance You may use...

Page 10: ...t in a rowing motion Inhale as you pull back Exhale as you pull your arms back Slowly bring your arms back to the beginning position as you inhale Works the calves legs hips abdominals lower and upper back and shoulders Start Finish Start Finish Seated Curls Sit on the glide board facing the handle holders with your legs straddling the glide board Grab the handle holders with your palms up Arms sh...

Page 11: ...Place your feet on the foot grip bar approximately 3 inches apart Cross your arms across your chest Inhale contract your abdominal muscles and as you push with your feet raise your head and shoulders Exhale and slowly return to the starting position lowering your head and shoulders Your upper and lower abdominals will really benefit from this exercise Start Finish Pulley Ab Crunch Lie flat on the ...

Page 12: ...mfortable sharing your photos and your success story please contact us at www thanefitness com EAT SMART Nutritional Guide with 6 Week Step By Step Training Program 21 Twisting Squat Lie on the glide board and place both feet on the foot grip bar approximately 3 inches apart Exhale and slowly push back Slightly drop your knees to one side as you extend them outward This will create a slight twist ...

Page 13: ...d orange juice 2 slices whole wheat toast or 1 bagel with 2 tbs jam SNACK 2 apples LUNCH Tuna Sandwich 2 slices 7 grain bread with j cup water packed tuna rinsed well 1 tbs reduced calorie mayonnaise and chopped celery lettuce and tomato slices j red pepper cut in strips SNACK 1 orange and l cup pineapple chunks DINNER 4 oz skinless chicken breast grilled 1 small baked potato with 1 tbs butter j c...

Page 14: ...By Step Training Program 25 DAY 8 1525 calories 40 gr fat BREAKFAST j cup calcium fortified orange juice 2 slices 7 grain bread toasted with 1 tbs butter each SNACK 1 apple j cup low fat cottage cheese LUNCH Sandwich 2 slices 7 grain bread 2 oz turkey or chicken breast 1 tbs reduced calorie mayonnaise lettuce tomato slices l cup coleslaw SNACK 1 j cups grapes DINNER 6 oz baked seafood 2 cups brocc...

Page 15: ...ted to body fat and body fat once accumulated comes off much slower and with much greater difficulty than it goes on a fact with which many people are already familiar Breakfast can go either way If you re hungry in the morning by all means eat away If not eat lightly Follow your body s signals EAT SMART Nutritional Guide with 6 Week Step By Step Training Program 27 SUPER SLIM DIET PLAN Don ts It ...

Page 16: ...ture intended Most of us have been conditioned to eat when it s time to eat lunchtime dinnertime breakfast But the truth is that it is far more natural to eat when you re hungry That means truly hungry not just craving food As much as possible try to follow this simple but powerful principle of eating The second timing principle to stop eating when you re no longer hungry is also very powerful but...

Reviews: