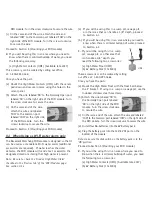
3. Attach the other end of the
cable labeled ‘NO’ to the
Normally Open port labeled
‘NO’ on the right side of the
WiFi module. Turn the screw
clockwise to secure the wire.
4. On the same end of the remote terminal cable,
attach the cable end labeled ‘COM’ to the Common
port labeled ‘COM’ on the right side of the WiFi
module. Turn the screw clockwise to secure the wire.
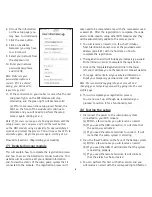
5. Connect the USB charger
to the WiFi module using
the included mini USB
cable
6. Plug the other end of the
USB charger into your power outlet
7. The red and green lights on the WiFi module should
start alternating. This means that it is ready for setup.
Note: In order to get your messages during a power outage,
we recommend using the 12 volt battery providing backup
power to your backup system.
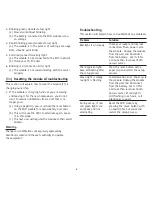
8. Using the 6 foot, 12 volt battery cable, attach the large
ringlug labeled ‘positive’ (+), to the positive post of
the battery.
9. Attach the smaller ringlug labeled negative (-), to the
negative post of the battery.
10. Plug the power jack
at the other end of
the wire into the
12V/6V DC Battery
port on the bottom
of the Module.
Note: In order to receive
notification during a power
outage, you must have a Wi-Fi router / modem with a built-in
battery backup or an uninterruptible power supply (UPS)
powering the equipment.
Proceed to section 5 (Mounting your WiFi module)
(3) Accessories
When connected using a USB port, it is possible to add
a high water detector using either a float (HWF) or
contacts (HWC). If water reaches the water detector, the
WiFi module will send a text or email to the designated
locations stating that high water is present.
Note: Be sure to check the ‘Used as High Water Alarm’
checkbox in the ‘Devices tab’ of the ‘WiFi Modules page’.
See section 9-1-C
1.
If you will be using this in a sump
pit, sewage pit, or other area that
can handle a 3/8” depth, you
need the following accessory:
(a) High Water Float (HWF)
This accessory can be ordered by calling
our office at: 1-800-991-0466.
Once you have the part:
(a) Mount the High Water Float (HWF) with the float ball
below the ‘L’ bracket. If using in a sump or sewage
pit, use the included stainless
steel hose clamp.
(b) Attach the wire labeled ‘NO’ to
the Normally Open port labeled
‘NO’ on the right side of the
HWF
-
+
3

