background image

6

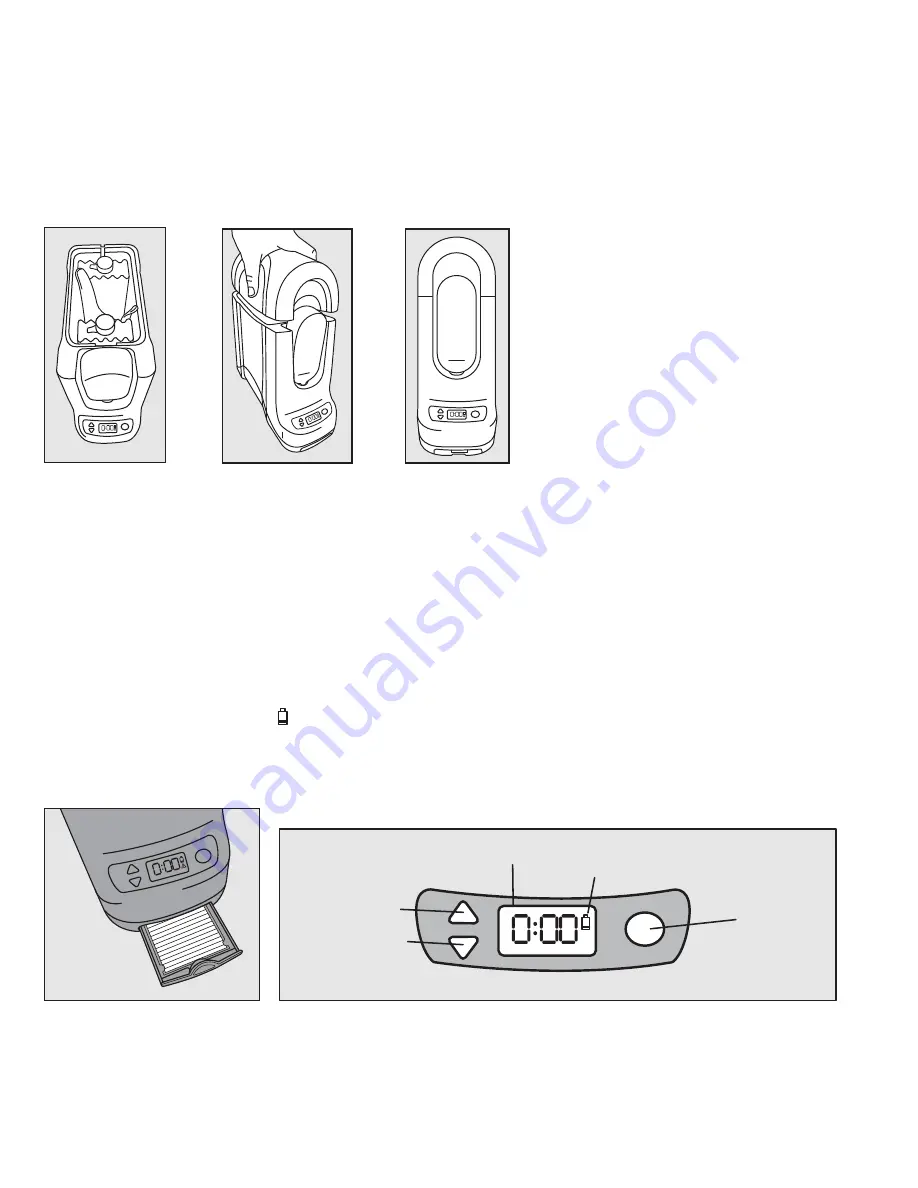
Up arrow button

Down arrow button

LCD Screen

Low battery indicator

Power button

SETTING THE UNIT IN STAND-BY MODE

1.  Turn the unit ON by pressing the power button for 2 seconds.

2.  Using the up/down buttons, set the desired warming time.

     Be aware of the following:


a.  Use the provided chart to determine the recommended warming time.


NOTE: The recommended warming times are not exact durations. Adjust the   


              warming times as desired.

              b.  For initial use, the LCD screen will read: 0:00. After using the unit for a warming    


              cycle, the unit will display the warming time used last. The warming time can be    


              adjusted up/down as desired (up to a max of 15 minutes).


C.  The battery icon     will appear if the remote battery level is low.

3.  After 5 seconds from the last button pushed, the LCD screen will show two circulating  

     zeros 5 times, then will show set warming time indicating that the unit is in standby mode.

NOTE: The remote will pulse a soft blue light indicating the warmer is in stand-by mode.

• Do not thaw frozen breast milk in the bottle warmer.

 Do not place bottle/jar directly onto heating element.

• Always use lift-out basket when warming.

6.  Replace cover onto the bottle warmer. Cover must remain securely on the bottle warmer   


     during use.

Summary of Contents for Y6467

Page 1: ... reservoir Lift out basket Ice packs 2 Control panel Warming time reference drawer Y6467 Remote button Remote Bottle Warmer Instruction Manual Questions Let s talk help thefirstyears com USA Canada 1 800 704 8697 ...

Page 2: ...y attachments not recommended by the appliance manufacturer may cause injuries 16 Do not place on or near a hot gas or electric burner or in a heated oven 17 Extreme caution must be used when moving an appliance containing hot oil or other hot liquids 18 To disconnect turn any control to off then remove plug from wall outlet 19 Do not use appliance for other than intended use 20 This product does ...

Page 3: ...n color may form on the inner surfaces of the warming chamber and can cause damage to the unit To remove mineral deposits 1 Unplug the unit 2 Remove the basket and wash separately as indicated above 3 Pour 2 oz distilled white vinegar into the warming chamber and let it stand for an hour or two longer if necessary 4 Pour out the vinegar and rinse the chamber two or three times with 3 or 4 oz of cl...

Page 4: ...teries are not to be mixed Do not dispose of batteries in fire as they may explode or leak Never use a screwdriver or any other tool to pry batteries from the compartment as the supply terminals could be short circuited Do not leave batteries in the product for long periods of non use Failure to follow these instructions may cause batteries to make popping sounds and leak battery acid which could ...

Page 5: ... warmer into stand by mode reference next section The remote will pulse a blue light indicating the bottle warmer is in stand by mode If the remote s blue light is not pulsing you will need to move either the remote or the warmer unit to a closer proximity to the other and test the range again 5 PREPARING THE UNIT FOR STAND BY MODE 1 Place the unit on a flat and level surface Plug into AC outlet 2...

Page 6: ... cycle the unit will display the warming time used last The warming time can be adjusted up down as desired up to a max of 15 minutes C The battery icon will appear if the remote battery level is low 3 After 5 seconds from the last button pushed the LCD screen will show two circulating zeros 5 times then will show set warming time indicating that the unit is in standby mode NOTE The remote will pu...

Page 7: ... pulse a soft orange light When warming cycle is complete the remote will glow orange for 10 minutes and the bottle warmer LCD screen will display 0 00 To shut off the lights LCD screen and remote prior to the auto shut off time press the power button for 2 seconds From bottle warmer After setting the time press the power button once to activate warming to the preset warming time NOTE After attemp...

Page 8: ... Push power button for 2 seconds to cancel warming It is not recommended to reheat formula or breast milk either serve or dispose of bottle contents after canceling warming cycle 8 Remote battery level low LCD Screen battery icon Remote always check the warmer s LCD screen when setting the unit in standby mode No water in water reservoir Remote is out of range from the bottle warmer LCD Screen nor...

Page 9: ...aintenance of the products Disclaimer of Other Warranties THE EXPRESS WARRANTIES IN THE PRECEDING SECTION ARE EXCLUSIVE AND IN LIEU OF ALL OTHER WARRANTIES However to the extent applicable law does not permit disclaimers of certain implied warranties such warranties are limited to the warranty period identified above Some states and countries do not allow limitations on how long an implied warrant...

Page 10: ...es Reorient or relocate the receiving antenna Increase the separation between the equipment and receiver Connect the equipment into an outlet on a circuit different from that to which the receiver is connected Consult the dealer or an experienced radio TV technician for help This device complies with Part 15 of the FCC Rules Operation is subject to the following two conditions 1 this device may no...

Reviews: