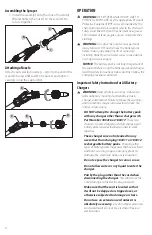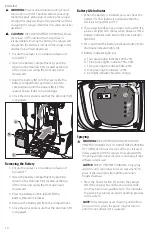
background image

7

• 

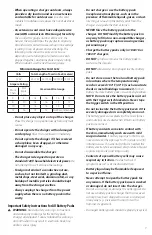
When operating a charger outdoors, always 

provide a dry location and use an extension 

cord suitable for outdoor use.

 Use of a cord 

suitable for outdoor use reduces the risk of electrical 
shock.

• 

An extension cord must have adequate wire 

size (AWG or American Wire Gauge) for safety. 

The smaller the gauge number of the wire, the 
heavier the cord and thus the greater its capacity. 
An undersized cord will cause a drop in line voltage 
resulting in loss of power and overheating. The 
following table shows the correct size to use 
depending on total length of all extension cords 
plugged together, and nameplate ampere rating. 
When in doubt, use the next heavier gauge.

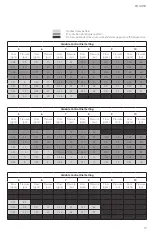
Minimum Gauge for Cord Sets

Volts

Total Length of Cord in Feet (meters)

120V

25 (7.6) 50 (15.2) 100 (30.5) 150 (45.7)

Ampere Rating

American Wire Gauge

More 

Than

Not 

More 

Than

0

6

18

16

16

14

6

10

18

16

14

12

10

12

16

16

14

12

12

16

14

12

Not Recommended

• 

Do not place any object on top of the charger.


Place the charger in a position away from any heat 
source.

• 

Do not operate the charger with a damaged 

cord or plug. 

Have them replaced immediately.

• 

Do not operate the charger if it has received 

a sharp blow, been dropped, or otherwise 

damaged in any way. 

• 

Do not disassemble the charger.

• 

The charger is designed to operate on 

standard 120V household electrical power.

 Do 

not attempt to use it on any other voltage. 

• 

Foreign materials of a conductive nature, 

such as, but not limited to, grinding dust, 

metal chips, steel wool, aluminum foil, or any 

buildup of metallic particles should be kept 

away from the charger cavities.

• 

Always unplug the charger from the power 

supply when there is no battery pack in the 

cavity.

Important Safety Instructions for All Battery Packs

WARNING:


 Read all safety warnings, instructions, 

and cautionary markings for the battery pack, 
charger, and product. Failure to follow the warnings 
and instructions may result in electrical shock, fire, 
and/or serious injury.

• 

Do not charge or use the battery pack 

in explosive atmospheres, such as in the 

presence of flammable liquids, gases, or dust.


Inserting or removing the battery pack from the 
charger may ignite the dust or fumes.

• 

NEVER force the battery pack into the 

charger. DO NOT modify the battery pack in 

any way to fit into a non-compatible charger, 

as battery pack may rupture causing serious 

personal injury.

• 

Charge the battery packs only in 183416  or 

183417 chargers.

• 

DO NOT

 splash or immerse the battery pack in 

water or other liquids.

• 

DO NOT

 allow water or any liquid to enter battery 

pack.

• 

Do not store or use the tool and battery pack 

in locations where the temperature may 

reach or exceed 104° F (40° C) (such as outside 

sheds or metal buildings in summer).

 For best 

battery life store battery packs in a cool, dry location. 

NOTE: Do not store the battery packs in a tool 

with the trigger switch locked on. Never tape 

the trigger switch in the ON position.

• 

Do not incinerate the battery pack even if it is 

severely damaged or is completely worn out.


The battery pack can explode in a fire. Toxic fumes 
and materials are created when lithium-ion battery 
packs are burned.

• 

If battery contents come into contact with 

the skin, immediately wash area with mild 

soap and water.

 If battery liquid gets into the eye, 

rinse water over the open eye for 15 minutes or until 
irritation ceases. If medical attention is needed, the 
battery electrolyte is composed of a mixture of liquid 
organic carbonates and lithium salts.

• 

Contents of opened battery cells may cause 

respiratory irritation.

 Provide fresh air. If 

symptoms persist, seek medical attention.

• 

Battery liquid may be flammable if exposed 

to a spark or flame.

• 

Never attempt to open the battery pack for 

any reason. If the battery pack case is cracked 

or damaged, do not insert into the charger.


Do not crush, drop, or damage the battery pack. Do 
not use a battery pack or charger that has received 
a sharp blow, been dropped, run over, or damaged 
in any way (e.g., pierced with a nail, hit with a 
hammer, stepped on).

•  Damaged battery packs should be properly recycled.

Summary of Contents for 190679

Page 1: ...p com 800 311 9903 info thefgi com 23 Garden St New York Mills NY 13417 Do not return this product to the store For help information or parts contact WARNING Read and fully understand manual before using this product Failure to follow instructions could result in death or serious injury ...

Page 2: ...er 9 Installing the Battery 9 Removing the Battery 10 Battery Life Indicator 10 Spraying 10 CLEANING 11 Battery Pack Cleaning 11 Charger Cleaning Instructions 12 VERTICALWAND STORAGE CLIP 12 NOZZLE STORAGE CLIP 12 STORAGE 12 TRANSPORTATION 12 MAINTENANCE 12 Repairs 12 Replacing the Harness 13 Shut Off Assembly Maintenance 13 Nozzle Maintenance 13 Cap and Strainer Basket Maintenance 14 In Tank Filt...

Page 3: ...ufacturer and or refer to the chemical Safety Data Sheet SDS of the chemical being used This includes at least goggles gloves and protective clothing Failure to use appropriate PPE could result in chemical exposure through skin contact eye contact inhalation or other means After initial assembly extended storage or any possibly damaging event such as a fall always inspect the sprayer for damage an...

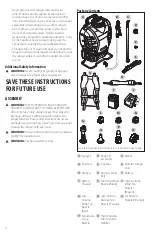
Page 4: ...could occur SAVE THESE INSTRUCTIONS FOR FUTURE USE ASSEMBLY WARNING RISK OF PERSONAL INJURY AND OR PROPERTY DAMAGE DUE TO CHEMICAL EXPOSURE After initial assembly always inspect the sprayer for damage and test it with plain water to check for proper function Ensure all connections are secure and leak free and the hose is free from damage prior to using the sprayer with chemicals WARNING Only use a...

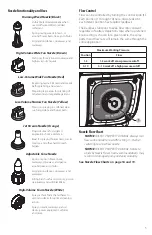
Page 5: ...es driveways and walkways Killing brush such as poison ivy poison oak kudzu and wild blackberry High Volume Foam Nozzle White Sprays a thick foam that adheres to vertical surfaces for optimal cleaning action Spray on walls walkways patios decks power equipment vehicles and more Flow Control Flow can be controlled by turning the control knob 1 Each position 1 through 10 has a discrete detent each d...

Page 6: ... Battery Chargers WARNING Read all safety warnings instructions and cautionary markings for the battery pack charger and product Failure to follow the warnings and instructions may result in electrical shock fire and or serious injury DO NOT attempt to charge the battery pack with any charger other than a charger with Part Number 183416 or 183417 These two chargers a slow charger and a fast charge...

Page 7: ...k fire and or serious injury Do not charge or use the battery pack in explosive atmospheres such as in the presence of flammable liquids gases or dust Inserting or removing the battery pack from the charger may ignite the dust or fumes NEVER force the battery pack into the charger DO NOT modify the battery pack in any way to fit into a non compatible charger as battery pack may rupture causing ser...

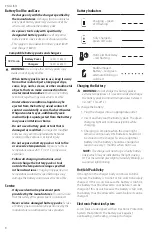
Page 8: ...e specified range may damage the battery and increase the risk of fire Service Only use identical replacement parts provided by the manufacturer This will ensure that the safety of the power tool is maintained Never service damaged battery packs Service of battery packs should only be performed by the manufacturer or authorized service providers Battery Indicators Charging green LED flashing Fully...

Page 9: ...ect the sprayer hose shut off wand and all connections for damage before each use A damaged or loose hose connection can result in unintended exposure to the pressurized chemicals resulting in serious injury or property damage Before you Begin Test the sprayer with plain water before use with chemicals prior to initial use and after prolonged storage Place the sprayer on a stable surface and ensur...

Page 10: ...he battery N from the compartment 5 Close the door and ensure that the door latch 1 is engaged Battery Life Indicator 1 When the battery is installed you can check the battery life This feature is active whether the device is turned ON or OFF 2 The power interface has a rocker style switch 1 a blue LED 2 which shines when power is ON a battery indicator push button 3 and indicator lights 4 3 Press...

Page 11: ...and remove the battery according to the Removing the Battery section 2 Remove the cap 1 and empty any extra chemical from the tank into a suitable container for later use or dispose according to the chemical manufacturer s instructions 3 Use clean water to thoroughly rinse and empty the tank until all chemicals and residues are removed 4 Add approximately 1 quart 1 liter of clean water to the tank...

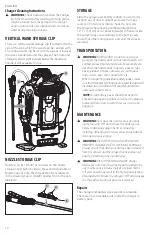
Page 12: ...re carry or transport the battery pack so that metal objects can contact exposed battery terminals For example do not place the battery pack in aprons pockets tool boxes product kit boxes drawers etc with loose nails screws keys coins hand tools etc When transporting individual battery packs make sure that the battery terminals are protected and well insulated from materials that could contact the...

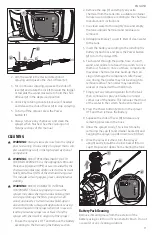
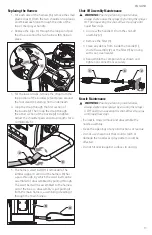
Page 13: ...ssembled to the harness out of the box so disassembly is just pulling it from the main harness assembling is feeding it through the main harness H K Shut Off Assembly Maintenance WARNING Prior to performing maintenance always depressurize the sprayer by turning the sprayer OFF and squeezing the shut off lever to spray until liquid flow stops 1 Unscrew the handle 1 from the shut off assembly 2 2 Re...

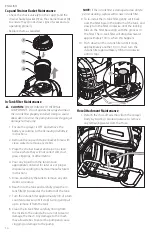
Page 14: ...rt debris or residue 6 Reach into the tank and carefully grasp the in tank filter 1 located at the bottom of the tank 7 Turn the in tank filter approximately 1 8 of a turn counterclockwise until it stops turning and pull up to remove it from the tank 8 Clean the in tank filter carefully rinsing from the inside to the outside Be sure not to tear or damage the mesh Any damage to the mesh may allow d...

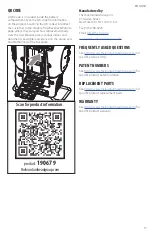
Page 15: ...com product 190679 product 190679 Scan for product information Scan for product information Manufactured by The Fountainhead Group Inc 23 Garden Street New York Mills NY 13417 U S A Fax 315 768 4220 Email Info TheFGI com www TheFountainheadGroup com FREQUENTLY ASKED QUESTIONS See https www thefountainheadgroup com for specific product FAQ s PATENT NUMBERS See https www thefountainheadgroup com for...

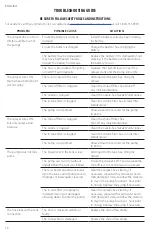
Page 16: ...or the pump to prime The sprayer turns ON but only sprays at low pressure The shut off filter is clogged Clean the shut off filter See Shut off Assembly Maintenance The nozzle is clogged Clean the nozzle See Nozzle Maintenance The in tank filter is clogged Clean the in tank filter See In Tank Filter Maintenance The pump is not primed Allow at least 30 seconds for the pump to prime The pump does no...

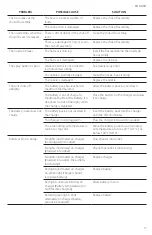
Page 17: ... of charge To maximize the life of the battery it is designed to shut off abruptly when the charge is depleted Place the battery on the charger and allow it to charge The battery pack does not charge The battery pack is not inserted in the charger Insert the battery pack into the charger until the LED illuminates The charger is not plugged in Plug the charger into a working outlet The surrounding ...

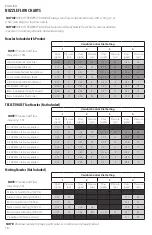
Page 18: ...uded Variable Control Dial Setting NOTE Pressure and Flow may vary 5 1 2 3 4 Flow gpm Pressure psi Flow gpm Pressure psi Flow gpm Pressure psi Flow gpm Pressure psi 0 1 GPM Fan all spray angles 0 11 43 0 2 GPM Fan all spray angles 0 15 22 0 18 29 0 18 29 0 20 36 0 3 GPM Fan all spray angles 0 18 13 0 21 17 0 23 22 0 25 27 0 4 GPM Fan all spray angles 0 19 9 0 22 12 0 25 16 0 28 20 0 5 GPM Fan all ...

Page 19: ...ssure psi Flow gpm Pressure psi Flow gpm Pressure psi Flow gpm Pressure psi Flow gpm Pressure psi Flow gpm Pressure psi 0 21 42 0 23 51 0 25 59 0 26 67 0 28 33 0 31 39 0 33 47 0 34 50 0 36 54 0 38 61 0 31 24 0 34 29 0 37 35 0 39 39 0 41 43 0 44 49 0 33 18 0 37 22 0 41 27 0 43 30 0 45 35 0 49 40 0 35 14 0 39 17 0 43 21 0 46 24 0 49 28 0 53 33 0 37 9 0 41 11 0 46 14 0 49 16 0 53 19 0 58 24 0 38 6 0 ...

Page 20: ...m 23 Garden St New York Mills NY 13417 Ne retournez pas ce produit au magasin Pour obtenir de l aide des renseignements ou des pièces communiquez avec nous AVERTISSEMENT Lire et comprendre entièrement ce manuel avant d utiliser ce produit Si ces consignes ne sont pas suivies cela pour rait entraîner la mort ou des blessures graves ...

Page 21: ...terie 27 Remplissage du pulvérisateur 28 Installation de la batterie 29 Retrait de la batterie 29 Voyant de charge de la batterie 29 Pulvérisation 29 NETTOYAGE 30 Nettoyage du bloc batterie 31 Directives de nettoyage du chargeur 31 PINCE D ENTREPOSAGEVERTICAL DE LA LANCE 31 PINCE D ENTREPOSAGE DES BUSES 31 ENTREPOSAGE 31 TRANSPORT 31 MAINTENANCE 31 Réparations 31 Remplacement du harnais 32 Entreti...

Page 22: ...e et suivre toutes les instructions et précautions sur l étiquette du fabricant des substances chimiques qui seront utilisées dans ce pulvérisateur Utiliser l équipement de protection individuelle EPI approprié comme recommandé par le fabricant de la substance chimique ou consulter la fiche signalétique de la substance chimique utilisée L EPI comprend au moins des lunettes de sécurité des gants et...

Page 23: ...ettre ni ranger le pulvérisateur à un endroit où il peut tomber ou être entraîné dans une baignoire ou un évier Consignes de sécurité supplémentaires AVERTISSEMENT Ne jamais modifier le pulvérisateur ou une de ses pièces Des dommages ou blessures personnelles pourraient survenir CONSERVERCESDIRECTIVES POURUNEUTILISATIONFUTURE ASSEMBLAGE AVERTISSEMENT RISQUE DE BLESSURES PERSONNELLES ET DE DOMMAGES...

Page 24: ... long des clôtures entrées et voies piétonnières Élimination des broussailles comme le sumac vénéneux le sumac à feuille de chêne la vigne japonaise et la ronce commune Buse pour mousse à débit élevé Blanche Pulvérise une mousse épaisse qui adhère aux surfaces verticales pour un nettoyage optimal Pulvériser sur les murs les entrées les patios ou terrasses les matériaux motorisés les véhicules et p...

Page 25: ...s directivesdesécuritéainsiquelesmisesengardeausujet dubloc batterie duchargeuretduproduit Lenon respect desavertissementsetdesdirectivespeutentraînerdes déchargesélectriques desincendiesetdesblessuresgraves NE PAS essayer de recharger le bloc batterie avec chargeur autre que celui portant le numéro de pièce 183416 ou 183417 Ces deux chargeurs un chargeur rapide et un lent ainsi que le bloc batter...

Page 26: ...erie dansuneatmosphèreexplosive commeen présencedeliquides degazoudepoussières inflammables Insérerouretirerlebloc batteriedu chargeurpeutmettrefeuauxpoussièresouauxvapeurs NE JAMAIS forcer le bloc batterie dans le chargeur NE PAS modifier le bloc batterie de quelque façon que ce soit dans un chargeur non compatible car cela pourrait causer la rupture du bloc batterie et causer des blessures perso...

Page 27: ...iséepeutendommagerlabatterieet augmenterlesrisquesd incendie Réparation N utiliserquedespiècesderechangeidentiques fourniesparlefabricant Celagarantiralemaintien delasécuritédesoutilsélectriques Ne jamais faire l entretien de blocs batteries endommagés L entretien des blocs batteries ne devrait être effectué que par le fabricant ou un fournisseur de service autorisé Voyants de la batterie Chargeme...

Page 28: ...u fabricant concernant les substances chimiques et la fiche signalétique relative aux substances chimiques AVERTISSEMENT Avant chaque utilisation inspecter le pulvérisateur le flexible l assemblage d arrêt la lance et toutes les connexions au cas où ces pièces seraient endommagées Une connexion de flexible endommagée ou mal fixée peut occasionner une exposition accidentelle des substances chimique...

Page 29: ...rs le bas 3 Appuyer sur le bouton de la batterie 2 et soulever la batterie N jusqu à ce qu elle se dégage 4 Enlever la batterie N de son compartiment 5 Fermer la porte et s assurer que le loquet 1 est bien fermé Voyant de charge de la batterie 1 Lorsque la batterie est installée vous pouvez vérifier la charge de la batterie Cette fonction est activée que l appareil soit mis en marche ou à l arrêt ...

Page 30: ... pièces 1 S assurer que le pulvérisateur est en position d ARRÊT et enlever la batterie comme décrit à la section Retrait de la batterie 2 Enlever le capuchon 1 et vider ce qui reste de substance chimique du réservoir dans un contenant qui convient pour une utilisation future ou mettre au rebut selon les directives du fabricant de la substance chimique 3 Utiliser de l eau propre pour rincer à fond...

Page 31: ...es composants et annuler la garantie du pulvérisateur TRANSPORT AVERTISSEMENT RISQUE DE DÉPART DE FEU Ne pas entreposer ou transporter le bloc batterie alors que des objets de métal pourraient entrer en contact avec les bornes exposées de la batterie Par exemple ne pas placer le bloc batterie dans un tablier une poche une boîte à outils la boîte d un ensemble du produit un tiroir etc avec des clou...

Page 32: ...r défaut Le désassemblage s effectue simplement en tirant sur cette sangle à partir du harnais principal et l assemblage s effectue en la rentrant dans le harnais principal H K Entretien de l assemblage d arrêt AVERTISSEMENT Avantd effectuerl entretien toujoursdépressuriserlepulvérisateurenmettantle pulvérisateuràl ARRÊTetenpressantlelevierd arrêtpour pulvériserjusqu àcequel écoulementdeliquideces...

Page 33: ...dre le filtre à intérieur du réservoir 1 situé au bas du réservoir et le retirer délicatement 7 Tourner le filtre intérieur du réservoir d environ 1 8 de tour dans le sens horaire jusqu à ce qu il arrête de tourner et tirer vers le haut pour l enlever du réservoir 8 Nettoyer soigneusement le filtre en rinçant de l intérieur vers l extérieur S assurer de ne pas déchirer ou endommager la maille Sino...

Page 34: ...9 produit 190679 Balayerpourobtenirdesinformationssurleproduit Balayerpourobtenirdesinformationssurleproduit Fabriqué par The Fountainhead Group Inc 23 Garden Street New York Mills NY 13417 U S A Télécopieur 315 768 4220 Courriel Info TheFGI com www TheFountainheadGroup com FOIRE AUX QUESTIONS Voir https www thefountainheadgroup com pour la foire aux questions précises sur le produit NUMÉROS DE BR...

Page 35: ...filtreintérieurduréservoir La pompe n est pas amorcée Attendre au moins 30 secondes pour que la pompe s amorce Le pulvérisateur se met en marche mais ne pulvérise qu avec une faible pression Le filtre d arrêt est bouché Nettoyer le filtre d arrêtVoir Entretiende l assemblaged arrêt La buse est bouchée Nettoyer la buse Voir Entretiendelabuse Le filtre intérieur du réservoir est bouché Nettoyer le f...

Page 36: ...idir La batterie est déchargée Pour maximiser la durée de vie de la batterie elle est conçue pour arrêter brusquement de fonctionner lorsque la charge est épuisée Placer la batterie sur le chargeur et la laisser recharger Le bloc batterie ne charge pas Le bloc batterie n est pas bien inséré dans le chargeur Insérer le bloc batterie dans le chargeur jusqu à ce que le voyant à DEL s allume Le charge...

Page 37: ...37 FRANÇAIS ...

Page 38: ...le des réglages variables REMARQUE La pression et le débit peuvent varier d environ 5 1 2 3 4 Débit gal min Pression psi Débit gal min Pression psi Débit gal min Pression psi Débit gal min Pression psi Éventail 0 1 gal min tous les angles de jets 0 11 43 Éventail 0 2 gal min tous les angles de jets 0 15 22 0 18 29 0 18 29 0 20 36 Éventail 0 3 gal min tous les angles de jets 0 18 13 0 21 17 0 23 22...

Page 39: ...ession psi Débit gal min Pression psi Débit gal min Pression psi Débit gal min Pression psi 0 21 42 0 23 51 0 25 59 0 26 67 0 28 33 0 31 39 0 33 47 0 34 50 0 36 54 0 38 61 0 31 24 0 34 29 0 37 35 0 39 39 0 41 43 0 44 49 0 33 18 0 37 22 0 41 27 0 43 30 0 45 35 0 49 40 0 35 14 0 39 17 0 43 21 0 46 24 0 49 28 0 53 33 0 37 9 0 41 11 0 46 14 0 49 16 0 53 19 0 58 24 0 38 6 0 43 8 0 48 10 0 51 12 0 55 14...

Page 40: ...m 800 311 9903 info thefgi com 23 Garden St New York Mills NY 13417 No devuelva este producto a la tienda Para obtener ayuda información o piezas comuníquese con ADVERTENCIA Lea y comprenda el manual antes de usar este producto El incumplimiento de las instrucciones puede ocasionar la muerte o lesiones graves ...

Page 41: ...rizador 48 Instalación de la batería 49 Retirar la batería 49 Indicador de vida de la batería 49 Rociado 49 LIMPIEZA 50 Limpieza de la batería 51 Instrucciones de limpieza del cargador 51 CLIP DE ALMACENAMIENTO DE LAVARILLAVERTICAL 51 CLIP DE ALMACENAMIENTO DE LA BOQUILLA 51 ALMACENAMIENTO 51 TRANSPORTE 51 MANTENIMIENTO 51 Reparaciones 51 Reemplazo del arnés 52 Mantenimiento del conjunto de cierre...

Page 42: ...e este pulverizador Lea y siga todas las instrucciones y precauciones de la etiqueta del fabricante de los productos químicos que se utilicen en este pulverizador Utilice el equipo de protección personal EPP adecuado según las recomendaciones del fabricante del producto químico y o consulte la hoja de datos de seguridad SDS del producto químico que se utilizará Esto incluye al menos gafas guantes ...

Page 43: ...guarde el aparato donde pueda caerse o ser empujado dentro de una bañera o lavabo Información de seguridad adicional ADVERTENCIA No modifique nunca el pulverizador ni ninguna de sus partes Podrían producirse daños o lesiones GUARDEESTASINSTRUCCIONES PARASUUSOFUTURO ENSAMBLAJE ADVERTENCIA RIESGO DE LESIONES Y O DAÑOS A LA PROPIEDAD DEBIDO A LA EXPOSICIÓN A PRODUCTOS QUÍMICOS Después del ensamblaje ...

Page 44: ...as para vehículos y caminos Eliminación de arbustos como hiedra venenosa roble venenoso kudzu y mora silvestre Boquilla de espuma de alto volumen Blanca Rocía una espuma gruesa que se adhiere a superficies verticales para una acción de limpieza óptima Rocíe en paredes pasarelas patios plataformas equipos eléctricos vehículos y más Control de flujo El flujo se puede controlar girando la perilla de ...

Page 45: ...ndelabatería elcargadoryelproducto Elincumplimientodelas advertenciaseinstruccionespuedeprovocardescargas eléctricas incendiosy olesionesgraves NO intente cargar la batería con ningún otro cargador que no sea uno con el número de pieza 183416 o 183417 Estos dos cargadores un cargador lento y un cargador rápido y las baterías están diseñados específicamente para trabajar juntos Estos cargadores no ...

Page 46: ...xplosivas comoenpresenciadelíquidos gases opolvoinflamables Insertaroquitarlabateríadel cargadorpuedeencenderelpolvoolosvapores NUNCA fuerce la batería en el cargador NO modifique la batería de ninguna manera para que encaje en un cargador no compatible ya que la batería puede romperse y causar lesiones graves Cargue las baterías solo en cargadores 183416 o 183417 NO salpique o sumerja la batería ...

Page 47: ...nadecuada o a temperaturas fuera del intervalo especificado puede dañar la batería y aumentar el riesgo de incendio Servicio Use solo piezas de repuesto idénticas suministradas por el fabricante original Esto garantizará que la calidad de la herramienta eléctrica se mantenga No repare nunca las baterías dañadas El servicio de las baterías sólo debe ser realizado por el fabricante o los proveedores...

Page 48: ...S de los productos químicos para una mezcla y aplicación seguras ADVERTENCIA Inspeccione el pulverizador la manguera el cierre la varilla y todas las conexiones para descartar daños antes de cada uso Una conexión de manguera dañada o suelta puede dar lugar a una exposición involuntaria a los productos químicos presurizados lo que provocaría lesiones graves o daños a la propiedad Antes de empezar P...

Page 49: ... para abrirla y bajarla 3 Presione el botón de la batería 2 y levante la batería N hasta que se suelte 4 Retire la batería N del compartimiento 5 Cierre la puerta y asegúrese de que el pestillo de la puerta 1 esté enganchado Indicador de carga de la batería 1 Cuando la batería está instalada puede verificar la carga de la misma Esta función está activa tanto si el dispositivo está encendido como a...

Page 50: ...r con productos químicos en ninguna parte del mismo 1 Asegúrese de que el pulverizador esté apagado y quite la batería conforme a la sección Retirarlabatería 2 Retire la tapa 1 y vierta cualquier producto químico que quede en el tanque en un recipiente adecuado para su uso posterior o deséchelo de acuerdo con las instrucciones del fabricante del producto químico 3 Use agua limpia para enjuagar y v...

Page 51: ...as al cierre o a otros componentes y anular la garantía TRANSPORTE ADVERTENCIA PELIGRO DE INCENDIO No almacene lleve o transporte la batería de manera que objetos metálicos puedan entrar en contacto con los terminales expuestos de la misma Por ejemplo no coloque la batería en delantales bolsillos cajas de herramientas cajas de productos cajones etc con clavos sueltos tornillos llaves monedas herra...

Page 52: ...o solo jale del arnés para ensamblarlo debe pasarlo por el arnés H K Mantenimiento del conjunto de cierre ADVERTENCIA Antes de realizar el mantenimiento despresurice siempre el pulverizador apagándolo y apretando la palanca de cierre para pulverizar hasta que el flujo de líquido se detenga 1 Desenrosque la manija 1 del conjunto de cierre 2 2 Retire el filtro 3 3 Limpie todos los restos de suciedad...

Page 53: ...tanque para eliminar cualquier rastro de suciedad restos o residuos 6 Introduzca la mano en el tanque y agarre con cuidado el filtro del tanque 1 ubicado en el fondo de este 7 Gire el filtro del tanque aproximadamente 1 8 de vuelta en sentido antihorario hasta que no gire más y tire para sacarlo del tanque 8 Limpie el filtro del tanque cuidadosamente enjuagándolo de dentro hacia fuera Asegúrese de...

Page 54: ...aobtenerinformacióndelproducto Escanearparaobtenerinformacióndelproducto Fabricado por The Fountainhead Group Inc 23 Garden Street New York Mills NY 13417 U S A Fax 315 768 4220 Correo electrónico Info TheFGI com www TheFountainheadGroup com PREGUNTAS FRECUENTES Consulte https www thefountainheadgroup com para ver las preguntas frecuentes de un producto específico NÚMEROS DE PATENTE Consulte https...

Page 55: ...delfiltrodeltanque La bomba no está cebada Deje por lo menos 30 segundos para que la bomba se cebe El pulverizador se enciende pero sólo pulveriza a baja presión El filtro de cierre está obstruido Limpie el filtro de cierre Consulte Mantenimientodelconjuntodecierre La boquilla está obstruida Limpie la boquilla Consulte Mantenimiento delaboquilla El filtro del tanque está obstruido Limpie el filtro...

Page 56: ...ría ha alcanzado su límite térmico máximo Deje que la batería se enfríe La batería está descargada Para maximizar la vida de la batería está diseñada para apagarse abruptamente cuando se agota la carga Ponga la batería en el cargador y deje que se cargue La batería no se carga La batería no está insertada en el cargador Inserte la batería en el cargador hasta que el LED se ilumine El cargador no e...

Page 57: ...57 ESPAÑOL ...

Page 58: ...variable NOTA La presión y el flujo pueden variar en un 5 1 2 3 4 Flujo gpm Presión psi Flujo gpm Presión psi Flujo gpm Presión psi Flujo gpm Presión psi Abanicoa0 1GPM todoslosángulosdepulverizado 0 11 43 Abanicoa0 2GPM todoslosángulosdepulverizado 0 15 22 0 18 29 0 18 29 0 20 36 Abanicoa0 3GPM todoslosángulosdepulverizado 0 18 13 0 21 17 0 23 22 0 25 27 Abanicoa0 4GPM todoslosángulosdepulverizad...

Page 59: ... gpm Presión psi Flujo gpm Presión psi Flujo gpm Presión psi Flujo gpm Presión psi Flujo gpm Presión psi 0 21 42 0 23 51 0 25 59 0 26 67 0 28 33 0 31 39 0 33 47 0 34 50 0 36 54 0 38 61 0 31 24 0 34 29 0 37 35 0 39 39 0 41 43 0 44 49 0 33 18 0 37 22 0 41 27 0 43 30 0 45 35 0 49 40 0 35 14 0 39 17 0 43 21 0 46 24 0 49 28 0 53 33 0 37 9 0 41 11 0 46 14 0 49 16 0 53 19 0 58 24 0 38 6 0 43 8 0 48 10 0 ...

Page 60: ...190679 REVISIÓN A 08 2021 www thefountainheadgroup com ...

Reviews: