background image


GJ HANDY & CO LTD USER WARRANTY POLICY


Users Statement of Warranty 

Each new machine is warranted against defective material or assembly of material under normal usage. The 
warranty applies to the original purchaser and covers faulty parts and the labour involved in replacing and 
repairing those parts, which are of original manufacture. 
 

Period of Warranty 


Webb (excludes Electric Handheld & Dynamic), Webb Pro, Sanli Engine 

a)


2 years from the original date of sale to the first domestic user. 

b)


90 days from the original date of sale to the professional/commercial user. 

c)


90 days from the original date of sale when used for hire. 

d)


A reduced warranty period of 90 days applies to those items which are subject to normal wear and tear 
(e.g. but not limited to wheels, tyres, cutter bars, cylinders, cutting blades, blade boss, belts, cables, nylon 
line & spool, collection bags, spark plugs). 

e)


Engines are supplied with a separate warranty to the machine. The engine manufacturers warranty 
statement which will be supplied within the engine instruction manual. All enquiries and warranty repairs 
should be discussed with the engine manufacturer or approved warranty repair dealer. 

f)


90 days from the original date of purchase for Replacement Spare Parts (unless normal wear & tear 
component, which are covered for 30 days). 

g)


All machines’ must be serviced wit

hin the first 12 months from the original date of purchase to comply 

with the warranty, failure to do so will invalidate the 2nd year of the warranty.  


All warranty repairs must be undertaken by an authorised service dealer. These dealers have been accredited 
by GJ Handy & Co Ltd and agree to only use genuine parts and follow our repair procedures.


Webb Electric Handheld, Webb Dynamic, Handy, Mowerland, Q-Garden 

a)


1 year from the original date of sale to the first domestic user. 

b)


90 days from the original date of sale to the professional/commercial user. 

c)


90 days from the original date of sale when used for hire. 

d)


A reduced warranty period of 90 days applies to those items which are subject to normal wear and tear 
(e.g. but not limited to wheels, tyres, cutter bars, cylinders, cutting blades, blade boss, belts, cables, nylon 
line & spool, collection bags, spark plugs). 

e)


Engines are supplied with a separate warranty to the machine. The engine manufacturers warranty 
statement which will be supplied within the engine instruction manual. All enquiries and warranty repairs 
should be discussed with the engine manufacturer or approved warranty repair dealer. 

f)


90 days from the original date of purchase for Replacement Spare Parts (unless normal wear & tear 
component, which are covered for 30 days). 


All warranty repairs must be undertaken by an authorised service dealer. These dealers have been accredited 
by GJ Handy & Co Ltd and agree to only use genuine parts and follow our repair procedures. 


Version 06 (01-18) 


Summary of Contents for 1938182001

Page 1: ... read understand this manual payingattention to the safety instructions before use Incorrect use of the product could put the operator or machine in danger Whilst every effort has been made to ensure the accuracy of information contained in this manual our policy of continuous improvement determines the right to make modifications without prior warning Images used are for illustration purposes onl...

Page 2: ...ersonal educational use only Commercial copying redistribution hiring or lending is prohibited No part of this publication may be stored in a retrieval system or transmitted in any other form or means without written permission from Handy Distribution In all cases this copyright notice must remain intact ...

Page 3: ...of your machine please contact us TEL 01793 333212 EMAIL customerservice handydistribution co uk MON FRI 8 00AM TO 5 30PM EXCL BANK HOLIDAYS SPECIAL WARNINGS INSTRUCTIONS The splitting operation of the machine is designed to be activated by one person While there is the possibility that additional operators could be working with the machine e g for loading and unloading only one operator should ac...

Page 4: ... with Hydraulic oil from the factory to allow the machine to be used straight from the carton following assembly Do check the oil level instructions available in the manual prior to the first use and periodically thereafter Type 22 hydraulic oil is recommended ELECTRICAL REQUIREMENTS Connect the main leads to a standard 220 240V 10 50Hz 1Hz electrical supply which has protection devices of under v...

Page 5: ... of all oil at an authorised collection point or follow the local authority stipulations that apply Dispose of used oil in an environmentally friendly way Check your log splitter before turning it on Keep guards in place and in working order Replace damaged missing or failed parts before using it 10m Keep all bystanders animals at least 10 metres away from the machine during operation If approache...

Page 6: ...round the logsplitter Prevent body contact with grounded surfaces pipes radiators ranges and refrigerator enclosures Never open the pushbutton box on the motor Should this be necessary contact a qualified electrician Make sure your fingers do not touch the plug s metal prongs when plugging or unplugging the logsplitter After installation the degree of protection of the BSI and the SEV approved plu...

Page 7: ...nt or follow the stipulations in the country where the logsplitter is used Do not discharge into drains soil or water STORE IDLE EQUIPMENT When not in use the machine should be stored in a dry location Keep the machine away from children and others not qualified to use it This symbol on the product or on its packaging indicates that this product may not be treated as household waste Instead it sha...

Page 8: ...s of this logsplitter in the illustrations If you believe you are missing any components please contact us 1 Log Splitter Frame 2 Control Lever Guard Assembly 1 pair 3 Adjustable Log Holder 1 pair 4 Wheels 1 pair 5 Support Table 6 Operator s Manual 7 Hardware Bag see contents below ...

Page 9: ...eel shaft then secure them together by tightening the bolt 4 Slide the wheel on the shaft Hold the wheel in place with a flat washer and a cotter pin from outside Bend and spread the cotter pin prongs in opposite directions 5 Put on the wheel cap 6 Repeat the same steps to install the wheel on the other side SUPPORT TABLE 1 Before assembly loosen the star knob by turning it counterclockwise 2 Unfo...

Page 10: ...t the end of the armguard Otherwise the armguard cannot be flexibly rotated 3 Put a big flat washer on support bracket of the armguard align the holes Thread the bolt which is previously inserted on the armguard in the first step through the big flat washer and the bracket Then put a flat washer and a nut on the bolt from the other side Secure tightly with wrenches 4 Follow the same steps to insta...

Page 11: ...ADJUSTABLE LOG HOLDER 1 Secure the log clamps on the armguards with star knobs and flat washers Each star knob has three flat washers ...

Page 12: ...KNOW YOUR MACHINE Make yourself aware of the compnents and operational levers of the machine prior to attempting any work ...

Page 13: ...LOOSEN THE OIL FILLER AIR BLEED WILL KEEP SEALED AIR IN THE HYDRAULIC SYSTEM COMPRESSED SUCH CONTINUOUS AIR COMPRESSION WILL BLOW OUT THE SEALS OF THE HYDRAULIC SYSTEM AND CAN CAUSE PERMANENT DAMAGE TO THE LOGSPLITTER WHICH IS NOT COVERED UNDER THE TERMS CONDITIONS OF THE MANUFACTURERS WARRANTY TRANSPORTING YOUR LOGSPLITTER The logsplitter is equipped with 2 wheels for minor moving To move the log...

Page 14: ...n will lengthen the durability of the ram Route the power cord Route the cord from the power source to the splitter in a way that safeguards against tripping on the cord or the cord becoming damaged during the work session Protect the power cord from impacts pulling or corrosive materials Open the Oil Filler Air Bleed Loosen the oil tank cover a few turns whenever the splitter being used Retighten...

Page 15: ...rs angle Hold the log with clamping brackets closely in the control lever guards Lower both levers to start splitting action Releasing either lever stops the motion of the splitting wedge Releasing both handles returns the splitting wedge to the upper position Stack as you work This will provide a safer work area by keeping it uncluttered and avoid the danger of tripping or damaging the power cord...

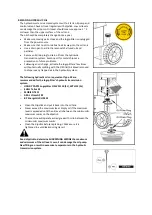
Page 16: ...aulic oil and check the level again until the oil level reaches the maximum max mark on the dipstick The following hydraulic oils or equivalent Type 22 are recommended for the log splitter s hydraulic transmission system o HANDY PARTS Logsplitter Oil WPL110 1L WPL113 5L o SHELL Tellus 22 o MOBIL DTE 11 o ARAL Vitam GF 22 o BP Energol HLP HM 22 Clean the dipstick and put it back into the oil tank M...

Page 17: ...hout actually splitting with the Oil Filler Air Bleed removed to disperse any trapped air in the hydraulic system The following hydraulic oils or equivalent Type 22 are recommended for the log splitter s hydraulic transmission system o HANDY PARTS Logsplitter Oil WPL110 1L WPL113 5L o SHELL Tellus 22 o MOBIL DTE 11 o ARAL Vitam GF 22 o BP Energol HLP HM 22 Clean the Dipstick and put it back into t...

Page 18: ...ition and split the log If the problem continues contact the local approved service dealer Oil leaks around cylinder ram or from other points Air sealed in hydraulic system while operating Loosen Bleed Screw by 3 4 rotations before operating the log splitter Oil Filler Air Bleed is not tightened before moving the log splitter Tighten the oil filler up before moving the log splitter Hydraulic Contr...

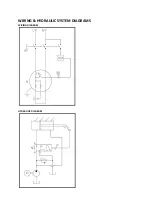
Page 19: ...WIRING HYDRAULIC SYSTEM DIAGRAMS WIRING DIAGRAM HYDRAULIC DIAGRAM ...

Page 20: ...ing directives 2006 42 EC Machinery Directive 2014 30 EU Electromagnetic Capability The conformity assessment procedure followed was in accordance with EN 609 1 2017 EN 60204 1 2006 A1 2009 AC 2010 Notified Bodies TÜV Rheinland LGS Products GmbH Address es Tillystrabe 2 90431 Nürnberg Authorised signatory technical file holder Date 01 09 2018 Signature Name Mr Simon Belcher Position Chairman Compa...

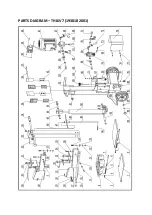
Page 21: ...PARTS DIAGRAM THLSV7 1938182001 ...

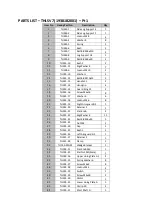
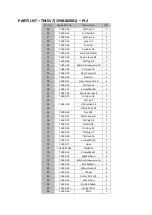
Page 22: ...H245 16 Screw M6x16 8 19 TH245 17 Washer 6 6 20 TH245 18 Locknut M6 8 21 TH245 19 Right Armguard G5 1 22 TH245 20 Retainer 1 1 23 TH245 21 Star Knob 4 24 TH245 22 Big Washer 8 11 25 TH245 23 Bolt 8 8 M8x45 5 26 TH245 24 Nut M8 2 27 TH199 20 Cap 2 28 TH245 25 Bush 1 2 29 TH245 26 Left Armguard G5 1 30 TH245 27 Retainer 2 1 31 TH245 28 Clamp 2 32 TH199 22GM Wedge Bracket 1 33 TH199 21 Star Knob M6 1...

Page 23: ... 37 Screw M8x90 2 61 TH245 38 Spring Washer 8 7 62 TH199 70 Oil Hose G5 1 63 TH245 39 Oil Cap K 1 64 Oil Dipstick K6 1 65 O Ring 25x2 65 1 66 TH199 65 Nut M8 3 67 TH199 67 Motor Support 3 68 TH199 74 Oil Plug A2 1 69 TH199 72 Nozzle A4 1 70 TH199 35 Oil Hose G5 1 71 TH199 34 Oil Plug G1 1 72 TH199 36 Oil Hose 16 1 73 TH199 77 Screw M8x35 2 74 TH199 71 Valve 1 75 TH199 37GM Shield G5 1 76 TH199 16 ...

Page 24: ...st be serviced within the first 12 months from the original date of purchase to comply with the warranty failure to do so will invalidate the 2nd year of the warranty All warranty repairs must be undertaken by an authorised service dealer These dealers have been accredited by GJ Handy Co Ltd and agree to only use genuine parts and follow our repair procedures Webb Electric Handheld Webb Dynamic Ha...

Page 25: ... products GJ Handy Co Ltd will never warranty in terms of the merchantability or the fitness for a particular purpose b No person is authorised to make any warranties representations or promises expressed or implied on behalf of GJ Handy Co Ltd or to modify the terms conditions or limitation of this warranty policy in any way c Neither GJ Handy Co Ltd nor any company affiliated with GJ Handy Co Lt...

Page 26: ...______________________________________________ ________________________________________________________ ________________________________________________________ ________________________________________________________ ________________________________________________________ ________________________________________________________ ________________________________________________________ ___________...

Page 27: ......

Page 28: ...2 Mon Fri 8 00am to 5 30pm excl Bank Holidays Email customerservice handydistribution co uk To see our range of garden machinery equipment visit www thehandy co uk Making gardening easier affordable since 1938 Distributed by Handy Distribution Murdock Road Dorcan Swindon SN3 5HY ...

Reviews: