background image

Page 6

ASSEMBLY


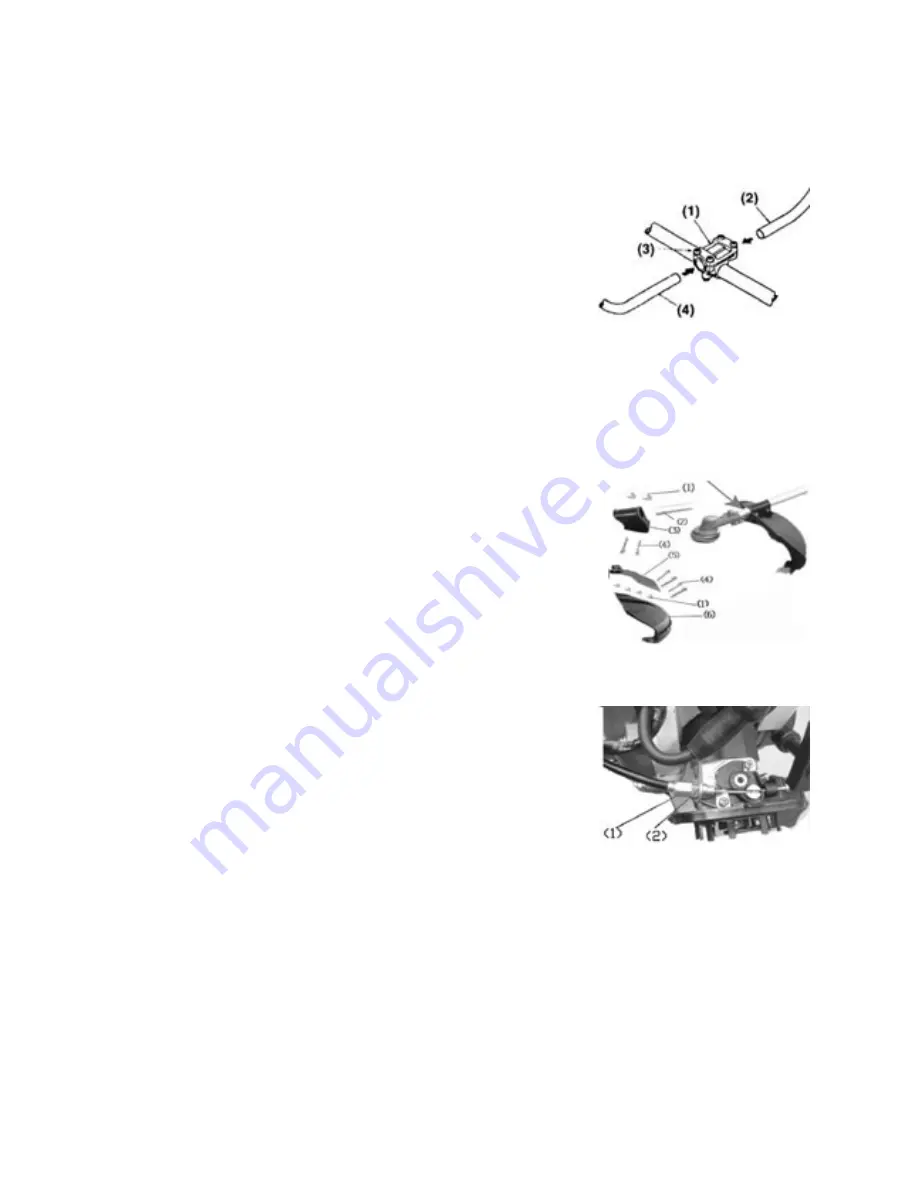
Attach the Handle:

• 

Loosen the four bolts


(3) on the handle bracket (1).

• 

Insert the right handle (2) (throttle lever is attached) and 

the left handle assembly (4) into the bracket and

retight

en the bolts securely.

Safety Guard:

•  Attach the safety guard (6) as shown and fix securely 

using the four bolts M5x25 supplied.

Adjusting the Throttle Cable

:

• 

After releasing the throttle lever, pull the throttle 

cable

.

• 

The normal play is 1 or 2 mm when measured at the 

      carburettor side end.

• 

If the play is too short or long, take off the air cleaner 

cover, loosen the locknut (1) and adjust (2).

Summary of Contents for THBC43

Page 1: ...ATOR S MANUAL AND PARTS LIST PETROL BRUSHCUTTER THBC43 Spares Support 01793 333212 www thehandy co uk Before use please read understand this manual paying particular attention to the safety instructions 30 05 2012 ...

Page 2: ...ONTENTS SAFETY INSTRUCTIONS 3 MAJOR PARTS 4 FUEL 5 SPECIFICATIONS 5 ASSEMBLY 6 7 OPERATION 8 REPLACEMENT OF LINE 9 HINTS AND TIPS 10 MAINTENANCE 11 PARTS DIAGRAMS AND LISTS 12 15 EC DECLARATION OF CONFORMITY 16 ...

Page 3: ...de before use for any worn or damaged parts Do not use until the parts are repaired or replaced Before starting the engine make sure the blade is not in contact with anything and have a clear work area and a secure footing Hold the brushcutter firmly with both hands when using and keep all parts of your body away from the machine Always ensure a safe firm footing and do not over reach or work abov...

Page 4: ... from Cutter 5 Keep Bystanders away 6 Sound Power Level 7 Wear Strong Gloves 8 Wear Safety Boots 9 Keep Hands away from Cut ter 10 Max allowed RPM Warning Labels on Machine Fuel Tank Starter Air Cleaner Harness Switch Handle Throttle Throttle Cable Ignition Switch Shaft Blade Guard Blade Gear Case ...

Page 5: ...ap and fuel the machine to 80 capacity Fasten the fuel cap tightly and wipe up any spillage Ensure that any stored petrol oil mixture 2 stroke is clearly marked in a separate can and only stored for 4 6 weeks If the brushcutter is not going to be used for a long period drain the mixture from the fuel tank start the engine and drain the carburettor of any remaining fuel Dispose of any unwanted 2 st...

Page 6: ... retighten the bolts securely Safety Guard Attach the safety guard 6 as shown and fix securely using the four bolts M5x25 supplied Adjusting the Throttle Cable After releasing the throttle lever pull the throttle cable The normal play is 1 or 2 mm when measured at the carburettor side end If the play is too short or long take off the air cleaner cover loosen the locknut 1 and adjust 2 ...

Page 7: ...e nut 1 Screw in an anti clockwise direction and tighten using the box spanner Release the allen key Note to undo the nut to change the blade turn clockwise Attaching the Line Trimmer Head Lay the brushcutter on its back Insert the allen key into the gear shaft as before to stop the shaft turning Remove the washer 3 in pic above but leave washer 5 on the shaft Screw the nylon head 3 anti clockwise...

Page 8: ...itch to the I position 5 Hold the trimmer shaft near the engine firmly and pull the starter strongly 6 If the engine does not start repeat the procedure for starting a cold engine CAUTION 1 After starting the engine accelerate and decelerate the engine several times by opening and closing the throttle trigger 2 Air in the carburetor causes poor acceleration or engine stoppage 3 Re fuel before the ...

Page 9: ...or any worn or damaged parts To reload the spool with line Cut two lengths of spare line 3 metres long Position each line in the two holes located in the centre of the spool and wind in the direction of the arrow on the spool Wind the line on until you have about 15cm left Secure the lines into the slots on the spool Replace the spring and reposition the spool with the two cords in the eyelets Clo...

Page 10: ...and twigs getting caught around the blade Use the brushcutter like a scythe sweep it to the right and left just above ground level when cutting grass and light brush Using the Line Trimmer Head Use the nylon head for cutting grass around fence posts and trees where a metal blade could become damaged When the two nylon cords become too short accelerate the engine and bump the nylon head on the grou...

Page 11: ...d If the spark plug is clogged with carbon clean thoroughly or replace with an NGK BM6A or Champion CJ8 Grease Apply multipurpose grease to the gear head after every 25 hours of use Idle Adjustment Screw If the blade continues to run on when you release the throttle lever or the engine stops it may be necessary to adjust the Idle Adjustment Screw Turning it clockwise increases the engine speed and...

Page 12: ...Page 12 PARTS DIAGRAM DRIVE UNIT ...

Page 13: ...ase Assembly 1 6 TH119 6 Cam Tap Head 1 7 1 TH119 7 1 Screw ST3 5x16 2 7 2 TH119 7 2 Bolt 1 7 3 TH119 7 3 Throttle Lever 1 7 4 TH119 7 4 Handle Cover Right 1 7 5 TH119 7 5 Handle Pipe Right Hand 1 7 6 TH119 7 6 Handle Bracket Centre 1 7 7 TH119 7 7 Handle Bracket Lower 1 7 8 TH119 7 8 Bolt M5x25 4 7 9 TH119 7 9 Handle Bracket Upper 1 7 10 TH119 7 10 Bolt 2 7 11 TH119 7 11 Handle grip 1 7 12 TH119 ...

Page 14: ...Page 14 PARTS DIAGRAM ENGINE ...

Page 15: ...lt 2 14 TH120 14 Element 1 45 TH120 45 Muffler assembly 1 15 TH120 15 Plate 1 46 TH120 46 Plate 1 16 TH120 16 Cover Assembly 1 47 TH120 47 Gasket Base 1 17 TH120 17 Screw 1 48 TH120 48 Bolt 4 18 TH120 18 Key 1 49 TH120 49 Plate 1 19 TH120 19 Crankcase Left 1 50 TH120 50 Carburettor 1 20 TH120 20 Pin 2 51 TH120 51 Spark Plug 1 21 TH120 21 Bearing 2 52 TH120 52 Cylinder 1 22 TH120 22 Crankshaft Left...

Page 16: ...as in according with Annex V of the Directive 2000 14 EC Name of the Notified Body Intertek Testing Services Shanghai Ltd Address Building No 86 1198 Qingzhou Road North Caihejing Development Zone Shanghai 200233 P R China Measured Sound Pressure Level 105 7 dB A Guaranteed Sound Power Level 110 dB A Standards and technical specifications referred to EN ISO 11806 2008 EN ISO 14982 1998 EN ISO 3744...

Reviews: