background image


OPERATION


This log splitter is equipped with “ZHB” control system that must be operated with both hands – the 
left hand controls the hydraulic control lever while right hand controls the pushbutton switch. The 
log splitter will freeze if either hand is removed. The log pusher will only start to return backward to 
the starting position after both hands release the controls. During use the log pusher will move 
towards the splitting wedge putting pressure on the log. 
 
The trigger type lockout device is used to avoid accidental Hydraulic Control Lever activation. To 
operate the Hydraulic Control Lever, draw the Trigger backward with your index finger before 
pushing the Hydraulic Control Lever forward. 


Never force the log splitter for more than 5 seconds. Do not keep pressure on it to split 
excessively hard wood.  


After 5 seconds of constant use, the oil under pressure will be overheated and the machine could be 
damaged. For such extremely hard logs, rotate it by 90

o

 to see whether it can be split in a different 

direction (the log should still be split with the grain as shown in the diagrams in this manual). In any 
case, if you are not able to split the log, this means that its hardness exceeds the capacity of the 
machine and thus that log should be discarded to protect the log splitter. 

 
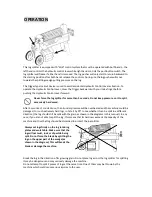
Always set logs firmly on the log retaining 
plates and work table. Make sure that the 
log will not twist, rock or slip while being 
split. Do not force the blade by splitting the 
log on the upper part of the wedge (as 
shown in the diagram).


This will break the 

blade or damage the machine. 


Break the log in the direction of its growing grain. Do not place log across the log splitter for splitting. 
It may be dangerous and may seriously damage the machine. 
Do not attempt to split 2 pieces of logs at the same time. One of them may be thrown by the 
machine which could cause serious injuries to the user.


Summary of Contents for THLS-6-PLUS

Page 1: ...ead understand this manual paying particular attention to the safety instructions before use The manufacturer reserves the right to change the product specification and livery according to continued product improvements Due to the weight of this machine we recommend a two person lift from the carton 193894001 25 02 2016 ...

Page 2: ......

Page 3: ...PERATION CHECKING REPLACING HYDRAULIC OIL TROUBLE SHOOTING MAINTENANCE STORAGE PARTS LISTS DIAGRAM WARRANTY EC DECLARATION OF CONFORMITY If you require any assistance with regards to the contents or operation of your machine please contact us Tel 01793 333212 Mon to Friday 8 30am to 5 30pm Email customerservice handydistribution co uk ...

Page 4: ...t the main leads to a standard 230V 10 50Hz 1Hz electrical supply which has protection devices for under voltage over voltage over current as well as a residual current device RCD with maximum residual current rated at 0 03A EXTENSIONS LEADS Improper use of extension leads may cause inefficient operation of the log splitter which can result in overheating Be sure the extension lead is no longer th...

Page 5: ...g when not in use before making adjustments changing parts cleaning or working on the log splitter Consult the technical manual before servicing Wear foot protection Take used oil to an authorized collection point or follow the local stipulations that apply where the log splitter is being used Do not discharge into drains soil or water Check your log splitter before turning it on Keep guards in pl...

Page 6: ...k that the electric circuit is adequately protected and that it corresponds with the power voltage and frequency of the motor Check that there is a ground connection and a regulation differential switch further up the circuit Ground the log splitter Prevent body contact with grounded surfaces pipes radiators ranges and refrigerator enclosures Never open the pushbutton box on the motor Should this ...

Page 7: ...the machine away from children and others not qualified to use it This symbol on the product or on its packaging indicates that this product may not be treated as household waste Instead it shall be handed over to the applicable collection point for the recycling of electrical and electronic equipment For more detailed information about recycling of this product please contact your local council o...

Page 8: ...face Familiarise yourself with the controls and features of this log splitter in the illustrations 1 Log Pusher 2 Work Table 3 Wedge 4 Handle 5 Support Leg 6 Log Retaining Plates 7 Switch 8 Motor 9 Electric Motor Switch Case 10 Wheels short distances ONLY 11 Hydraulic Control Lever 12 Control Lever Guard 13 Bleed Screw 14 Oil Drain Bolt w Dipstick 15 Max Pressure Limiting Screw ...

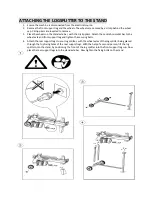
Page 9: ...s Attach the centre horizontal bar to the wheel axle and front support leg and tighten the securing bolts 4 Attach the rear support legs to your log splitter with the wheel axles of the log splitter being placed through the top fixing holes of the rear support legs With the help of a second person lift the log splitter onto the stand by positioning the front of the log splitter into the front supp...

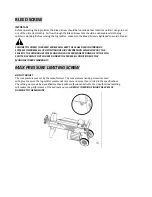
Page 10: ...TINUOUS AIR COMPRESSION WILL BLOW OUT THE SEALS OF THE HYDRAULIC SYSTEM AND CAN CAUSE PERMANENT DAMAGE TO THE LOG SPLITTER WHICH IS NOT COVERED UNDER THE TERMS CONDITIONS OF THE MANUFACTURERS WARRANTY MAX PRESSURE LIMITING SCREW DO NOT ADJUST The max pressure was set by the manufacturer The max pressure limiting screw is sealed with glue to ensure the log splitter works under pressure no more than...

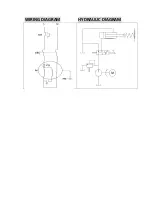
Page 11: ...WIRING DIAGRAM HYDRAULIC DIAGRAM ...

Page 12: ...se the oil under pressure will be overheated and the machine could be damaged For such extremely hard logs rotate it by 90o to see whether it can be split in a different direction the log should still be split with the grain as shown in the diagrams in this manual In any case if you are not able to split the log this means that its hardness exceeds the capacity of the machine and thus that log sho...

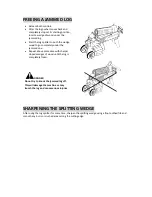
Page 13: ...y under the jammed one Repeat above procedure with sharper sloped wedges of wood until the log is completely freed DANGER Do not try to knock the jammed log off This will damage the machine or may launch the log and cause serious injuries SHARPENING THE SPLITTING WEDGE After using the log splitter for some time sharpen the splitting wedge using a fine toothed file and smooth any burrs or crushed a...

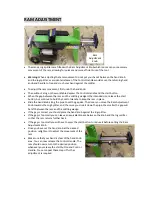
Page 14: ... hand knob along the pipe to set the gap size The closer you move the Ram Adjustment Knob towards the Log Splitter and the more you slide it down the pipe the smaller the gap will be left between the ram and the splitting wedge If the gap is correct you should place the hand knob against the log splitter If the gap is too small you can leave an equivalent space between the knob and the log splitte...

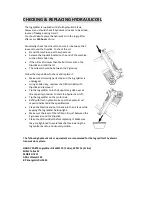
Page 15: ... splitter is unplugged Using an Allen key unscrew the Oil Drain Bolt with Dipstick and remove it Tip the log splitter onto the Support Leg side over a 4 litre capacity container to drain the hydraulic oil off Tip the log splitter on the motor side Refill with fresh hydraulic oil as per the hydraulic oil capacity indicated in the specifications Clean the Dipstick and put it back into the oil tank w...

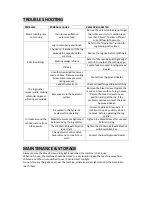
Page 16: ...ssive air in the hydraulic system Remove the bleed screw Operate the ram 5 or 6 times without a log in place Return the bleed screw to open position and split the log If the problem continues contact the local Approved Dealer Oil leaks around the cylinder ram or from other points Air sealed in the hydraulic system while operating Loosen the Bleed Screw by 2 3 rotations to open position do not remo...

Page 17: ...PARTS DIAGRAM THLS 6 193893001 ...

Page 18: ...ut 4 88 TH114 66 Motor Foot Nut 3 17 TH114 26 O ring 1 53 TH114 22 Flat Wahser 5 89 TH114 67 Motor Foot 1 18 TH114 3 Piston 1 54 TH114 21 Screw 4 90 TH114 90 Electrical cable Housing 1 19 TH114 2 Piston Ring 1 55 TH114 88 Wheel cover 2 91 TH114 91 Screw 11 20 TH114 4 O ring 1 56 TH114 89 Block turn 2 92 TH114 92 Switch Box cover 1 21 TH114 5 Spring 1 57 TH114 90 Wheel 2 93 TH114 93 Airproof underl...

Page 19: ... 1 TH202 01 Bolt 8 8 M8 25 6 2 TH202 02 Nut M8 6 3 TH202 03 Washer 8 6 4 TH202 04 Spring Washer 8 6 5 TH202 05 Support Leg Front CAA39011 1 6 TH202 06 Bolt 8 8 M10 25 4 7 TH202 07 Connector CBA39107 A 1 1 8 TH202 08 Rear Axle CBA39011 1 9 TH202 09 Support Leg Rear CAA39012 2 ...

Page 20: ... the warranty failure to do so will invalidate the 2nd year of the warranty A reduced warranty period of ninety days applies to those items which are subject to normal wear and tear e g wheels tyres cutter bars cylinders bottom blades belts cables grass bags spark plugs All Handy Handy Pro All others Mowerland and Q Garden domestic products 1 year from the original date of sale to the first domest...

Page 21: ... products GJ Handy Co Ltd will never warranty in terms of the merchantability or the fitness for a particular purpose No person is authorised to make any warranties representations or promises expressed or implied on behalf of GJ Handy Co Ltd or to modify the terms conditions or limitation of this warranty policy in any way Neither GJ Handy Co Ltd nor any company affiliated with GJ Handy Co Ltd sh...

Page 22: ...e The conformity assessment procedure followed was in accordance with EN609 1 1999 A1 03 A2 09 EN60204 1 EN 954 1 1996 6 2 2 EN982 EN 292 2 1991 5 5 EN ISO 4413 2010 Notified Body TUV Rheinland CCIC Qingdao Co Ltd Addresses 6F No 2 Bldg No 175 Zhuzhou Rd Qingdao 266101 P R China Tillystrasse 2 90431 Nurnberg GERMANY Authorised signatory and technical file holder Date 26 02 2016 Signature Name Mr S...

Page 23: ......
Page 24: ...CONTACT US TEL 01793 333212 MON FRI 8 30AM TO 5 30PM Email customerservice handydistribution co uk Tosee our complete range of garden machinery and equipment visit www thehandy co uk Distributed by Handy Distribution Murdock Road Dorcan Swindon SN3 5HY ...

Reviews: