background image

P.8

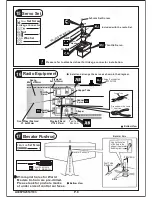
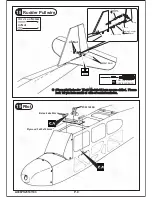
Elevator Pushrod

17

PB2x16mm 

Set Screw

2

Elevator Pushwire

Bottom View

Elevator Horn

Line up the holes
of the horn to the
edge of the elevator
See diagram.

Fuel Tube

Ø

6x5mm

Horn

PB2x16mm

Ø

1mm pilot holes for World 

Models tri-horn are pre-drilled. 
Please look for pin-hole marks
at under side of control surfaces.

Front Wheel

11

Radio Equipment

16

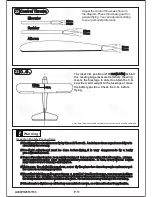
Install and arrange the servo as shown in the diagram.

Rudder

Servo

Straper

Fuel Tube

Ø

6x5mm

Bottom View

Plywood

9x57x122mm

Servo Set 

3 x 3mm


Set Screw

Linkage Connector

M2


Nut

2mm

 Washer

1

1

1

2

15

Please refer to attached sheet for linkage connector installation.

Included with the radio Set.

Th

ro

ttl

e P

us

hw

ire

3x3mm Set Screw


Throttle Servo.

2

m m

2mm


Washer

M2


Nut

2mm


Washer

Charge


Receptacles

KP0041300

TWM PL8210010
CLEVIS WRENCH


Copper Tube


Spong

60x70x122mm

Elevator

Servo

Throttle

Servo

Press


down the center

1

/

3 portion


Copper Tube

Rigging Z Bend
  

Ø

1.8 x 27mm

Front


Wheel Pushrod


Ø

1

.

6x320mm


A088PO25531103

Summary of Contents for Super Frontier Senior

Page 1: ...ithout prior preparation may cause injuries Remember safety is the most important thing Always keep this instruction manual at hand for quick reference 0 46 cu in displacement 2 cycle Radio required 4 channel 5 servos radio w standard Specifications are subject to change without notice Specifications INSTRUCTION MANUAL EA D R Y T T S O O F M L L Y A Super FACTORY PRE FABRICATED ALMOST READY TO FLY...

Page 2: ...place any defective parts but will not extend to the parts that are good before gluing to defective parts during assembly Warranty will not cover any parts modified by customer 2 Symbols used throughout this instruction manual comprise of the following 3 PARTS LIST P 2 P 1 3mm Do not overlook this symbol Cut off shaded portion Peel off shaded portion covering film Pay close attention here Pierce t...

Page 3: ...3NUT 8pcs SPINNERØ52mm 1set THROTTLEPUSHWIREØ1 2x445mm 1pc PLASTICTUBEd2xD3x200mm 1pc COVERING LIGHTEX SGX 312 BRIGHT RED LIGHTEX SGX 100 WHITE LIGHTEX SGX 251 SKY BLUE LIGHTEX SGX 351DARK BLUE LIGHTEX SGX 313 PINK LIGHTEX SGX 250 BLUE P 2 13 SCREWPWA2 6x12mm 5pcs SILICONGROMMETd1 5xD6 5mm 5pcs COWLING 1pc TRANSPARENT3DTEMPLATE 1pc 14 SIDEWINDOWS 1pair 15 LINKAGECONNECTORØ2 1mmHW7111060 2sets 16 S...

Page 4: ...shaded portion covering film PB2x20mm Horn Bottom View Pre glued 1mm TWM PL8210010 CLEVIS WRENCH Please dry fit wing joiner into left and right wing to make sure they fit with the proper dihedral angle mark the wing joiner if necessary Apply epoxy glue to both sides of all surfaces in contact Use a stick to apply the glue to inner side of wing joiner sleeve and apply the glue to wing joiner before...

Page 5: ...ollar 4 4 4 3mm Set Screw 4 1mm Collar Main Landing Gear Ø4mm PA3x12mm C C C C 4 Stabilizer A A A A Stabilizer Main Wing B B B B Temporary install the main wing adjust leveling of the stabilizer to make it as parallel to the main wing as possible Pre glued Pre glued 1 5mm A088PO25531103 ...

Page 6: ...M4x25mm Socket Head Screw 4 4 M4x25mm Fuel Tank 8 380cc Fuel Tank Install Balsa 10x15x117mm For Fuel Tank Position Fixing Fuel Tank 380cc Front Landing Gear 9 PA3x14mm Screw 4 PA3x14mm Steering Arm Stand d4xD9mm Washer d4xD9mm Washer 2mm UP A088PO25531103 ...

Page 7: ...position Spinner Ø52mm 105mm 4 13 in Front Wheel 11 3mm Set Screw 4 6mm Collar 3 3 Collar 4 6mm Collar 4 6mm Collar 4 6mm 10 Canopy PWA2 3x8mm Screw d1 5xD6 5mmSiliconGrommet Silicon Grommet d1 5xD6 5mm PWA2 3x8mm PWA2 3x8mm 5 5 Right Angle Wheel Spacer d3xD7mm Washer 1 5mm 1 5mm M3 Nut d3xD7mm Washer d3xD7mm Washer A088PO25531103 ...

Page 8: ...Windows 14 13 Cowling PWA2 6x12mm Screw d1 5xD6 5mm Silicon Grommet Trim the cowling so it will match your engine PWA2 6x12mm 5 5 1 5mm Silicon Grommet d1 5xD6 5mm 1 5mm Fuel Filler PL8110030 A088PO25531103 ...

Page 9: ...as shown in the diagram Rudder Servo Straper Fuel Tube Ø6x5mm Bottom View Plywood 9x57x122mm Servo Set 3 x 3mm Set Screw Linkage Connector M2 Nut 2mm Washer 1 1 1 2 15 Please refer to attached sheet for linkage connector installation Included with the radio Set Throttle Pushwire 3x3mm Set Screw Throttle Servo 2mm 2mm Washer M2 Nut 2mm Washer Charge Receptacles KP0041300 TWM PL8210010 CLEVIS WRENCH...

Page 10: ...e PM2x16mm Screw 2 M2 Nut PM2x16mm 2 Ø1mm pilot holes for World Models tri horn are pre drilled Please look for pin hole marks at side of control surfaces M2 Nut 2mm TWM PL8210010 CLEVIS WRENCH Clevis Rigging Coupler 1 8 x 27mm Ring Fuel Tube 6x5mm Copper Tube A088PO25531103 ...

Page 11: ...3xD12mm Washer 2 2 PM3x30mm Wing Protection 3x40x120mm Wing Setting 21 A A A A B B B B C C D D C C D D Adjust the wing and fuselage configuration as shown in the diagrams 2mm d3xD12mm Washer PM3x30mm Screw A088PO25531103 ...

Page 12: ... done before flying it is very dangerous to fly a badly pre adjusted aircraft Super Frontier Senior is specially designed to be powered by 2C 0 46 engine using a more powerful engine does not mean better performance In fact over powered engine may cause severe damage and injuries Make sure the air field is spacious never fly the plane too close to people and never get too close to a running propel...

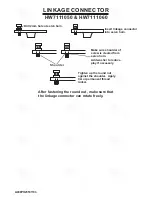
Page 13: ...connector can rotate freely Drill 2mm hole at servo horn Insert linkage connector into servo horn Make sure shoulder of screw is cleared from servo horn Add washer to reduce play if necessary Shoulder Tighten up the round nut against the shoulder Apply CA or permanent thread locker A088PO25531103 ...

Page 14: ...lease fill in the following and send to AirBorne Models 4749 K Bennett Drive Livermore CA 94551 USA 1 Name 2 Address 3 Phone E mail 4 Model Wing QC Fuselage QC QC numbers are stamped on wing and fuselage 5 Date of Purchase 6 Store Name Please call AirBorne Models at 925 371 0922 for any assistance in filling this form Thank you very much for purchasing our product A088PO25531103 ...

Page 15: ...kage Code No Size Package Code No Size Package Code No Size Package Code No SV4031 KP0041300 Special tool for clevis installation Suitable for standard and small EP clevis Large Clevis Small Clevis 180mm Extension MS9111450 600 x 240 x 350 1 pc A088PO25531103 ...

Page 16: ...t s T r a i n e r Du c t e dF a n Pa t t e r n F u n f l y E l e c t r i c Gl i d e r Bo a t A c c e s s o r i e s Co v e r i n g L i g h t e x T o u g h l o n The World Models www theworldmodels com Manufacturing Co Ltd A088PO25531103 ...

Reviews: