background image

P.1

INDEX

Read through the manual before you begin, so you will have an overall idea of what to do. 

BEFORE YOU BEGIN

BEFORE YOU BEGIN 

PARTS LIST

ASSEMBLY

SAFETY PRECAUTIONS

P.1 

P.2

P.3-P.12

P.12

Check all parts.  If you find any defective or missing parts contact your local dealer.  Please

DRY FIT and check for defects for all parts that will require CA or Epoxy for final assembly.

Any parts you find to be defective after the gluing process may be difficult to remove for

warranty replacement.  The manufacturer will replace any defective parts, but will not extend

to the parts that are good before gluing to defective parts during assembly.  Warranty will

not cover any parts modified by customer.    

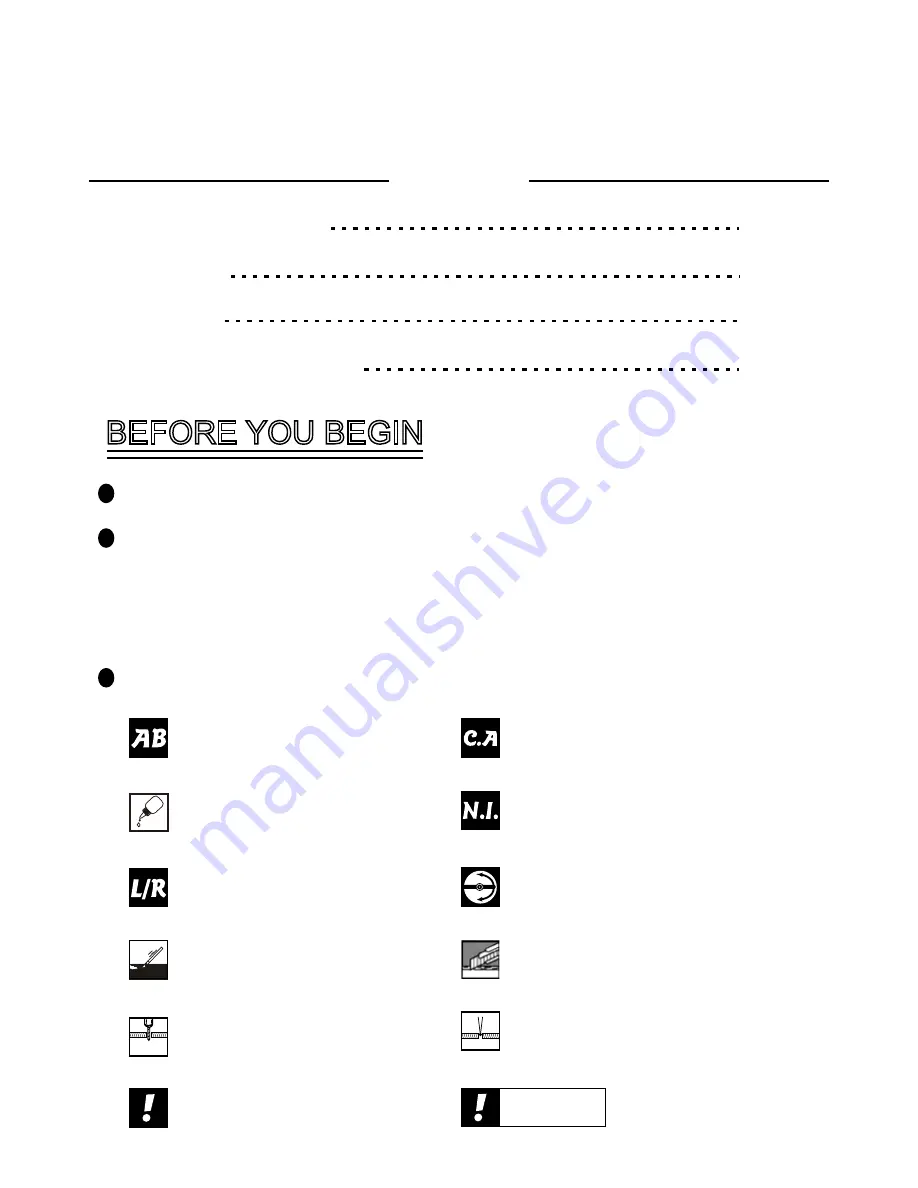
Symbols used throughout this instruction manual comprise of the following :-

1

2

3

Cut off shaded portion.

Ensure smooth non-binding

movement while assembling.

Apply instant glue

(C.A.glue, super glue.)

Assemble left and right

sides the same way.

Peel off shaded portion

covering film.

Pay close attention here!

Apply epoxy glue. 

Must be purchased separately !

Drill holes with the specified

diameter (here:  3mm).

Pierce the shaded portion

covering film.

3mm

Do not overlook this symbol !

Warning!

Apply thread locker

1/3 PAULISTINHA P-56

A324PO24581008

Summary of Contents for 1/3 PAULISTINHA P-56

Page 1: ...d precision model Operating this model without prior preparation may cause injuries Remember safety is the most important thing Always keep this instruction manual at hand for quick reference Wing Span 141 in 3580 mm Wing Area 2821 sq in 182 sq dm Flying Weight 28 5 lbs 13000 g Fuselage Length 91 in 2310 mm Specifications FACTORY PRE FABRICATED ALMOST READY TO FLY ARF SERIES MADE IN CHINA The Worl...

Page 2: ...l replace any defective parts but will not extend to the parts that are good before gluing to defective parts during assembly Warranty will not cover any parts modified by customer Symbols used throughout this instruction manual comprise of the following 1 2 3 Cut off shaded portion Ensure smooth non binding movement while assembling Apply instant glue C A glue super glue Assemble left and right s...

Page 3: ... SILICON GROMMET d2 5xD8 5mm PL1285135 4 pcs 11 FUEL TANK 1500cc PL1121500G gasoline 1 set CABLE TIE For Fuel Tank 1 5x8x500mm 1 pc DOUBLE SIDED TAPE 40x160mm 1 pc 12 PUSHROD Ø2 3x215mm w Threads For Elevator 2 pcs SCREW PM4x50mm 2 pcs M4 NYLON INSERT LOCK NUT 2 pcs SWIVEL CLEVIS HORN FAIRING PL4610010 2 sets HEAVY DUTY HORN BRACKET PL4112400 2 sets HEAVY DUTY SERVO HORN PL4120250 2 sets HEAVY DUT...

Page 4: ... 1 5mm PWA2 3x8mm Screw PWA2 3x8mm M2x10mm Heavy Duty Clevis Heavy Duty Horn Bracket Heavy Duty Clevis PA1 7x8mm M2x10mm PM4x60mm Pushrod Ø2 3x129mm M4 Nylon Insert Lock Nut M2 Nylon Insert Lock Nut Bottom View Bottom View 1 5mm M2 Nut M2 Nylon Insert Lock Nut A324PO24581008 M4 Nylon Insert Lock Nut ...

Page 5: ... Wing B B B B Temporary install the main wing adjust leveling of the stabilizer to make it as parallel to the main wing as possible Pre glued Bottom View Bottom View Completed Completed Pre glued PWM2 5x12mm Ø4x200mm P 4 465mm 481mm 174mm 280mm 184mm 260mm Main Wing Strut d4xD12mm Washer HM4x20mm d4xD9mm Washer M4 Nylon Insert Lock Nut HM4x20mm 3 5mm C C C C A324PO24581008 ...

Page 6: ...late M3 Nut M3x3mm Set Screw M3x3mm Set Screw PA1 7x8mm Collar 6 7 8 PWA2 5 x 12mm PA3 x18mm Copper Plate 1x12x60mm Spring 2 5mm 1 5mm P 5 Bottom View Bottom View Bottom View Aluminum Plate 3x15x77mm d4xD9mm Washer d4xD12mm Washer HM4x18mm PA4x20mm 2 5mm Front PA3x14mm 1 5mm PA3x18mm Screw HM4x18mm Screw PA3x14mm Screw PA4x20mm Screw d4xD12mm Washer d4xD9mm Washer PWA2 5x12mm Screw A324PO24581008 ...

Page 7: ...e attached sheet for usage of the transparent 3D template First insert the grommet to the cowling then apply screw M6x30 SOCKET HEAD SCREW Washer d6xD15mm M6 Blind Nut SOCKET HEAD SCREW M6x30 mm P 6 190mm 7 48 in d3xD7mm Washer 4 Cowling Fuselage d2 5x8 5mm Silicon Grommet PA3x12mm d3xD7mm Completed 7 2mm A324PO24581008 ...

Page 8: ...cc 13 12 PM4x50mm Screw 2 2 PM4x50mm Screw 1 1 Bottom View Bottom View Completed UP Elevator Pushrod PM4x50mm M4 Nylon Insert Lock Nut M2 Nylon Insert Lock Nut M2x10mm Heavy Duty Clevis Heavy Duty Horn Bracket PA1 7x8mm M2 Nut M2x8mm PL4120250 M2 Nut M2x8mm PL4120250 1 2 3 CABLE TIE 1 5x8x500mm DOUBLE SIDED 40x160mm M4 Nylon Insert Lock Nut M4 Nylon Insert Lock Nut P 7 A324PO24581008 ...

Page 9: ...ndow A Window B 15 Throttle Servo COMPLETED 1 5mm d2xD5mm Washer 24 P 8 Completed Servo Set 16 3x3mm Set Screw M2 Nut Linkage Connector 1 1 1 2 2mm Washer Please refer to the attached sheet for linkage connector installation M2 PM2x18mm PM2x18mm d2 5xD3 2x8mm 3mm 3mm d2xD5mm Washer M2 NUT Copper Tube Press down the center 1 3 portion A324PO24581008 ...

Page 10: ...tall and arrange the servo as shown in the diagram Bottom View 4 Sponge Battery Plastic tube d2xD3x300mm Throttle Pushrod D1 2x480mm Receiver Throttle Servo PC101110A BALSA ROD Ø8x220mm PWA2x12mm Screw P 9 PM2x14mm M2 Nylon Insert Lock Nut d2xD5mm Washer Charge Receptacles KP0041300 A324PO24581008 Apply thick CA or Canopy glue ...

Page 11: ...ough the pre drilled wing hole before applying the screw The hole on the wing tube is pre threaded do not over tighten the PM 3mm screw the set up is for future removal of the wing Step 3 Make sure the wings are resting against the fuselage tightly Locate the pre drilled 2 5mm hole at top of left wing and drill along with 2 5mm drill bit until it passes through the wing tube Apply the PA3x30mm sel...

Page 12: ... and fuselage configuration as shown in the diagrams Wing Struts HM4x15mm Screw d4x D12mm Washer 2 2 M4 NYLON INSERT LOCK NUT 2 21 22 A A A B B C C HM4x15mm M4 NYLON INSERT LOCK NUT Washer d4xD12mm B B C C A Bottom View A324PO24581008 ...

Page 13: ...dangerous to fly a badly pre adjusted aircraft 1 3 PAULISTINHA P 56 is specially designed to be powered by 80c c engine using a more powerful engine does not mean better performance In fact over powered engine may cause structural damage and injuries Make sure the air field is spacious never fly the plane too close to people and never get too close to a running propeller If you find wrinkles on th...

Page 14: ..._ Fuselage QC _______________________ QC numbers are stamped on wing and fuselage 5 Date of Purchase _____________________________________ 6 Store Name _________________________________________ Please call AirBorne Models at 925 371 0922 for any assistance in filling this form Thank you very much for purchasing our product LINKAGE CONNECTOR HW7111050 HW7111060 After fastening the round nut make su...

Page 15: ... cutting of the pre painted cowling Usage of the transparent 3D template Simply cut the transparent 3D template to fit your engine and exhaust pipe then slide onto the actual cowling and use as template to mark the openings required for final cutting 1 2 3 4 A324PO24581008 ...

Page 16: ...The World Models Manufacturing Co LTD www theworldmodels com n A324PO24581008 ...

Reviews: