background image

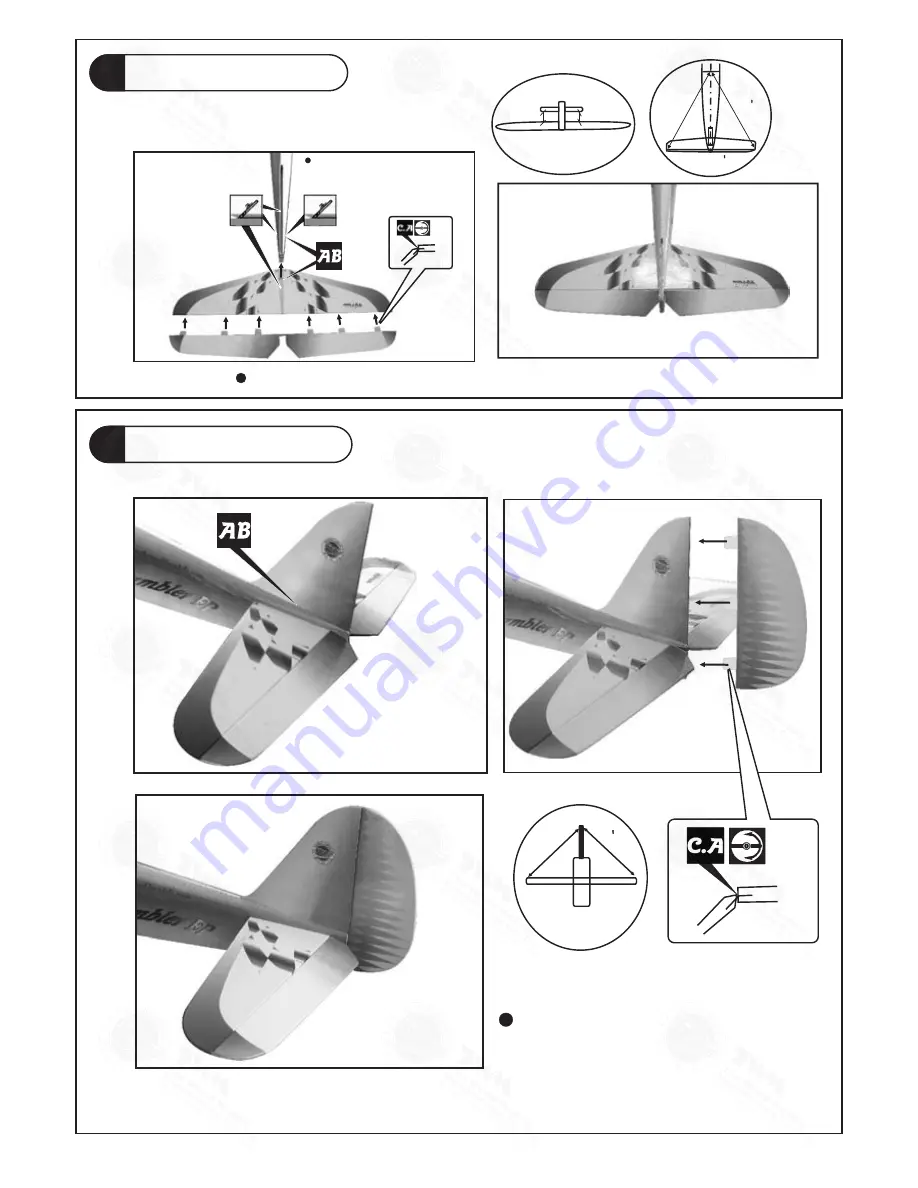
Stabilizer & Elevator

3

Apply instant type CA glue to both sides of each hinge.

Vertical Fin & Rudder 

4

Apply instant type CA glue to both 
sides of each hinge.

Completed

P.4

A=A

A

A

B=B'

B

B

Completed

Te m p o r a r y i n s t a l l t h e m a i n w i n g , a d j u s t 
l e v e l i n g o f t h e s t a b i l i z e r t o m a k e i t a s 
p a r a l l e l t o t h e m a i n w i n g a s p o s s i b l e .

(Stabilizer)

(Main Wing)

B

B'

B=B'

Remove coverings for all surfaces in 
contact before applying A/B epoxy glue.

E196BPO11180902

Summary of Contents for Rambler EP

Page 1: ...el Operating this model without prior preparation may cause injuries Remember safety is the most important thing Always keep this instruction manual at hand for quick reference Specifications are subject to change without notice FACTORY PRE FABRICATED ALMOST READY TO FLY ARF SERIES MADE IN CHINA The World Models Manufacturing Co LTD www theworldmodels com Requires 4 channel radio w 4 micro servos ...

Page 2: ...ment The manufacturer will replace any defective parts but will not extend to the parts that are good before gluing to defective parts during assembly Warranty will not cover any parts modified by customer INDEX BEFORE YOU BEGIN PARTS LIST ASSEMBLY SAFETY PRECAUTIONS P 1 P 2 P 9 BEFORE YOU BEGIN Read through the manual before you begin so you will have an overall idea of what to do Symbols used th...

Page 3: ...TUBE Ø4x4mm 1 pc HORN 1 pc SCREW PM2x8mm 2 pcs 8 SOCKET HEAD SCREW M3x8mm 2 pcs SCREW PM2x12mm 4 pcs SCREW PWA2x8mm 4 pcs WASHER d3xD7mm 2 pcs WASHER d2xD5mm 2 pcs M3 NUT 2 pcs 400 GEAR BOX 1 set COWLING 1 pc SPINNER Ø36mm SP26036FR0 1 pc FOLDING PROPELLER SET PL6314020 1 set OUTRUNNER MOTOR KM0283800 1 pc 9 STRAPER 2 pcs FUELTUBE Ø4x4mm 2 pcs SPONGE 10x50x150mm 1 pc BATTERYTIE 200mm 1 pc DOUBLE S...

Page 4: ...e pre drilled Please look for pin hole marks at under side of control surfaces Bottom View 2mm Main Wing 1 Apply instant type CA glue to both sides of each hinge Bottom View Aileron Servo Lead PM2x16mm Pushrod Ø1 4x58mm Clevis 2mm Horn Fuel Tube Ø4x4mm straper 1mm 1mm E196BPO11180902 ...

Page 5: ...pe CA glue to both sides of each hinge Completed P 4 A A A A B B B B Completed Temporary install the main wing adjust leveling of the stabilizer to make it as parallel to the main wing as possible Stabilizer Main Wing B B B B Remove coverings for all surfaces in contact before applying A B epoxy glue E196BPO11180902 ...

Page 6: ...ces Bottom View PM2 x 8mm Clevis Fuel Tube Ø4x4mm 2mm Ø1 4x425mm Bottom View Elevator Pushrod 7 PM2 x 8mm Screw 1mm pilot holes for World Models tri horn are pre drilled Please look for pin hole marks at under side of control surfaces 2 Bottom View Horn Fuel Tube Ø4x4mm Clevis PM 2x8mm 2mm Ø1 4x405mm Pushrod P 5 Wooden Block Wire Ø1x85mm 85mm 18mm 98mm 26mm E196BPO11180902 ...

Page 7: ...r 2 M3x8mmSocketHeadScrew TWM KP0011310 Solder Solder Don t over tighten the PM2 screws too much stress on the screws could split the firewall 1 3 2 6 4 PM2x12mm d2xD5mm Washer M2 Nut M3x8mm d3xD7mm Washer M3 Nut 2 d2xD5mm Washer 2 Paper M3x3mm Set Screw Steel Wire Ø1 2x35mm E196BPO11180902 TO ALLOW FOR BACKLASH OF MATCHING GEAR PUT A PIECE OF THIN PAPER BETWEEN THE GEARS AND THEN TIGHTEN THE M3X8...

Page 8: ...5 x D8mm Washer 2 5mm 3mm Set Screw 2 6mm Collar PA2 3x12mm Screw 4 2 6mm Collar 2 Radio Equipment 9 Double Sided Tape Battery Tie Motor Battery Elevator Pushrod Rudder Pushrod Straper Rudder Servo Elevator Servo Sponge Fuel Tube Ø4x4mm PA2 3x12mm Landing wire straps 1 5mm 56 2mm 48mm 2 5mm Brushless ESC E196BPO11180902 ...

Page 9: ...P 8 Canopy 12 A A B B C C B B C C A A Wing Setting 13 PWA2 x 8mm Screw 4 PWA2 x 8mm 1mm Pilot Adjust the wing and fuselage configuration as shown in the diagrams E196BPO11180902 ...

Page 10: ...lose to a running propeller Extreme caution should be exercised when working with electric powered models Make sure the propeller is cleared of all objects especially your hands before connecting the battery to the model Make sure you understand the operation of the ESC Electronic Speed Control by studying the ESC manual Once you plug in the battery for electric powered model always treat the prop...

Page 11: ...lease fill in the following and send to AirBorne Models 4749 K Bennett Drive Livermore CA 94551 USA 1 Name 2 Address 3 Phone E mail 4 Model Wing QC Fuselage QC QC numbers are stamped on wing and fuselage 5 Date of Purchase 6 Store Name Please call AirBorne Models at 925 371 0922 for any assistance in filling this form Thank you very much for purchasing our product E196BPO11180902 ...

Page 12: ...The World Models Manufacturing Co LTD www theworldmodels com E196BPO11180902 ...

Reviews: