background image

PARLOUR PELLET 3000 

PELLET HEATER 


17 

placed  on  a  non-combustible  floor  or 
ground,  well  away  from  all  combustible 
materials  pending  final  disposal.  If  the 
ashes  are  disposed  of  by  burial  in  soil  or 
otherwise locally dispersed, they should be 
retained  in  the  closed  container  until  all 
cinders have thoroughly cooled. 

c.


Vacuum  inside  stove  ash  pockets  on  both 
sides of fire pot. 

d.


Remove  fire  pot  by  lifting  up  and  out.  It 
may  be  brushed  out  or  vacuumed.  Fire  pot 
should  be  cleaned  regularly.  Make  sure 
slots  in  pot  are  not  plugged.  The  area 
around  and  below  the  pot  should  be 
checked  every  five  or  six  days  depending 
on  how  many  hours  a  day  you  are  burning 
your  heater  and  the  quality  of  the  pellets 
being burned. After a few days you will be 
able to determine the frequency required for 
cleaning.  Scrape  pellet  feed  chute  with 
putty knife to remove hardened material on 
which sawdust can accumulate. 

e.


Scrape pellet feed chute with putty knife to 
remove  hardened  material  on  which 
sawdust can accumulate. 

f.


The  tee  connector  on  the  vent  pipe  must 
have  a  clean  out  cap  and  this  must  be 
checked  every  four  to  six  weeks  or 
whenever  you  utilize  the  "Clean"  mode  on 
the control dial. 

g.


Fly  ash  can  also  accumulate  in  the  vent 
pipe. Inspect  the exhaust  system  frequently 
to  maintain  free  flow  of  exhaust  fumes. 
This  depends  entirely  on  the  quality  of  the 
pellets,  so  you  will  initially  monitor  the 
buildup in the vent pipe. Those installations 
going into an existing flue must be installed 
with  a  tee  connector  to  allow  access  to 
clean the ash from the pellet vent pipe. 

1.


Hopper  Clean  Out

:  Vacuum  the  accumulated 

saw  dust  in  the  hopper  weekly.  Keep  free  of 
debris and foreign material. An accumulation of 
saw dust can cause irregular pellet feed. For best 

results  this  should  be  done  on  a  regular  basis 
depending  on  how  often  the  heater  is  used.  If 
you  burn  the  heater  all  of  the  time,  you  should 
do this every eight to ten days. 

2.


Cleaning  the  Exhaust  Fan  Blade  &  Heat 
Exchanger

:  The  exhaust  blower  should  be 

checked  for  excessive  fly  ash  buildup.  Regular 
and  routine  maintenance  utilizing  the  clean  out 
feature  will  keep  the  exhaust  blower  housing 
and fan blades clean. This cleaning can only be 
done  when  the  heater  is  not  burning.  For  best 
results, run the fan in the "Clean" position  with 
the  door  open  for  approximately  45  seconds  or 
until  ash  is  no  longer  being  picked  up  by  the 
fan.  Remember,  you  must  always  check  the 
clean out cap on the tee after utilizing the clean 
feature (see Figure 14). 

(See Figure 19 for routine stove clean out and 
maintenance.) 

3.


Cleaning the Fan Guard

: The plastic fan guard 

on the bottom of the stove must be kept free of 
lint and dust. Check weekly for lint build-up and 
vacuum as necessary. 

4.


Keeping  the  Glass  Clean

:  If  soot  deposits 

accumulate  on  the  glass,  clean  with  window 
glass  cleaner  and  a  paper  towel  when  the  glass 
is cold. 

5.


Polishing the Gold and Chrome

: All gold and 

chrome  plating  used  on  the  Parlour  can  be 
cleaned  with  a  soft  cloth  and  non-abrasive 
cleaner. 

6.


Cleaning  and  Polishing  Gold

-

Plated  Parts

Gold  is  a  soft  metal  and,  therefore,  a  fragile 
surface. It will not discolor from heat, but it can 
easily  be  scratched.  Prior  to  the  first  burn  it  is 
important  to  use  Kel  Kem  Spray  Gold  Cleaner 
or  Flitz  Faucet  &  Fixture  Wax  and  a  soft  clean 
cloth  to  wipe  any  fingerprints  off  all  gold 
surfaces  or  the  heat  will  cause  the  oil  in  the 
fingerprint to remain in the surface permanently. 

Summary of Contents for PARLOUR 3000

Page 1: ...NS CONTACT LOCAL BUILDING OFFICIALS ABOUT RESTRICTIONS AND INSTALLATION INSPECTION AND PERMIT REQUIREMENTS FAILURE TO COMPLY WITH OWNER S MANUAL INSTRUCTIONS WILL VOID WARRANTY AND COULD RESULT IN PRO...

Page 2: ...Exchanger 15 High Temp Flue Indicator Light 13 Hopper clean out 15 filling 11 Installation 7 battery 13 clean out tee 8 distance to openings 8 floor protection 7 pipe configuration 7 pipe connections...

Page 3: ...tion Rear View 8 Figure 4 9 Figure 5 9 Figure 6 10 Figure 7 10 Figure 8 11 Figure 9 12 Figure 10 13 Figure 11 13 Figure 12 14 Figure 13 16 Figure 14 Replacement Parts List 20 Figure 15 Circuit Board D...

Page 4: ...PARLOUR PELLET 3000 PELLET HEATER 4 of 31 LABORATORY LISTING LABEL...

Page 5: ...pliance and components for damage Damaged parts may impair safe operation DO NOT install damaged components DO NOT install incomplete components DO NOT install substitute components Report damaged par...

Page 6: ...ontact your local dealer if assistance is required before during and after installation Before Start Up Check List 1 All Safety Warnings have been read and followed 2 The Owner s Manual has been read...

Page 7: ...ccessibility clearance for servicing and proper operation Never obstruct the front opening of the heater The heater may be installed as a free standing unit mounted on a non combustible protective flo...

Page 8: ...be provided for combustion and ventilation air The air inlet must remain unrestricted while unit is in use Outside air connection is located at the bottom near the front of the heater see Figure 2 Th...

Page 9: ...d so that access is provided for inspection and cleaning 2 Avoid installing heater in high traffic areas Keep children away from heater when in operation 3 Outside air required see Figure 10 4 A 3 inc...

Page 10: ...If there is a power failure the heater will shut down If the 12 volt back up system is installed the heater will automatically switch to the 12 volt power Route the power supply cord so it does not t...

Page 11: ...al see Figure 10 Follow thermostat manufacturer s instructions 3 Locate thermostat approximately 10 to 12 feet from heater or in an area that requires steady temperature Run thermostat wires from heat...

Page 12: ...PARLOUR PELLET 3000 PELLET HEATER 12 FIGURE 10 Fuse Holder To remove fuse push cap in and turn counter clockwise Rotated and enlarged view of plate bottom Outside Air Hook Up...

Page 13: ...pot must be seated flush and must sit even in the fire pot tray Air leakage around the fire pot will create a poor burn see Figure 12 In case of power outage with battery connected light the pellets i...

Page 14: ...of pellets per hour The flame will fluctuate from 3 to 8 inches in height 4 In the High position the Parlour will feed approximately 5 pounds of pellets per hour The flame will fluctuate between 3 in...

Page 15: ...lour Pellet 12V back up can be purchased as an option and includes the following components a Deep cycle seated 12 volt gel cell battery available at most battery stores b Battery connector cables for...

Page 16: ...ffect The following procedures should be studied carefully and performed regularly as indicated a Soot and Fly Ash Formation and Removal The products of combustion will contain small particles of fly...

Page 17: ...saw dust in the hopper weekly Keep free of debris and foreign material An accumulation of saw dust can cause irregular pellet feed For best results this should be done on a regular basis depending on...

Page 18: ...d check the feed chute to see what is causing the jam Remove any foreign material or object and restart the heater CAUTION Keep fingers and hands clear of the feed mechanism when heater is on 3 Proble...

Page 19: ...t you try another pellet brand In most climates the pellets and fly ash can absorb moisture from the air and create creosote and a severe clogging problem Keep this in mind when you store and handle y...

Page 20: ...PARLOUR PELLET 3000 PELLET HEATER 20 FIGURE 15 REPLACEMENT PARTS LIST 16...

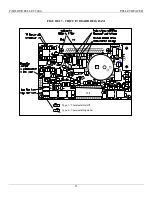
Page 21: ...PARLOUR PELLET 3000 PELLET HEATER 21 FIGURE 17 CIRCUIT BOARD DIAGRAM Type 2 Thermostat High Low Type 1 Thermostat On Off 17 0...

Page 22: ...PARLOUR PELLET 3000 PELLET HEATER 22 FIGURE 18 ELECTRICAL SCHEMATIC WIRING DIAGRAM 250 VAC 250 VAC...

Page 23: ...ot use a household vacuum cleaner 4 Connect vinyl clean out tube to pellet vac or shop vac An adaptor must be used to connect to a shop vac These can be purchased at hardware stores or home centers In...

Page 24: ...equipped with a blocked flue high temp safety sensor that will shut the stove off if there is a down draft blocked flue or high temperature condition If you install the stove on the side of the house...

Page 25: ...PARLOUR PELLET 3000 PELLET HEATER 25 APPENDIX B E I FIREPOT ASSEMBLY...

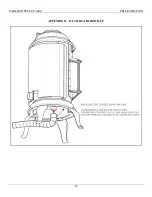
Page 26: ...PARLOUR PELLET 3000 PELLET HEATER 26 APPENDIX B OUTSIDE AIR HOOK UP...

Page 27: ...ellet and longer than 1 then the stove could go out on the low setting for lack of fuel Turn the trim clockwise to increase fuel and thus sustain the fire 2 The Fan Trim Pot Adjustment is located on t...

Page 28: ...em 4 in illustration 5 Vertical termination cap type L pellet must be used on all installations If wind conditions are present then utilize a high wind cap see item 5 in illustration PELLET QUALITY Ve...

Page 29: ...PARLOUR PELLET 3000 PELLET HEATER 29 APPENDIX E REPLACEMENT OF IGNITER...

Page 30: ...amages so the above limitation or exclusion may not apply to you This warranty gives you specific legal rights that vary from state to state WARRANTY WORK If you find this unit to be defective in mate...

Page 31: ...PARLOUR PELLET 3000 PELLET HEATER Thelin Hearth Products Inc 63 Laxalt Dr Carson City NV 89706 www thelinco com...

Reviews: