QUICK START GUIDE - SB25 MOUNT ADAPTER
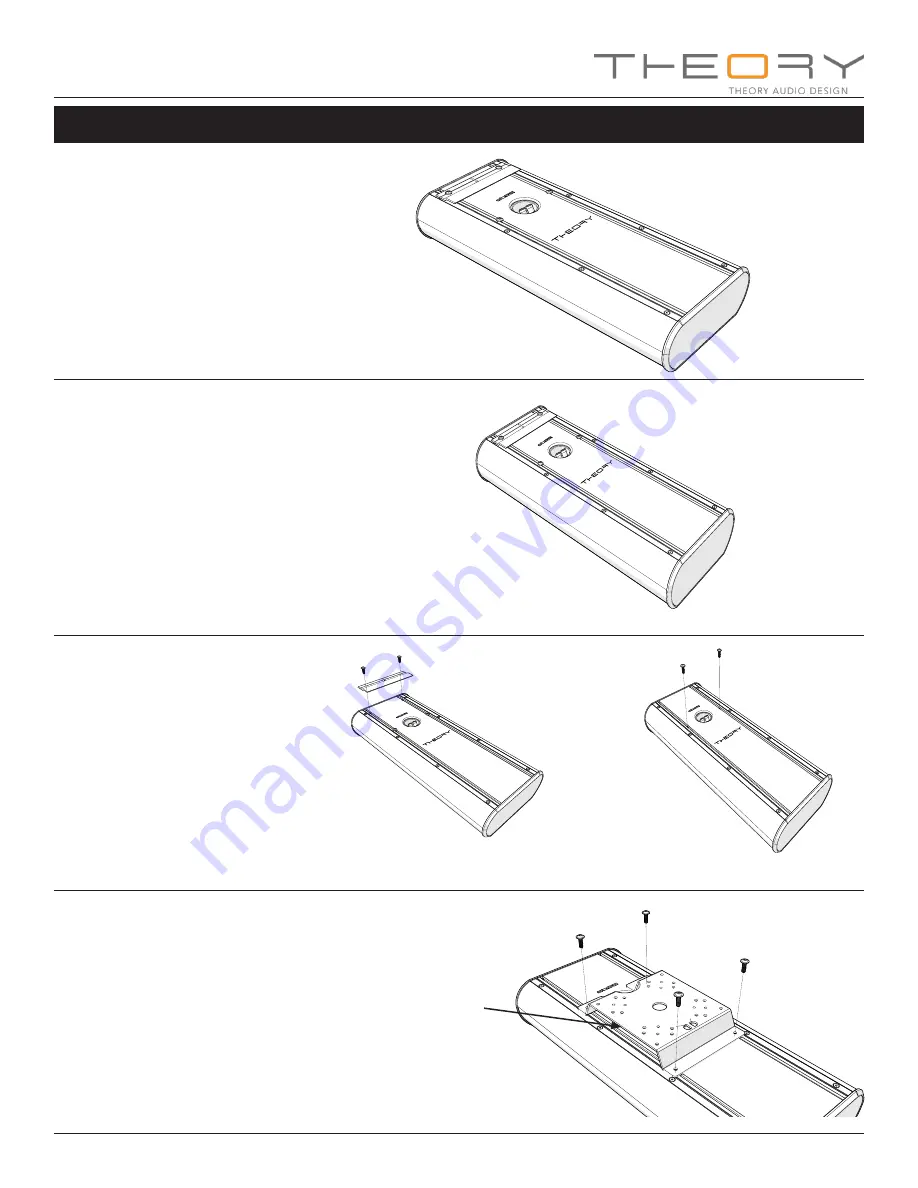
1 - LAY SB25 FACE DOWN
Find a safe, large, flat location free of protrusions or debris
and carefully lay your sb25 loudspeaker face down.
Figure 1.
FIGURE 1. Lay sb25 face down.
GET HELP
Your Theory sb25 loudspeaker is compact, but it is heavy
for its size. You will need at least one other person to lift and
hold the speaker in position during installation.
DO NOT TRY TO LIFT AND MOUNT YOUR THEORY
LOUDSPEAKER BY YOURSELF.
3 - ATTACH ADAPTER - LOOSELY
One at a time, align an M5 screw and adapter mount hole
with a nut inside the T-slot making sure that you honor the
ADAPTER orientation shown. The nuts can be moved
within the T-slot using a small screwdriver or the hex key.
Engage the screw into the nut just enough to retain the nut
on the screw, but leave as loose as possible as you will need
to move the adapter/screw around to align with the other
nuts in the T-slots as you go.
Figure 3
.
2 - REMOVE Z-CLIP
Using supplied 3mm hex wrench, remove the M5 machine
screws holding the Z-clip mounting bracket in place.
Remove the Z-CIip and store for future use. Retain the
M5 machine screws to mount the UNIVERSAL MOUNT
ADAPTER.
Figure 2a.
In similar fashion, remove the secondary M5 machine
screws installed in T-slots and retain to mount the UNIVER-
SAL MOUNT ADAPTER.
Figure 2b.
This will leave 4 nuts in the T-SLOT tracks. We will use
these nuts to attach the UNIVERSAL MOUNT ADAPT-
ER. Do not attempt to remove the nuts.
FIGURE 2a. Remove Z-Clip, retain screws.
FIGURE 3. Loosely attach ADAPTER to loud-
speaker using t-slot nuts, and machines screws
just removed.
PAGE 3
FIGURE 2b. Remove and retain secondary
screws.
Observe adapter orientation!
HEAVY!
ATTACHING ADAPTER
(If mounting to rigid conduit, attach adapter to conduit first, see page 4)


