QUICK START GUIDE - SB25 MOUNT ADAPTER
THEORY AUDIO DESIGN, LLC
25741 Atlantic Ocean Drive, Suite B
Lake Forest, CA 92630
Tel: 949-245-0505
www.theoryaudiodesign.com
© 2021 THEORY AUDIO DESIGN, LLC. All rights reserved.
Theory Audio Design routinely engages in programs to improve, modify and revise its products without notice or obligation. As such, your product may
differ slightly from what is shown in this guide.
1 - ATTACH ADAPTER TO CONDUIT FIRST!
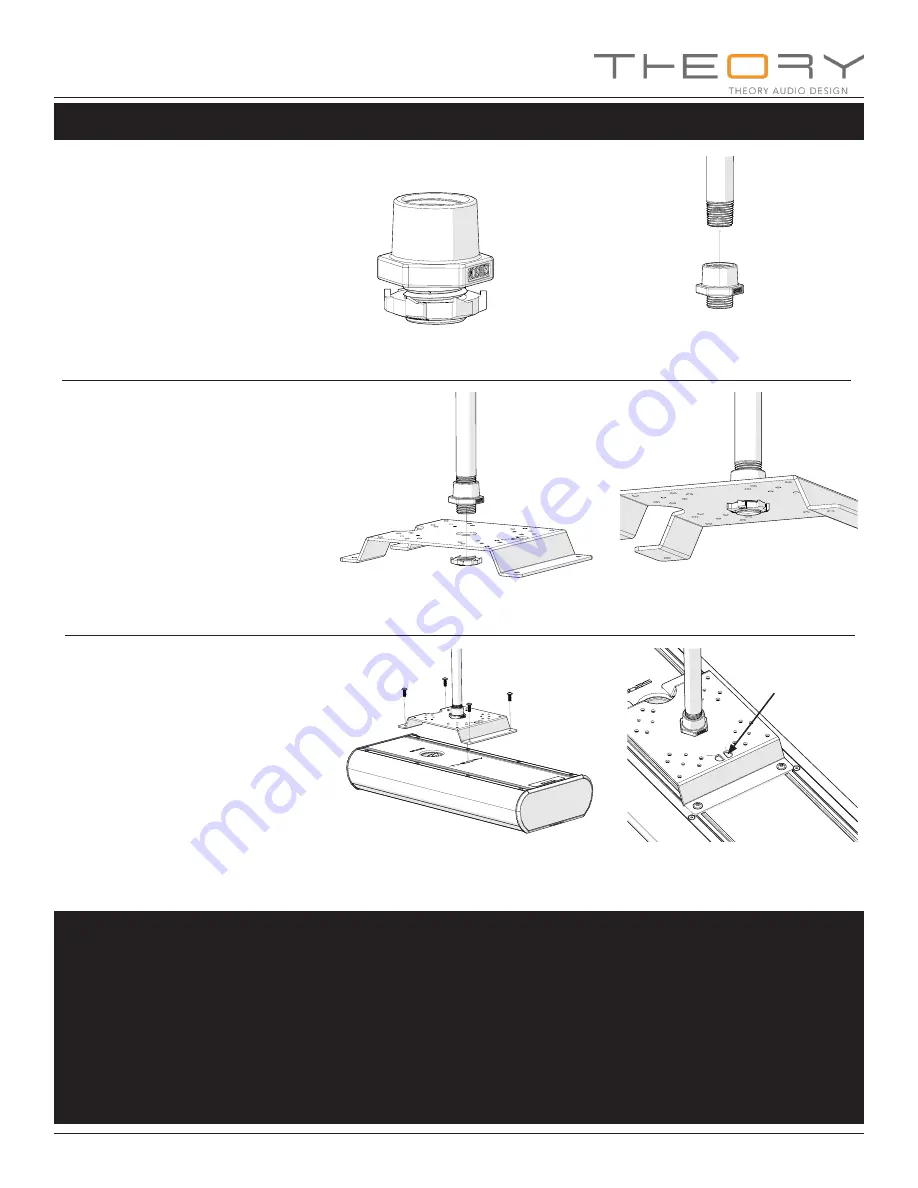
To hang the sb25 from threaded conduit, you will need to
purchase a 1/2” rigid conduit hub (not included).
Figure 8a.
After the conduit has been securely and safely attached
to the ceiling or suitable structural member, apply thread
locking compound and screw the conduit hub body onto
the conduit and tighten securely.
Figure 8b.
POLE (THREADED CONDUIT) MOUNT
2 - ORIENT AND ATTACH ADAPTER TO HUB
Apply thread-locking compoud to the hub threads and
loosely attach ADAPTER to hub.
Figure 9a.
Orient ADAPTER for desired speaker orientation and
tighten conduit hub nut securely.
Figure 9b.
FIGURE 8a. You will need to acquire a thread
rigid conduit hub (not included).
FIGURE 9a. Apply thread-locking compoud and loosely
attach adapter to conduit hub.
PAGE 5
FIGURE 8b. Using thread-locking compound,
tightly screw hub body to conduit.
FIGURE 9b. Orient adapter for desired speaker orien-
tation and tighten conduit hub nut securely.
3 - ATTACH SPEAKER TO ADAPTER AND IN-
STALL SAFETY TETHER (NOT INCLUDED)
With two or more people, carefully attach the speaker to
the ADAPTER following the steps outlined on pages 3-4.
Play particular attention to the position of the adapter on the
speaker as outlined in step 4 on page 4 as this will position
the speaker center of gravity directly under the conduit pole.
Figure 10a.
Obtain a suitable safety tether (not included) and attach it to
the ADAPTER at the safety tie point.
Figure 10b.
FIGURE 10a. With two or more people, carefully attach
speaker to adapter following the steps on pages 3-4.
FIGURE 10b. Connect a suitable safety tether (not
included) to the safety tie point on the adapter.
Attach safety tether
(not included) here


