


EX-TRACK
®
Operator Manual, Revision T-1
83
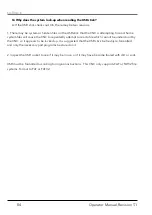
10.1. FAQ’s Operating the system
Q: How do you continue operation after a cutting stoppage during automatic cutting?
A: The following functions can be used after cutting is stopped in the automatic mode:
[STOP] key: The system will stop. The program can be continued immediately by pressing [START]
key. If necessary, use the arrow keys
[↑] [↓] [←] [→]
to adjust the torch position. When the torch is
located at required position, press the [START] key to continue cutting.
Use the [F
↑
] [F
↓
] keys to adjust the speed up or down, by 1% for each button press.
Use the [S
↑
] [S
↓
] keys to move the torch up or down.
Q: How do you restart a cut if the plate did not pierce?
A: The system can be sent back to the origin if this happens. Press the [STOP] key to stop system
motion, then press the [F6] key to move backwards on path. The torch will move backwards
on path until it reaches the pierce point. You may then re-start the cutting process and press
the [START] key to begin cutting again.
Q: If the power is lost during cutting, or some other interruption causes the program to be
abandoned, can the un-finished program be recovered?
A: Yes, the operator can use RESUME function to finish cutting a parked program:
1. If the program has been stopped and abandoned manually, follow the procedures in section
Resuming Parked Programs.
If there is a loss of power while cutting, the program can easily be recovered as long as the machine
is not moved while power is off. Follow the procedures in section Resuming Parked Programs, but
be sure to select the option 3) RELOCATE PATH, so that the program will continue from the current
system position.
Q: Why can some part program files not be read by the CNC after they are copied to the
USB stick using Windows Explorer?
A: If using the file type extension “.MPG”, Windows can include meta-data in the file or on the
disk. It is suggested that files only use the file type extensions “. CNC” or “.TXT” in order to
avoid problems.
Summary of Contents for EX-TRACK
Page 101: ...EX TRACK Operator Manual Revision T 1 101 Shape 1 Shape 2 Shape 3...
Page 102: ...EX TRACK Operator Manual Revision T 1 102 Shape 4 Shape 5 Shape 6...
Page 103: ...EX TRACK Operator Manual Revision T 1 103 Shape 7 Shape 8 Shape 9...
Page 104: ...EX TRACK Operator Manual Revision T 1 104 Shape 10 Shape 11 Shape 12...
Page 105: ...EX TRACK Operator Manual Revision T 1 105 Shape 13 Shape 14 Shape 15...
Page 106: ...EX TRACK Operator Manual Revision T 1 106 Shape 16 Shape 17 Shape 18...
Page 107: ...EX TRACK Operator Manual Revision T 1 107 Shape 19 Shape 20 Shape 21...
Page 108: ...EX TRACK Operator Manual Revision T 1 108 Shape 22 Shape 23 Shape 24...
Page 109: ...EX TRACK Operator Manual Revision T 1 109 Shape 25 Shape 26 Shape 27...
Page 110: ...EX TRACK Operator Manual Revision T 1 110 Shape 28 Shape 29 Shape 30...
Page 111: ...EX TRACK Operator Manual Revision T 1 111 Shape 31 Shape 32 Shape 33...
Page 112: ...EX TRACK Operator Manual Revision T 1 112 Shape 34 Shape 35 Shape 36...
Page 113: ...EX TRACK Operator Manual Revision T 1 113 Shape 37 Shape 38 Shape 39...
Page 114: ...EX TRACK Operator Manual Revision T 1 114 Shape 40 Shape 41 Shape 42...
Page 115: ...EX TRACK Operator Manual Revision T 1 115 Shape 43 Shape 44 Shape 45...
Page 116: ...EX TRACK Operator Manual Revision T 1 116 Shape 46 Shape 47 Shape 48...
Page 117: ...EX TRACK Operator Manual Revision T 1 117 Shape 49 Shape 50...
Page 118: ...EX TRACK Operator Manual Revision T 1 118 Notes...


