background image

6


IMPORTANT SAFETY INSTRUCTIONS

READ AND SAVE THESE INSTRUCTIONS

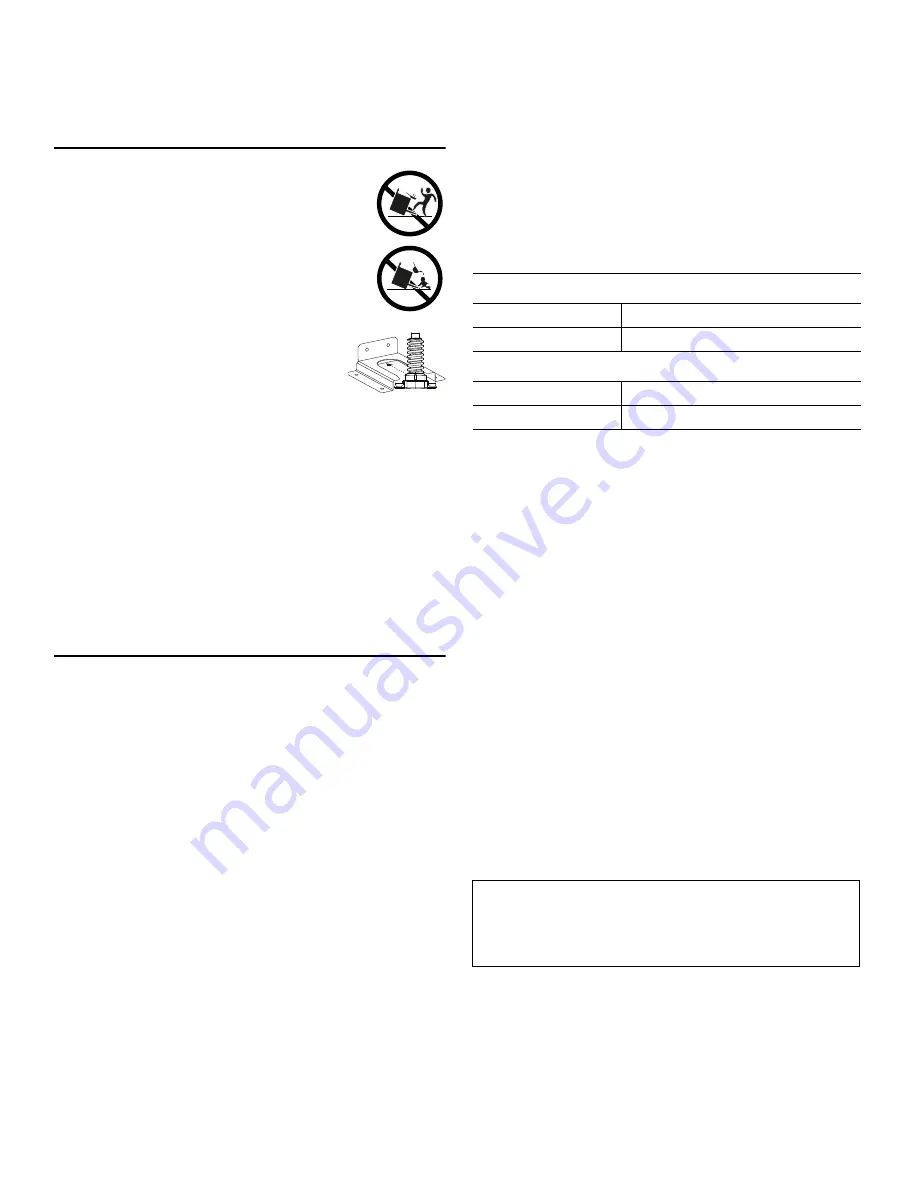
WARNING—DANGER OF TIPPING ON RANGES

All ranges can tip and injury can result. To 

prevent accidental tipping of the range, 
attach it to the floor, wall, or cabinet by 
installing the anti-tip bracket supplied.

A child or adult can tip the range over and 
be killed or seriously injured. Verify that the 
anti-tip bracket is securely installed. Ensure 
the anti-tip bracket is engaged when the 
range is moved.

DO NOT

 operate the range without 

the anti-tip bracket in place. Failure to 
follow the instructions in this manual 
can result in death or serious burns to 
children and adults.

If the range is pulled away from the wall for cleaning, 
service, or any other reason, ensure that the anti-tip 
bracket is properly reengaged when the range is 
pushed back into place. In the event of abnormal 
usage (such as a person standing, sitting, or leaning 
on an open door), failure to take this precaution can 
result in tipping of the range. Personal injury might 
result from spilled hot liquids or from the range itself. 

Check for proper installation and use of anti-tip 
bracket. Carefully tip range forward pulling from the 
back to ensure that the anti-tip bracket engages the 
range and prevents tip-over. Range should not move 
more than 1'' (2.5 cm).

REQUIREMENTS AND STANDARDS

The appliance must be electrically grounded in 
accordance with local codes or, in the absence of local 
codes, with the with the National Electrical Code, 
NFPA 70 or the Canadian Electrical Code, CSA C22.1.

Installation must conform with local codes or, in the 
absence of local codes, with the National Fuel Gas 
Code, ANSI Z223.1/NFPA 54 or, in Canada, the 
Natural Gas and Propane Installation Code, CSA 
B149.1.

Installation of appliances designed for manufactured 
(mobile) home installation must conform with the 
Manufactured Home Construction and Safety 
Standard, Title 24 CFR, Part 3280 [formerly the 
Federal Standard for Mobile Home Construction and 
Safety, Title 24, HUD (Part 280)] or with local codes 
where applicable.

Installation of appliances designed for recreational 
park trailers must conform with state or other codes 
or, in the absence of such codes, with the ANSI 
A119.5 Park Model Recreational Vehicle Standard.

See the Installation Instructions for electrical 
requirements, grounding instructions and clearance to 
combustible material requirements.

Service should only be done by an authorized service 
provider.

It is the responsibility of the owner and the installer to 
determine if additional requirements and/or standards 
apply to specific installations.

GAS REQUIREMENTS 

A manual valve must be installed in an accessible 
location in the gas piping external to the appliance for 
the purpose of turning on or shutting off gas to the 
appliance.

In the event a burner goes out and gas escapes, open 
a window or a door. 

DO NOT

 attempt to use the 

appliance until the gas has had time to dissipate. Wait 
at least 5 minutes before using the appliance.

For Massachusetts installations:

Installation must be performed by a qualified or 
licensed contractor, plumber or gas fitter qualified 
or licensed by the state, province or region where 
this appliance is being installed.

Shut-off valve must be a “T” handle gas cock.

Flexible gas connector must not be longer than 
36'' (914 mm).

The maximum depth of cabinets installed above 
cooking surface must be 13'' (330 mm).

PROPOSITION 65 WARNING

This product may contain a chemical known to the State of 
California, which can cause cancer or reproductive harm. 
Therefore, the packaging of your product may bear the 
following label as required by California:

Disposal of packaging

The packaging materials are environmentally compatible 
and can be recycled. Sort the individual components by 
type and dispose of them separately. Information about 
current disposal methods can be obtained from your 
specialist dealer or local authority.

Natural gas w.c.

Minimum

7'' (17.4 mbar) 

Maximum

14'' (34.9 mbar) 

LP gas w.c.

Minimum

11'' (27.4 mbar) 

Maximum

14'' (34.9 mbar) 

State of California Proposition 65 Warning:


WARNING

Cancer and Reproductive Harm - 

www.P65Warnings.ca.gov

Summary of Contents for PRD304WHC

Page 1: ...THERMADOR COM 8VH DQG FDUH GU IDE Professional Series Pro Grand and Pro Harmony Ranges...

Page 2: ...PRD364WDGU PRD304WHU PRD364WIGC PRD305WHC PRD364WIGU PRD305WHU PRD366WGC PRD364WDHC PRD366WGU PRD364WDHU PRD486WDGC PRD366WHC PRD486WDGU PRD366WHU PRD486WIGC PRD486WDHC PRD486WIGU PRD486WDHU PRG364WDG...

Page 3: ...Ta h da P__ XP RT U a P aT TU RXT c Rdbc Ta bTaeXRT Tg_TaXT RT www thermador com us support product registration Cooking Accessories 2 _ T T c h da ZXcRWT fXcW CWTa PS a VaXSS Tb VaX b cT__P hPZX _P b...

Page 4: ...ns 15 Initial start up 16 Available settings 16 Home Connect assistant 16 Setting the convection conversion 16 Setting the oven offset 17 Setting the cooking mode and temperature 17 Setting the timers...

Page 5: ...keep away from the appliance and immediately call your fire department DO NOT ATTEMPT TO EXTINGUISH AN OIL GREASE FIRE WITH WATER WARNING ALL APPLIANCES Proper installation Be sure your appliance is p...

Page 6: ...eating elements Heating elements should never be immersed in water WARNING GLASS CERAMIC COOKING SURFACES Do not cook on a broken cooktop If cooktop should break cleaning solutions and spillovers may...

Page 7: ...ldren should climb onto the appliance to reach these items they could be seriously injured WARNING AIR FLOW Do not block or obstruct the flow of air through the ventilation openings The vent is locate...

Page 8: ...onstruction and Safety Title 24 HUD Part 280 or with local codes where applicable Installation of appliances designed for recreational park trailers must conform with state or other codes or in the ab...

Page 9: ...Instructions concerning spacing behind the range when using the range with the island trim 2 Oven vent DO NOT obstruct 3 STAR burners and grates 4 Griddle option options will vary 5 Control panel 6 C...

Page 10: ...racks 6 Bake element hidden 7 Convection fan cover 8 Meat probe outlet 9 Rack positions 1 2 3 4 6 7 5 6 5 7 8 8 1 2 3 4 1 9 1 Oven interior light 2 Broil igniter 3 Infrared broil burner 4 Oven thermos...

Page 11: ...arm when the oven is in use Do not block the vent since it is important for air circulation Convection fan The convection fan operates during all convection modes When the oven is operating in a conve...

Page 12: ...ling flat racks 1 Grasp rack firmly on both sides and insert rack 2 Tilt rack up to allow stop into rack guide Oven start up Before baking or broiling the oven and broiler should be turned on to burn...

Page 13: ...ss If a burner does not light check to see that the cap is positioned correctly on the base If any one or more burners blow out the electronic igniter automatically activates to re light the flame Do...

Page 14: ...the griddle plate installed 1 Check the griddle plate adjustment by pouring two tablespoons of water on the back of the griddle plate 2 If water does not flow to the front of the griddle move the grid...

Page 15: ...l Fried scrambled LO to MED melt butter add eggs LO finish cooking Same as for standard burners XLO to hold for a short period Poached HI bring water to the boiling point add eggs LO to MED finish hea...

Page 16: ...over bring liquid to a boil LO to maintain simmer Simmer XLO to hold cover Vegetables Fresh HI cover bring water and vegetables to a boil LO to MED cook 10 minutes or until tender Same as for standard...

Page 17: ...ultry less tender cuts of meats and roasting vegetables 1 Conv roast Uses lower and more intense heat from upper element than convection bake with air circulated by a fan Use for tender cuts of meat a...

Page 18: ...settings or until the unit loses power in which case convection conversion will need to be reset Convection conversion is available for the convection bake and true convection modes only For meats an...

Page 19: ...sh four times to indicate the temperature offset has been initiated NOTE If the mode knob is rotated to any position other than OFF or if more than 1 minute passes with no activity while setting the t...

Page 20: ...and then press ENTER Setting the panel lock The panel lock is a safety mechanism to prevent the accidental turning on of the oven or changing an oven setting Panel lock can only be activated in standb...

Page 21: ...MERS on the main oven display 6 Press the left or to scroll to SABBATH TIMER 7 Press the right or and enter the DURATION TIME in 30 minute increments 8 Press ENTER A delay notification appears During...

Page 22: ...p Some operating modes can only be started on the oven itself Operating the appliance directly from the appliance always has priority During this time it is not possible to operate the appliance using...

Page 23: ...ck recommendations Gas main oven broil rack recommendations Secondary oven broil rack recommendations 48 models only Level Bake mode 4 Best for individual baked goods such as cookies biscuits pastries...

Page 24: ...levels for Cookies 3 and 5 Cakes 2 and 5 Levels Conv bake mode 1 3 and 5 Dual fuel Gas see note When several sheets of cookies are to be baked Place the baking sheets directly above each other on the...

Page 25: ...eathery dry Tomatoes Wash and towel dry Cut thin slices 1 8 thick drain well 5 12 Dry brick red color Dual fuel levels True conv mode 4 and 5 Cookies 2 3 and 4 Cookies 1 3 and 5 Pastries and other bak...

Page 26: ...in the app 5 Wait until NETWORK CONNECTED is shown on the display The connection may fail The display will alert you to try again or connect automatically The appliance is ready to connect to the app...

Page 27: ...onfirm the connection on your Home Connect app Setting the remote start See Initiating remote start on page 27 Setting the remote control 1 Press SETTINGS to cycle through available options until HOME...

Page 28: ...If a flame persists turn off the oven and allow it to cool before opening the door to wipe up the excessive food soil At the end of the clean cycle some gray ash or burned residue may remain inside th...

Page 29: ...second intervals to indicate to the user that the function is not available User must turn the knobs to OFF to cease the blinking lights Cleaning the appliance CAUTION Avoid cleaning any part of the...

Page 30: ...the glass lens cover with fingers along the bottom edge to prevent the cover from falling to the bottom of the oven Gently twist the flat blade screw driver to loosen the glass lens cover 5 Remove the...

Page 31: ...o the Installation Instructions Have a qualified electrician ground the range properly Igniters sparking but no flame ignition Gas supply valve is in OFF position Restore gas supply to the unit Range...

Page 32: ...en to you by the representative 2 Press ENTER to allow customer service access Product registration Register your BSH product to access to your product related information You may register your produc...

Page 33: ...you subject to certain limitations stated herein if your Product proves to have been manufactured with a defect in materials or workmanship If reasonable attempts to repair the Product have been made...

Page 34: ...the serial numbers have been altered defaced or removed service visits to teach you how to use the Product or visits where there is nothing wrong with the Product correction of installation problems...

Page 35: ...on du four 48 Descriptions des modes 48 D marrage initiale 49 R glages offerts 49 Assistant Home Connect 50 R glage de la conversion par convection 50 R glage du d calage du four 50 R glage du mode de...

Page 36: ...ement peut entra ner un incendie une explosion ou un risque de br lure pouvant entra ner des dommages mat riels des blessures corporelles ou la mort En cas d incendie loignez vous de l appareil et app...

Page 37: ...de choc lectrique ou d incendie Ustensiles de cuisson vitr s Seuls certains types de verre verre c ramique de c ramique de fa ence ou d autres ustensiles vitr s conviennent la cuisini re sans se cass...

Page 38: ...u papier d aluminium Une telle couverture bloque le d bit d air dans le four et pourrait entra ner une intoxication par monoxyde de carbone Utiliser une feuille de papier aluminium pourrait galement e...

Page 39: ...r des br lures parmi ces surfaces se trouvent les ouvertures de ventilation du four et les surfaces proches de ces ouvertures les portes du four et les fen tres des portes du four AVERTISSEMENT DANGER...

Page 40: ...les installations au Massachusetts L installation doit tre ex cut e par un entrepreneur un plombier ou un ajusteur d appareils gaz qualifi ou autoris par l tat la province ou la r gion d installation...

Page 41: ...ment derri re la cuisini re lors de l utilisation de la cuisini re avec la garniture d lot 2 vent du four NE PAS obstruer 3 Br leurs et grilles STAR 4 Option de plaque chauffante les options varient 5...

Page 42: ...7 Couvercle du ventilateur de convection 8 Sortie de la sonde de viande 9 Positions des grilles 1 2 3 4 6 7 5 6 5 7 8 8 1 2 3 4 1 9 1 clairage int rieur du four 2 Allumeur de gril 3 Br leur de gril in...

Page 43: ...e zone peut tre chaude lorsque le four fonctionne Ne bloquez pas l vent car il est important pour la circulation d air Ventilateur de convection Le ventilateur de convection fonctionne pendant tous le...

Page 44: ...avant de la grille sur les guides de la grille Installation de grilles plates 1 Saisissez fermement la grille des deux c t s et ins rez la grille 2 Inclinez la grille vers le haut pour engager la but...

Page 45: ...qui produit des tincelles lorsque le br leur est allum Chaque br leur doit s allumer en quatre secondes ou moins Si un br leur ne s allume pas v rifiez que le capuchon est correctement positionn sur...

Page 46: ...te install e 1 V rifiez le r glage de la plaque chauffante en versant deux cuill res soupe d eau l arri re de la plaque chauffante 2 Si l eau ne coule pas vers l avant de la plaque chauf fante d place...

Page 47: ...lon les instructions sur l emballage LO BAS LO BAS Pouding LO BAS MED LO MOYEN BAS porter le lait bullition LO BAS LO BAS ufs Cuits en coquille MED HI MOYEN LEV couvrir les ufs d eau ajouter le couver...

Page 48: ...on LO BAS MED MOYEN maintenir la pression Riz HI LEV couvrir porter l eau et le riz bullition LO BAS pour maintenir une bullition basse Couvrir et cuire jusqu ce que l eau soit absorb e Idem que pour...

Page 49: ...e LO BAS MED MOYEN cuire la cuisson d sir e Saut HI LEV chauffer l huile ajouter les l gumes HI LEV MED HI MOYEN LEV terminer la cuisson HI LEV MED HI MOYEN LEV terminer la cuisson Nourriture D marrer...

Page 50: ...sup rieur l air chaud qui circule sous l action d un ventilateur Pour des pi ces tendres de viande plus de 1 po 2 5 cm de volaille et de poisson Ne convient pas au brunissage 1 Levage Fait lever la p...

Page 51: ...toyage et apr s celui ci alors que la porte est verrouill e R parations distance3 Ce symbole est affich lorsque le service la client le est connect pour un acc s distance R glages3 Appuyez pour acc de...

Page 52: ...te ou et s lectionnez ON Marche 4 Appuyez sur ENTRER 5 Tourner le bouton de mode de cuisson CONV BAKE Cuisson par convection et celui de la temp rature la temp rature indiqu e dans la recette Le four...

Page 53: ...la minuterie de cuisine 1 Appuyez sur TIMERS MINUTERIES 2 Appuyez sur la gauche ou et s lectionnez KITCHEN TIMER MINUTERIE DE CUISINE 3 Appuyez sur la droite ou pour r gler l heure souhait e et appuye...

Page 54: ...evage 1 Laisser la p te d congeler si elle est congel e 2 Placer la p te dans un plat et couvrir l g rement 3 Utilisez n importe quel niveau de grille adapt la taille du bol ou du plat Fermez la porte...

Page 55: ...a gauche ou pour d filer jusqu SABBATH TIMER minuteur sabbat 7 Effleurez la droite ou et saisissez la dur e DURATION TIME par incr ments de 30 minute s 8 Appuyez sur ENTRER Un avis de temporisation ap...

Page 56: ...aison Respectez galement les directives fournies par l appli Home Connect La fonctionnalit de d marrage distance Remote Start fonctionne uniquement si l application Home Connect a bien t install e sur...

Page 57: ...roduits de boulangerie individuels tels que les biscuits les p tisseries etc 3 Id al pour la plupart des produits cuits au four 2 Si l article est grand comme un g teau des anges Il est pr f rable de...

Page 58: ...de cuisson convection 2 e t 4 utiliser pour les g teaux biscuits et autres produits de boulangerie Les moules g teaux doivent tre d cal s Les plaques biscuits doivent tre plac es sur la grille 2 dire...

Page 59: ...la serviette Couper en tranches minces de 1 8 po 3 mm d paisseur bien drainer 5 12 S ches couleur rouge vif Niveaux de bi nergie Mode de convection v ritable 4 et 5 Biscuits 2 3 et 4 Biscuits 1 3 et...

Page 60: ...NNECT 2 Appuyez sur ENTRER Si aucun r seau n a t tabli l assistant Home Connect vous guidera Si aucun r seau n a t tabli l assistant Home Connect vous guidera 3 Appuyez sur ENTRER pour s lectionner l...

Page 61: ...PRESS ENTER FOR HC Appuyez Entr e pour Home Connect s affiche 3 Appuyez sur SETTINGS R GLAGES pour parcourir les options disponibles jusqu ce que CONNECT TO HC APP CONNEXION L APPLICATION HC s affiche...

Page 62: ...our peu importe le type l int rieur du four ou sur n importe quelle autre partie autour du four Lorsque le four est r gl pour l autonettoyage les br leurs standard de la table de cuisson et la plaque...

Page 63: ...propres des ponges des serviettes en papier des brosses fibreuses des tampons en plastique non m talliques ou en laine d acier pour le nettoyage et le r curage comme recommand sur le tableau La plupa...

Page 64: ...2 9 Faites glisser la lentille de protection dans le clip du support et poussez l autre extr mit jusqu ce que le clip de fixation s enclenche dans le bo tier figure d 10 Allumez le disjoncteur a b c d...

Page 65: ...gaz de l unit La cuisini re ne fonctionnera pas les lumi res le four et les br leurs de surface ne s allumeront pas Pas d alimentation l unit V rifiez si le disjoncteur est ouvert V rifiez que la conn...

Page 66: ...er l appareil lectrom nager par la connexion Home C onnectTM Accorder l acc s au service la client le l appareil 1 Communiquez avec le service la client le Respectez les directives donn es par le tech...

Page 67: ...neuf R parez remplacez comme votre recours exclusif Pendant cette p riode de garantie Thermador ou l un de ses centres de r parations autoris s r parera gratuitement votre Produit sous r serve de cert...

Page 68: ...uit Sont galement exclus de la garantie les produits dont les num ros de s rie ont t modifi s effac s ou enlev s les visites d entretien visant enseigner le fonctionnement du produit et les visites me...

Page 69: ......

Page 70: ......

Page 71: ......

Page 72: ...d of possibilities that enhance your appliance experience For assistance with connecting contact us at the phone number above or view instructions here www home connect com us en help support set up S...

Reviews: