background image

7

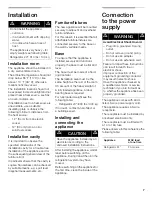
Installation

Installation room

The appliance should be installed in 
a dry, well ventilated room.

The ambient temperature should not 
drop below 55 °F (13 °C) or rise 
above 110 °F (43 °C), otherwise 
malfunctions may occur.

The installation location should not 
be exposed to direct sunlight and not 
placed near a heat source, such as 
an oven, radiator, etc.

If installation next to a heat source is 
unavoidable, use a suitable 
insulating plate or observe the 
following minimum distances from 
the heat source:

– 1.2" (3 cm) from an electric 

cooker,

– 12" (30 cm) from an oil or 

solid-fuel cooker.

Installation cavity

It is important to observe the 
specified dimensions of the 
installation cavity for a trouble-free 
installation of the appliance and for 
the subsequent general view of the 
furniture front.

In particular ensure that the cavity is 
square. Squareness can be checked 
by suitable means, e.g. spirit level, 
diagonal measurements, etc.

Furniture/fixtures

The new appliance will be mounted 
securely to adjacent and overhead 
furniture/fixtures.

For this reason it is essential that all 
attachable furniture/fixtures are 
connected securely to the base or 
the wall by suitable means.

Base

To ensure that the appliance is 
installed securely and functions 
properly, the base must be fiat and 
level.

The base must be made of a hard, 
rigid material.

The installation area must be the 
same height as the rest of the room.

On account of the heavy weight of 
a fully loaded appliance, a load-
bearing base is required.

For fully-loaded weight see the 
following table:

– Refrigerator 24": 890 Ibs / 400 kg

If in doubt, contact an architect or 
a building expert.

Installing and 
connecting the 
appliance

After installing the appliance, wait at 
least before switching on the 
appliance. During transit the oil in the 
refrigeration system may have 
moved.

Before switching on the appliance for 
the first time, clean the inside of the 
appliance.

Connection 
to the power 
supply

The appliance comes with an UL 
listed, 3-wire power supply cord.

The appliance requires a 3-wire 
receptacle.

The receptacle must be installed by 
a licensed electrician only.

The receptacle must be fitted with 
a 10 to 16A fuse. 

Please observe in this coherence the 
following table:

m

WARNING

m

Do not install the appliance:

– outdoors,

– in an environment with dripping 

water,

– in rooms which are at risk of 

frost.

The appliance is very heavy – for 
empty weight see following table:

Refrigerator 24": 310 Ibs / 140 kg

m

CAUTION

m

Have the appliance installed by an 
electrician according to the 
endosed installation instructions.

m

WARNING

m

Avoid Electrical Shock Hazard

– Plug into a grounded 3 prong 

outlet.

– Do not remove ground prong.

– Do not use an adapter.

– Do not use an extension cord.

Failure to follow these instructions 
can result in death, fire, or 
electrical shock.

Improper connection of the 
equipment grounding conductor 
may result in electric shock. 
Have the appliance checked by 
a qualified electrician or service 
technician if you are in doubt as 
to whether the appliance has been 
properly grounded.

Appliance

MAX load 
at one time

Refrigerator 24“

2 Ampere

Summary of Contents for T24BR..

Page 1: ...9000 439 085 T24BR T24IR T30BR T30IR...

Page 2: ......

Page 3: ...g the temperature 11 Super function 11 Setup mode 11 Settings which can be changed in Setup mode 12 Vacation mode 13 Sabbath mode 13 Refrigerating 13 How to save energy 14 Operating noises 14 Defrosti...

Page 4: ...light bulb set the POWER button in the OFF position to turn off the lights in order to avoid contact with a live wire filament 10 A burned out light bulb may break when being replaced NOTE Setting the...

Page 5: ...lar Congratulations With the purchase of your new refrigerator you have opted for a modem high quality domestic appliance Your refrigerator is distinguished by its economical energy consumption Each a...

Page 6: ...erator for storing cooked food dairy products meat products 5 Container for storing deli snacks 6 Vegetable container 7 Control buttons for Temperature Controlled Drawer FlexTemp 8 Temperature Control...

Page 7: ...oaded appliance a load bearing base is required For fully loaded weight see the following table Refrigerator 24 890 Ibs 400 kg If in doubt contact an architect or a building expert Installing and conn...

Page 8: ...p Shelf moves up Toggle switch down Shelf moves down Maximum load of the motorized shelf 22 1 lbs 10 kg In case of overload the mechanism is blocked temporarily Vegetable container with controllable v...

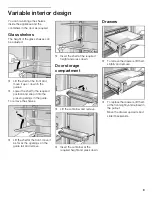
Page 9: ...to the preset openings in the guide To remove the shelves Lift the shelf at the front move it as far as the openings on the guide rail and remove Insert the shelf at the required height and press down...

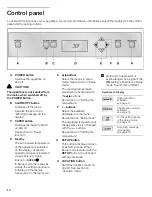
Page 10: ...splay See section on Setup mode E buttons Select the menus in setup mode See section on Setup mode The required temperature adjustment is activated with the buttons See section on Setting the temperat...

Page 11: ...by pressing the SUPER button The SUPER symbol and the Super temperature are displayed The function is ended by pressing the SUPER button again by activating the Eco function by activating the Vacatio...

Page 12: ...to save the setting Energy saving mode When the Economy function Eco is activated the appliance switches to an energy saving mode This Economy functions set at the factory to be energetically more fa...

Page 13: ...utton Hold down the SUPER button for a further 3 seconds The VACATION symbol flashes on the display SABBATH is displayed To end Sabbath mode press the VACATION button The previous settings and tempera...

Page 14: ...with the aid of a spirit level Use the height adjustable feet or place something underneath Drawers baskets or storage areas wobble or stick Check the removable parts and if required reinsert them Rec...

Page 15: ...inated Warning messages via the display If several warning messages are displayed simultaneously deal with each message individually While a warning message is displayed buttons cannot be pressed Door...

Page 16: ...display does not illuminate Power failure the fuse has actuated the mains plug has not been inserted properly Check that the power is on The fuse must be switched on Check that the mains plug is plugg...

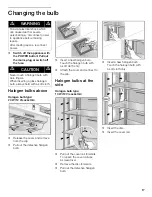
Page 17: ...ide Halogen bulb type 10 W 12 V socket G4 Pull out the cover rail forwards To loosen the cover rail use a screwdriver Remove the disc forwards Pull out the defective halogen bulb Insert a new halogen...

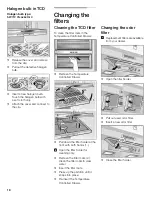
Page 18: ...he Temperature Controlled Drawer Remove the Temperature Controlled Drawer Pull down the filter holder at the front with both hands 1 Open the filter holder for cleaning only Remove the filter mats 2 C...

Page 19: ...ays from the date of purchase The foregoing timeline begins to run upon the date of purchase and shall not be stalled tolled extended or suspended for any reason whatsoever Repair Replace as Your Excl...

Page 20: ...spills of food liquid grease accumulations or other substances that accumulate on in or around the Product and 7 any external elemental and or environmental forces and factors including without limit...

Page 21: ...onction Super 29 Mode Configu ration Setup 29 R glages modifiables en mode Configuration Setup 30 Mode Vacances 31 Mode Sabbat 31 R frig ration 31 Comment conomiser de l nergie 32 Bruits de fonctionne...

Page 22: ...teur principal POWER sur la position OFF pour mettre l clairage hors tension et supprimer ainsi le risque de toucher un fil sous tension 10 Une ampoule grill e peut se briser pendant que vous la rempl...

Page 23: ...nt de vous y reporter ult rieurement D finitions Ce symbole sert attirer votre attention sur un aspect particulier F licitations En achetant ce nouveau r frig rateur vous avez opt pour un appareil m n...

Page 24: ...erre dans le r frig rateur destin es au rangement d aliments cuits de produits laitiers et de charcuterie 5 Bac destin ranger l picerie fine et les snacks 6 Bac l gumes 7 Boutons de commande affect s...

Page 25: ...tre les poids des appareils pleins reportez vous au tableau suivant R frig rateur 24 890 lbs 400 kg En cas de doute contactez un architecte ou un expert en b timent Installation et raccordement de l a...

Page 26: ...yez sur la partie sup rieure du bouton la clayette monte Appuyez sur la partie inf rieure du bouton la clayette descend Charge maximale admise par l tag re motoris e 22 1 lbs 10 kg En cas de surcharge...

Page 27: ...dans les orifices pr r gl s dans le guide Pour retirer les clayettes Soulevez une clayette loignez la des orifices situ s sur le rail de guidage puis retirez la Positionnez la clayette sur la hauteur...

Page 28: ...s servent s lectionner les menus en mode Configuration Voir la section intitul e Mode Configuration Les boutons servent activer l ajustage requis de temp rature Voir la section intitul e R glage de la...

Page 29: ...Pour activer la fonction appuyez sur le bouton SUPER Le symbole SUPER et la temp rature Super s affichent Pour d sactiver cette fonction vous pouvez Appuyer nouveau sur le bouton SUPER Activer la fon...

Page 30: ...r enregistrer ce r glage Mode conomie d nergie Lorsque la fonction conomie Eco est active l appareil commute sur un mode destin conomiser de l nergie La fonction conomie a t r gl e la fabrication pour...

Page 31: ...symbole VACATION affich clignote Le r tro clairage de l affichage s teint La mention SABBATH s affiche Pour mettre fin au mode Sabbat appuyez sur le bouton VACATION L appareil se sert nouveau des r g...

Page 32: ...appareil n est pas d aplomb Nivelez l appareil l aide d un niveau bulle Servez vous des pieds ajustables en hauteur de l appareil ou placez quelque chose sous les pieds Les tiroirs bacs ou clayettes v...

Page 33: ...s dans l appareil 24 heures plus tard v rifiez si les odeurs ont disparu Messages d avertissement apparus l afficheur Si plusieurs messages d avertissement s affichent simultan ment traitez les indivi...

Page 34: ...nct la fiche m le n est pas correctement enfonc e dans la prise V rifiez que le secteur est bien sous tension R armez le disjoncteur V rifiez que la fiche m le est bien enfonc e dans la prise du secte...

Page 35: ...g ne 10 W 12 V douille G4 Tirez le rail couvercle vous Pour d tacher le rail couvercle utilisez un tournevis Tirez le disque vous pour le retirer Extrayez l ampoule halog ne d fectueuse Ins rez une am...

Page 36: ...iroir temp rature contr l e proc dez comme suit Extrayez ce tiroir TCD Avec les deux mains tirez la plaque s paratrice vers le bas 1 N ouvrez le porte filtre que pour le nettoyage Retirez les nattes f...

Page 37: ...e en vigueur de la garantie c est le meilleur moyen pour Thermador de vous pr venir dans le cas peu probable o un avis de s curit ou un rappel de produit serait mis Dur e de la garantie Thermador gara...

Page 38: ...erie et b timent y compris le manquement installer le produitenstricte conformit avec les codes et r glements locaux anti incendie et sur le b timent 5 l usure normale l usage le renversement de nourr...

Page 39: ...48 Modo de ajuste Setup 48 Ajustes que pueden modificarse en el modo correspondiente 49 Modo vacaci n Vacation 50 Modo Sabbath 50 Enfriado 50 Como economizar energ a 51 Ruidos durante el funcionamien...

Page 40: ...da coloque el conmutador de POWER en OFF a fin de evitar el contacto con un objeto bajo tensi n 10 Una lamparilla quemada puede romperse al intentar cambiarla NOTA colocar el control de temperatura en...

Page 41: ...iones Este s mbolo se utiliza para llamar la atenci n del usuario respecto de algo en particular Felicitaciones Con la compra de ese refrigerador usted se ha decidido por un equipo domiciliario modern...

Page 42: ...para almacenar alimentos hervidos productos l cteos y productos de carne 5 Gaveta para almacenar dulces y bocadillos 6 Gaveta para verduras 7 Pulsador de control para el caj n de temperatura controlad...

Page 43: ...es o adornos que se sujeten est n firmemente montados en la base o en las paredes con elementos adecuados Base Para asegurar que el electrodo m stico est firmemente montado y funciones correctamente l...

Page 44: ...m stico A fin de evitar olores deje las puertas abiertas Funciones Liberty Shelf Estante motorizado El electrodom stico dispone un estante motorizado de altura ajustable La altura de este estante pued...

Page 45: ...ediante las aberturas de ventilaci n ajustables Desplazando la palanca totalmente hacia la derecha la ventilaci n est completamente abierta baja humedad del aire Desplazando la palanca totalmente haci...

Page 46: ...compartimiento y extr igalo Inserte el compartimiento a la altura requerida y presi nelo hacia abajo Gavetas Para quitar las gavetas lev ntelas levemente y extr igalas Para volver a colocar las gaveta...

Page 47: ...eccionan los men s en el modo de ajuste Ver la secci n Modo de ajuste El ajuste de la temperatura requerida se ejecuta mediante los pulsadores Ver la secci n Ajuste de temperatura F Pulsador Seleccion...

Page 48: ...sador SUPER Se visualiza el s mbolo SUPER y la temperatura correspondiente en el display La funci n concluye volviendo a accionar el pulsador SUPER activando la funci n Eco activando el modo Vacaci n...

Page 49: ...p para almacenar el ajuste Modo de bajo consumo de energ a Si est activada la funci n de ahorro de energ a Eco el electro dom stico conmuta a un modo de ahorro de energ a Este modo ajustado en f brica...

Page 50: ...uminaci n de fondo del display y se visualizar SABBATH Para cancelar el modo Sabbath presione el pulsador VACATION Volver n a utilizarse los ajustes y la temperatura anterior Enfriado Acomode los alim...

Page 51: ...om stico no est correctamente nivelado Nivele el electrodom stico mediante un nivel de agua Utilice las patas ajustables o coloque alg n objeto debajo de las mismas Las gavetas cestas o zonas de almac...

Page 52: ...recen varios mensajes de advertencia simult neamente en el display trate a cada uno por separado Mientras aparecen mensajes de advertencia en el display no pueden operarse los pulsadores Alarma de pue...

Page 53: ...do el fusible El enchufe no est correctamente conectado Controle que est encendida la alimentaci n Debe conmutarse el fusible Controle que el enchufe est correctamente conectado La unidad de refrigera...

Page 54: ...uite el riel de cobertura tirando de l Para aflojar el list n de cobertura utilice un destornillador Quite el disco hacia delante hacia delante Extraiga la lamparilla defectuosa tirando de ella Coloqu...

Page 55: ...emperatura controlada Tirar la parte anterior de la placa separadora con ambas manos hacia abajo 1 Abrir el soporte exclusivamente para la limpieza Quitar las esteras filtrantes Limpiar las esteras fi...

Page 56: ...retorno del producto Per odo de duraci n de la garant a Thermador garantiza que el producto fue confeccionado con materiales libres de defectos y que no presenta defectos de producci n por un per odo...

Page 57: ...tado la ciudad o la regi n referentes a lo el ctrico de plomer a y o construcci n edilicia incluyendo el producto en estricta conformidad con c digos y reglamentaciones referentes a la seguridad contr...

Page 58: ...58...

Page 59: ......

Page 60: ...9000 439 085 8902 en uc fr fc es mex...

Reviews: