1800 Hurd Drive ● Irving, Texas 75038 ● (972) 580-0200 ● (888) 580-0202 ● Fax (972) 580-0277
URL: www.thermal-edge.com ● Email:
SP-ENG-211-D48-02 Rev 2.3 26 |
P a g e
Appendix A
Phoenix Contact Power Connector Instructions
Scope: Instructions for connecting power wires to air conditioners equipped with a “Phoenix Contact” power
connector.
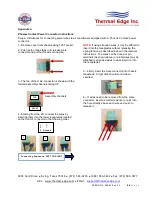
1 - Remove cover from chassis using T25 Torx bit.
2 - Push both orange tabs in to release male
connector and pull out for wire connection.
3 - The top of the male connector is shown with the
formed assembly channels facing UP.
4 - Starting from the left, connect the wires by
inserting them into the lower receptacles located
on the front of connector in the following order.
NOTE:
If using stranded wires, it may be difficult to
insert into the receptacles without releasing the
spring tension as described below in the removal
instructions. The wires can be tinned or pin
terminals (as shown above) or pin ferrules may be
attached to stranded wires to ease insertion into
the receptacles.
5
– Firmly insert the male connector into chassis
receptacle. A light click should sound when
secured.
6
– If wires need to be removed from the male
connector, insert a small screwdriver or pick into
the hole directly above each wire and push to
release it.
Assembly channels
1.
+
2.
-
3. Ground
TOP
FRONT
Connecting Sequence: LEFT TO RIGHT
1
2
3

