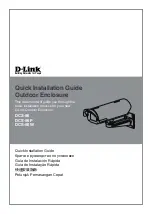
background image

15

16

PCI Slot Usage

Português /
1.  Desaperte os parafusos com a chave de fendas. 
2.  Instale a placa PCI no local adequado e 

aparafuse.

English /

1.  

Loosen the screws with a screwdriver.

2.  Install the PCI card in proper location and secure 

it with screws.

Deutsch /

1.  

Lösen Sie die Schrauben mit einem  

Schraubendreher.

2.  Installieren Sie die PCI-Card in der 

vorgesehenen Position und sichern Sie sie mit 
Schrauben.

Français /

1.  

Desserrez les vis à l’aide d’un tournevis.

2.  Installez la carte PCI dans l'endroit approprié et 

fixez-la avec des vis.

Español /

1.  

Afloje los tornillos con un destornillador.

2.  Instale la tarjeta PCI en la ubicación adecuada y 

asegúrela con tornillos.

Italiano /

1.  

Allentare le viti con un cacciavite.

2.  Installare la scheda PCI nella posizione 

appropriata e fissarla con le viti.

ภาษาไทย /

1. 

ใช้ไขควงขันสกรูออก 

2

.


ติดตั้งการ์ด PCI 

ในตำแหน่งที่เหมาะสมแล้วขันสกรูยึดให้แน่น

繁體中文

 /

1. 用螺絲起子將螺絲取下.

2.


將擴充卡放置在合適的位置並用螺絲固定。

日本語 /

1. 

ドライバーでねじを緩めます。

2.  

PCI  

カードを適切な場所に取り付け、ねじで固

定します。

简体中文 /

1. 用螺

丝起子将螺丝取下.

2. 将扩充卡放置在合适的位置并用螺丝固定。

Türkçe


/

1.  

Vidalar

ı, 

bir tornavida ile gevşetin.

2

.

  PCI kartını uygun konuma takın ve vidalarla 

sabitleyin.

Русский /

1. 

Ослабьте винты отверткой.

2.


Установите плату 

PCI


в надлежащий разъем 

и закрепите ее винтами.
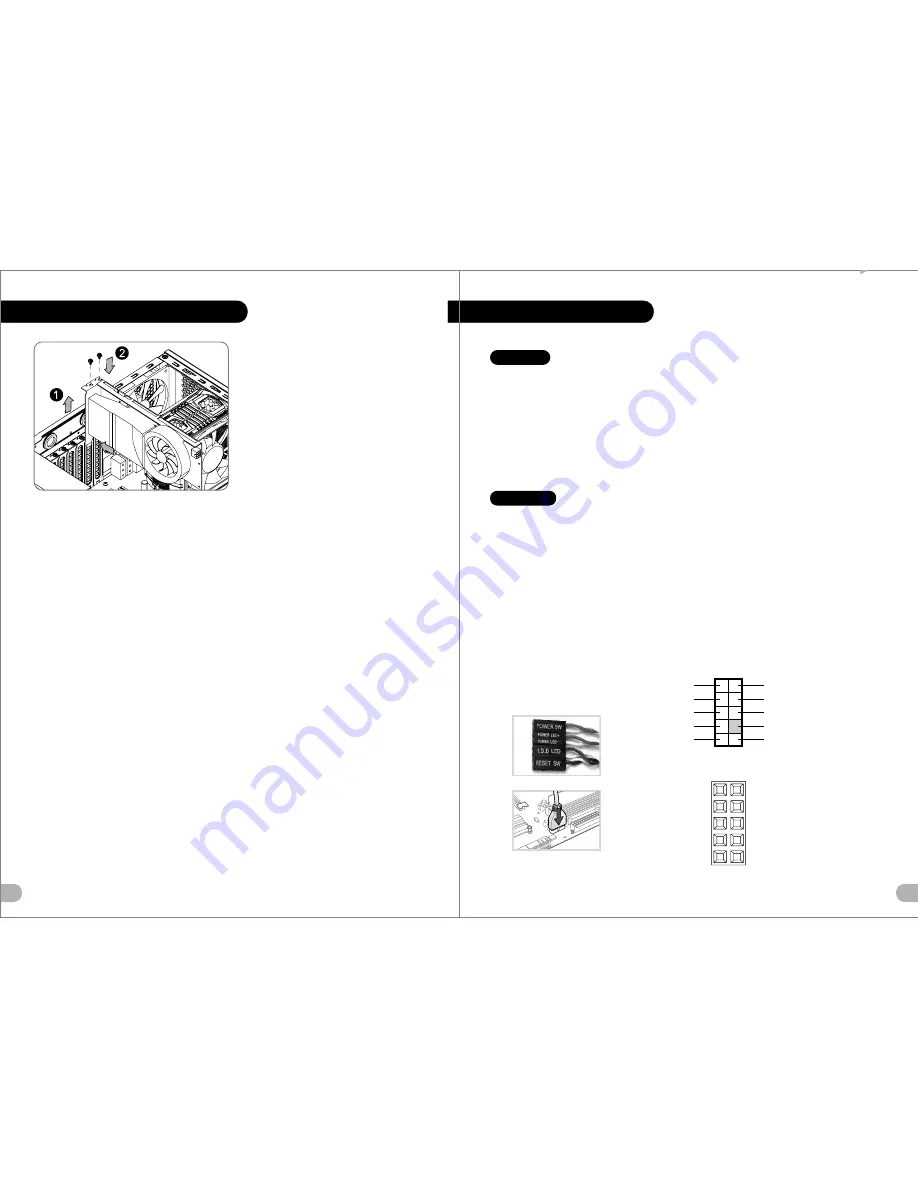
Leads Installation

Leads Installation Guide

Case LED Connection

 / On the front of the case, you can find some LEDs and switch leads. Please consult your user 

manual of your motherboard manufacturer, then connect these leads to the panel header on the motherboard.

USB 2.0 Connection

 / Please consult your motherboard manual to find out the section of “USB connection”.

USB 3.0 connection

 / 

1. Make sure your motherboard supports USB 3.0 connection.
2. Connect the USB 3.0 cable to the available USB 3.0 port on your computer.

Audio Connection

 / Please refer to the following illustration of Audio connector and your motherboard user manual. 

Please select the motherboard which used AC’97 or HD Audio(Azalia),(be aware of that your audio supports AC’97 or HD 
Audio (Azalia)) or it will damage your device(s).

Anschlüsse herstellen

Gehäuse-LED-Verbindungen

 / Auf der Gehäusevorderseite finden Sie einige LEDs und Verbindungen. Bitte nehmen 

Sie die Gebrauchsanweisung Ihres Motherboard Herstellers zur Hilfe und schließen Sie diese Verbindungen an die Panel 
Header Belegung des Motherboards an.

USB 2.0 Anschluss

 / Bitte nehmen Sie die Gebrauchsanweisung Ihres Motherboards zur Hilfe und lesen Sie unter dem 

Kapitel „USB Anschlüsse“ nach.

USB 3.0 Anschluss

 / 

1. Stellen Sie sicher, dass Ihre Hauptplatine den USB 3.0 Anschluss unterstützt.
2. Verbinden Sie das USB 3.0 Kabel mit dem USB 3.0 Port auf Ihrem Computer.

Audio Anschlüsse

 / Bitte beachten Sie die folgende Abbildung der Audio Anschlüsse und die Anweisung in der 

Gebrauchsanweisung Ihres Motherboards. Bitte wählen Sie das Motherboard, das AC’97 oder HD Audio(Azalia) 
verwendet, (achten Sie darauf, dass Ihr Audio AC’97 bzw. HD Audio (Azalia unterstützt)). Andernfalls entstehen schwere 
Schäden an Ihrem(n) Gerät(en)!!!

USB 3.0 Connection

PRESENCE#

BLACK

SENSE1_RETURN

AUD GND

SENSE2_RETURN

YELLOW

BROWN

RED

PORT1 R

PORT2 R

PORT1 L

BLUE

PORT2 L

SENSE_SEND

KEY

PURPLE

GREEN

ORANGE

BLACK

AUDIO HD AUDIO Function

N

.

C

KEY

RED

2

WHITE

2

GREEN

2

BLACK

RED

1

WHITE

1

GREEN

1

BLACK

USB


F


unction

VCC1

D1-

D1+

GND

NC

VCC2

D2-

D2+

GND

KEY

English

Deutsch

藍色線條為尺寸標示,請勿印刷上去!

1

3/

0

6/1

4

A

發 稿 日 期

版本

X

X

X

X

X

MARKETING

CHECK

PRODUCT GM

其他特殊處理效果

表面處理

2

厚度

(g/m )

材質

印刷色彩

封面樣式(當封面與內頁樣式不同時尚須填寫

)

125

 mm

產品 料號

Chaser A2 1

C A -1 A 3- 0 0M1 WN-00

說明書

產 品名稱

印 刷項 目

子 件 料號

騎馬釘

24

80

書寫紙

單色

其他特殊處理效果

表面處理

2

厚度

(g/m )

裝訂方式

材質

頁數

印刷色彩

規格樣式

整本

DESIGN

poki

刀模線

176

 mm

Summary of Contents for Chaser A21

Page 1: ...ser s Manual Benutzerhandbuch Mode d emploi Manual del usuario Manuale dell utente Manual do Utilizador 安裝說明書 用戶手冊 ユーザーズマニュアル Руководство пользователя kullanıcı elkitabı EEE Yönetmeliğine Uygundur คู มือการใช Chaser A21 Chaser A21 Chaser A21 Pursuit without fear 藍色線條為尺寸標示 請勿印刷上去 13 06 14 A 發稿日期 版本 X X X X X MARKETING CHECK PRODUCT GM 其他特殊處理效果 表面處理 2 厚度 g m 材質 印刷色彩 封面樣式 當封面與內頁樣式不同時尚須填寫 125 mm 子件料號 ...

Page 2: ...5 HDD 1 For Stand off Cable Tie 5 4 2 Cable Management Buzzer Tapping Screw 8mm FDD Bracket For FDD Bracket For FDD 1 Motherboard Alarm Nut setter Chaser A21 Mid Tower PSU LCS Upgradable Radiator Support Net Weight SECC 3 x 5 25 1 x 3 5 Converted from one 5 25 drive bay 6 x 3 5 1 x 2 5 7 9 6 x 9 6 Micro ATX 12 x 9 6 ATX USB 3 0 x 1 USB 2 0 x 1 HD Audio x 1 Standard PS2 PSU optional Supports 1 2 3 ...

Page 3: ...a è 320 mm 12 6 In caso di installazione di una ventola anteriore superiore sul case non installare primo dispositivo vano da 5 25 3 4 Warning and Notice Atenção Limite de altura para o dissipador do CPU O limite de altura para o dissipador do CPU é 155 mm 6 1 polegadas Limite de comprimento para VGA placa gráfica O limite de comprimento para VGA placa gráfica é 320 mm 12 6 polegadas Se estiver a ...

Page 4: ...ด านหลังของแชสซีส แล วเปิดแผงด านข าง English Place the power supply in proper location and secure it with screws Deutsch Installieren Sie das Netzteil an seiner Position und sichern Sie es mit Schrauben Français Mettez l alimentation dans le bon endroit et sécurisez la avec des vis Español Coloque el suministro de alimentación en el lugar adecuado y asegúrelo con tornillos Italiano Posizionare l ...

Page 5: ...chts 2 Drehen Sie die Verriegelungseinheit im Uhrzeigersinn um die Einheit zu entsperren und die Verriegelungseinheit zu entfernen 3 Platzieren Sie die 5 25 Zoll Einheit in den Laufwerkschacht 4 Finden Sie die passenden Öffnungen Bringen Sie die Verriegelungseinheit wieder an und drehen Sie sie gegen den Uhrzeigersinn um das Laufwerk zu sperren Français 1 Retirez le couvercle de la baie de lecteur...

Page 6: ...ie die Netzabdeckung des 5 25 Zoll Laufwerksschachts 2 Drehen Sie die Verriegelungseinheit im Uhrzeigersinn um die Einheit zu entsperren und die Verriegelungseinheit zu entfernen 3 Sichern Sie die 3 5 Zoll Einheit mit Schrauben auf dem Adapter 4 Schieben Sie den Adapter in eine freie 5 25 Zoll Bucht dann montieren Sie die 5 25 Zoll zu 3 5 Zoll Netzabdeckung an der Frontseitenkonsole 5 Finden Sie d...

Page 7: ...onte edin 5 Uygun açıklıkları bulun Kilit aygıtını yerine takın ve sürücüyü sabitlemek için saatin ters yönünde döndürün ภาษาไทย 1 ถอดฝาตะแกรงปิดขนาด 5 25 ออก 2 หมุนอุปกรณ ล อคตามเข มนาฬิกาเพื อปลดล อค แล วถอดอุปกรณ ล อคออก 3 ขันสกรูยึดอุปกรณ ขนาด 3 5 ให แน นบนอะแด ปเตอร 4 เลื อนอะแด ปเตอร เข าในช องไดรฟ ขนาด 5 25 ที ว างอยู จากนั น ให ต อเชื อมฝาตะแกรงปิด ที ปรับขนาดจาก 5 25 เป น 3 5 เข ากับ แผงด...

Page 8: ...HDD yi sürücü bölmesinin içine yerleştirin 3 Uygun açıklıkları bulun Kilit aygıtını yerine takın ve sürücüyü sabitlemek için saatin ters yönünde döndürün ภาษาไทย 1 หมุนอุปกรณ ล อคตามเข มนาฬิกาเพื อปลดล อค แล วถอดอุปกรณ ล อคออก 2 ใส HDD ลงช องไดรฟ 3 ขยับให เข าที พอดี ใส อุปกรณ ล อคกลับเข าไปแล วหมุนอุปกรณ ล อค ทวนเข มนาฬิกาเพื อล อคไดร ฟให อยู กับที 2 5 HDD Installation English 繁體中文 简体中文 Deutsch 将...

Page 9: ...our motherboard supports USB 3 0 connection 2 Connect the USB 3 0 cable to the available USB 3 0 port on your computer Audio Connection Please refer to the following illustration of Audio connector and your motherboard user manual Please select the motherboard which used AC 97 or HD Audio Azalia be aware of that your audio supports AC 97 or HD Audio Azalia or it will damage your device s Anschlüss...

Page 10: ... NC VCC2 D2 D2 GND KEY Guida di installazione dei contatti Connessione del LED del case Nella parte anteriore del case sono presenti alcuni contatti per interruttori e LED Consultare il manuale utente del produttore della scheda madre quindi connettere i contatti alla parte superiore del pannello sulla scheda madre Connessione USB 2 0 Consultare il manuale per la scheda madre che comprende la sezi...

Page 11: ...я производителя материнской платы Подключение USB 2 0 См раздел Подключение USB в руководстве материнской платы Подключение USB 3 0 1 Убедитесь что материнская плата поддерживает подключение по стандарту USB 3 0 2 Подсоедините кабель USB 3 0 к свободному порту USB 3 0 компьютера Подключение аудиоразъема См следующую иллюстрацию аудиоразъема и руководство пользователя материнско й платы Выберите ма...

Page 12: ...วจสอบให แน ใจว าอุปกรณ รับส งสัญญาณเสียงของคุณรองรับ AC 97 หรือ HD Audio Azalia มิฉะนั นอุปกรณ ของคุณอาจเสียหายได Thermaltake Power Supply Series Optional As today s technology updates rapidly consumers are always requesting for higher and higher PC performance which also increases loads to power supplies Therefore selecting a suitable and reliable power supply becomes a necessary lesson for all P...

Reviews: