background image

17

18

简体中文 /

日本語 /

Italiano /

1. 

Controllo luce LED – Premere per 

    attivare/disattivare il colore dei LED (Blu, 

    Verde, Rosso e flash LED singolo)

2. Controllo velocità ventola – Ruotare in 

    senso orario per ottenere una maggiore 

    velocità della ventola

3. Controllo velocità ventola – Ruotare in 

    senso antiorario per ridurre la velocità 

    della ventola

繁體中文

 /

1. 

LED 

燈控制 – 按按鈕以切換 

LED 

燈的顏色 

    (藍色、綠色、紅色或單 

LED 

閃爍)

2. 風扇轉速控制 – 順時針方向旋轉可提高風

    扇轉速。

3. 風扇轉速控制 – 逆時針方向旋轉可降低風

    扇轉速

简体中文 /

1. 

LED 

灯控制 – 按按钮以切换 

LED 

灯的颜色

   (蓝色、绿色、红色或单 

LED 

闪烁)

2. 风扇转速控制 – 顺时针旋转可提高风扇转速

3. 风扇转速控制 – 逆时针旋转可降低风扇转速

日本語 /

1. 

LED

ライトコントロール – このスイッチを

    押して

LED

の色(青、緑、赤、1度の

LED

    滅)を切り替えます。

2. ファン速度コントロール – 右に回転させる

    とファン速度が上がります

3. ファン速度コントロール – 左に回転させる

    とファン速度が下がります 

Русский /

Русский /

1. 

Переключатель светодиодной 

    подсветки — нажмите, чтобы 

    изменить цвет индикатора (синий, 

    зеленый, красный и однократное 

    мигание индикатора)

2. Регулятор скорости вентилятора — 

    поверните по часовой стрелке для 

    увеличения скорости вентилятора

3. Регулятор скорости вентилятора — 

    поверните по часовой стрелке для 

    увеличения скорости вентилятора 

Türkçe


/

1. 

I

ş

ı

k Denetimi – I

ş

ı

klar

ı

n rengini 

    de

ğ

iştirmek (Mavi, Yeşil, K

ı

rm

ı

z

ı


ve Tek 

    I

ş

ı

ğı Yanıp Sönen) için düğmeye basın

2. Fan Hızı Denetimi – Fan hızını artırmak 

    için saat yönünde döndürün

3. Fan Hızı Denetimi – Fan hızını 

    düşürmek için saatin ters yönünde 

    döndürün 

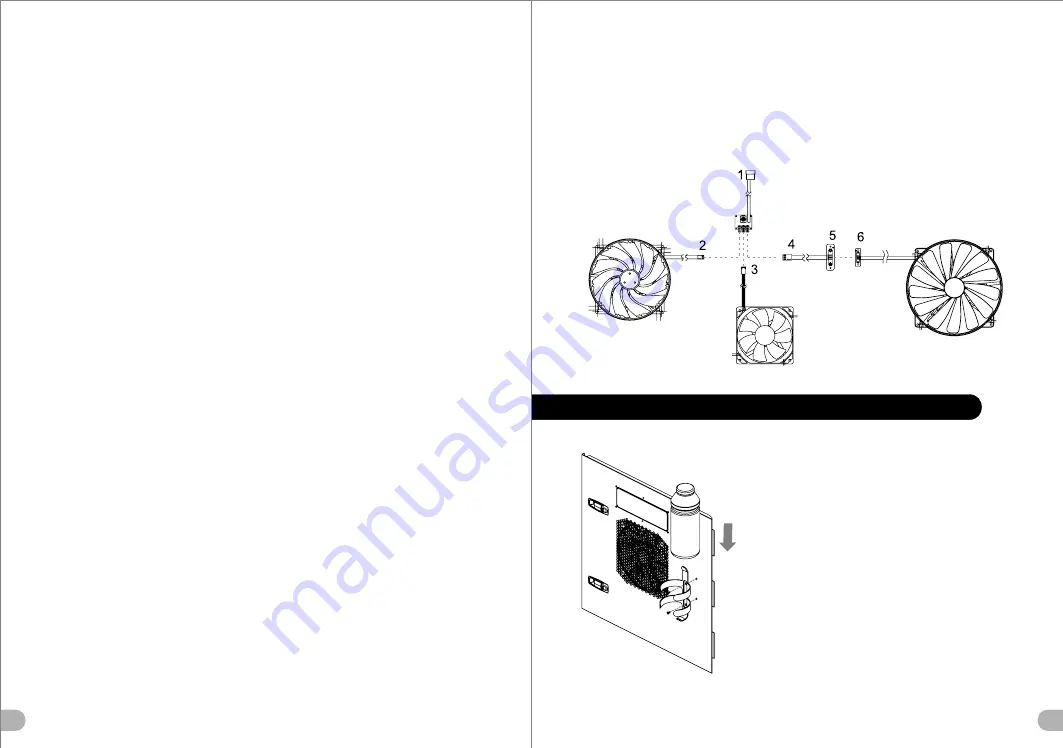
2.9 Water Bottle Cage Installation(

o

ptional)

简体中文 /

日本語 /

Русский /

English /

繁體中文

 /

Deutsch /

简体中文 /

日本語 /

Français /

Español /

Русский /

Italiano /

Türkçe


/

Tighten


the


screws

.

鎖緊螺絲。

Ziehen Sie die 

拧紧螺丝。

Schrauben fest.

ねじを締め付けます。

Serrez les vis.

Apriete los tornillos.

Закрутите винты.

Serrare le viti.

Vidaları sıkın.

Fan Speed & Light Controller Connector Descriptions

① 4-

pin peripheral connector

②,③,④ 

Fan power & signal connector (Front & Top)

⑤,⑥ 

Plug & Play fan power & signal connector (Side)

Note: Please ensure the Plug & Play connector is correctly connected with 

           corresponding electrode (i.e. + to + & - to - & S to S)

-

+

F

a

n


1

F

a

n

2

F

a

n

3

RGB L


ight

RGB L


ight

RGB L


ight

RGB L


ight

RGB L


ight

RGB L


ight

RGB L


ight

RGB L


ight

RGB L


ight

RGB L


ight

RGB L


ight

RGB L


ight

2510

2510

S

+

-

Summary of Contents for Element V Black Edition VL200K1W2Z

Page 1: ...rks belong to their respective companies www thermaltake com Tested To Comply With FCC Standards FOR HOME OR OFFICE USE Create for eSports User s Manual Benutzerhandbuch Mode d emploi Manual del usuar...

Page 2: ...ce Model Case Type Net Weight Dimension H W D Cooling System Drive Bays Accessible Hidden Material Color Expansion Slots Motherboards I O Ports LCS Upgradable PSU Removable PSU Bridge Adjustable PSU B...

Page 3: ...d passe pas 155 mm Limite de longueur de la carte compl mentaire VGA V rifiez que la longueur de votre carte compl mentaire VGA ne d passe pas 335 mm Limitaci n de altura del refrigerador de CPU Aseg...

Page 4: ...vissez les vis au dos du bo tier 4 Tirez le panneau lat ral de droite comme la fl che l indique Espa ol 1 Para extraer el panel lateral izquierdo extraiga los tornillos de mano de la parte trasera de...

Page 5: ...lock the tool free clip Deutsch 1 Ziehen Sie am unteren Rand der Vorderseitentafel um sie vom Geh use zu entfernen 2 Entfernen Sie die Plastikabdeckung des 5 25 Zoll Schachts 3 Dr cken Sie einw rts u...

Page 6: ...y sliding HDD into the icage 3 Secure HDD by tightening screw to HDD 4 Squeeze and push in ward the tool free clip to secure the icage Deutsch 1 Dr cken Sie die Klemme von Hand kein Werkzeug erforderl...

Page 7: ...lemek i in alet gerektirmeyen klipsi s k t r n ve i e 1 do ru ittirin 2 iCage 3 4 iCage 1 2 HDD iCage 3 iCage HDD 4 iCage 2 4 2 5 HDD Installation English Deutsch 2 5 Fran ais Espa ol 2 5 T rk e Itali...

Page 8: ...s vis 2 Fixez le bloc alimentation dans le bon emplacement et securisez le avec des vis 1 G kayna birimini uygun konuma tak n ve vidalarla sabitleyin Instale la unidad de fuente de 2 PSU yu uygun konu...

Page 9: ...Operation English 1 LED Light Control Press to switch LEDs color Blue Green Red and Single LED Flash 2 Fan Speed Control Turn clockwise for higher fan speed 3 Fan Speed Control Turn counter clockwise...

Page 10: ...i in saat y n nde d nd r n 3 Fan H z Denetimi Fan h z n d rmek i in saatin ters y n nde d nd r n 2 9 Water Bottle Cage Installation optional English Deutsch Fran ais Espa ol Italiano T rk e Tighten th...

Page 11: ...R PORT1 L BLUE PORT2 L SENSE_SEND KEY PURPLE GREEN ORANGE BLACK AUDIO AZALIA Function 3 0 Leads Installation Guide Guide d installation des fils Connexion des voyants du bo tier Sur la face avant du...

Page 12: ...Channel Audio Signal Rear Right Channel Audio Signal R RET NC BROWN RED MIC IN MIC POWER Front Microphone Power Front Microphone input Signal KEY BLUE NC BLUE L OUT Front Left Channel Audio Signal Fr...

Page 13: ...unutmay n aksi takdirde ayg t lar n z zarar g r r Kasa k ba lant s AUDIO AC 97 Function GROUND Front Audio Ground L RET Rear Left Channel Audio Signal Rear Right Channel Audio Signal R RET NC BROWN R...

Page 14: ...ti graphic cards mode The functions can assure all Thermaltake Power Supply meets the balance in noise control and heat exhausted All power supply provides complete protection function as follow 1 Ove...

Reviews: