22
21
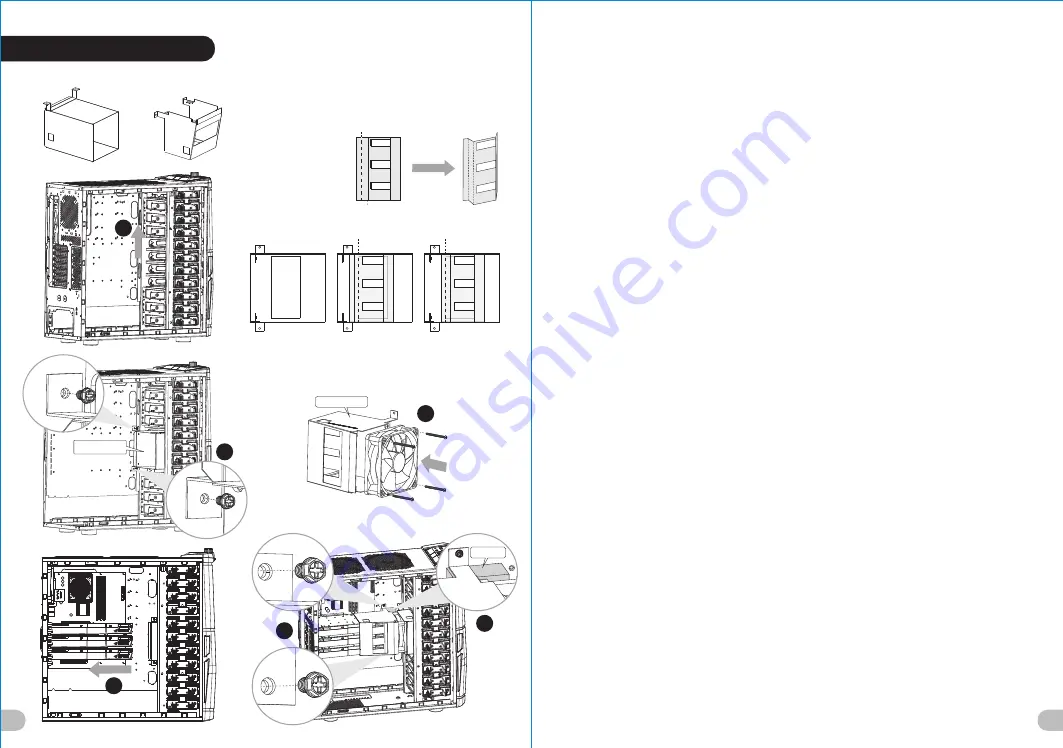
Dotted line A
Dotted line B
(Figure 1)
(For 10.6”)
(For 9.6”)
Dotted line B
Dotted line A
Back of Fan Duct 2
Before sticking
the Mylar on
Fan Duct 2,
bend the Mylar
as Figure 1.
5
6
4
3
2
Fan Duct 1
3.0 For 3-Way SLI
English /
1.
Squeeze and pull outward the tool-free clip and then move the iCage upward for 4 bays.
2.Put the Fan Duct 1 into the empty 5.25” drive bay cage and secure it to the motherboard plate
by screws.
3.Install the graphic cards and place the Mylar over Fan Duct 2 as shown.
Notice:
For 10.6” graphic card: Align the dotted line B of the Mylar with Fan Duct 2.
For 9.6” graphic card: Align the dotted line A of the Mylar with Fan Duct 2.
4.Secure the 120x38mm fan on Fan Duct 2.
5.Put Fan Duct 2 on the 3-Way graphic cards and secure it to the motherboard plate with screws.
6.Place the sponge between the 120x38mm fan and the motherboard plate to avoid the air leaks.
7.Connect the 3-pin wire of the 120x38mm fan to the motherboard’s fan connector.
Connect the unused power cable to the graphic cards.
Deutsch /
1.Drücken und ziehen den werkzeugfreien Clip nach außen und bewegen Sie dann den iCage 4
Schächte nach oben.
2.Legen Sie die Ventilatordurchführung 1 in den leeren 5,25 Zoll Laufwerksschacht und
befestigen Sie sie mit Schrauben an der Hauptplatine.
3.Installieren Sie die Grafikkarten und platzieren Sie das Mylar über der Ventilatordurchführung 2,
wie gezeigt.
Hinweis:
Für 10,6 Zoll Grafikkarte: Richten Sie die gestrichelte Linie B des Mylar mit der
Ventilatordurchführung 2 aus.
Für 9,6 Zoll Grafikkarte: Richten Sie die gestrichelte Linie A des Mylar mit der
Ventilatordurchführung 2 aus.
4.Sichern Sie den 120x38 mm Ventilator auf der Ventilatordurchführung 2.
5.Bringen Sie die Ventilatordurchführung 2 auf den 3-Wege-Grafikkarten an und sicher Sie sie
auf der Hauptplatine mit Schrauben.
6.Setzen Sie den Schwamm zwischen den 120x38 mm Ventilator und die Hauptplatine, um
Leckagen zu vermeiden.
7.Verbinden Sie das 3-polige Kabel für den 120x38 mm Ventilator mit dem Gebläseanschluss
der Hauptplatine.
Schließen Sie die nicht verwendeten Stromkabel an die Grafikkarten an.
Français /
1.
Pressez et tirez vers l’extérieur le clip sans outil, puis déplacez l'iCage 4 baies vers le haut.
2.Placez le Conduit de Ventilation 1 dans la cage vide de la baie de 5,25” et fixez-le à la plaque
de la carte mère avec les vis.
3.Installez les cartes graphiques et placez le Mylar sur le Conduit de Ventilation 2 comme illustré.
Remarque :
Pour la carte graphique de 10,6” : Alignez la ligne pointillée B du Mylar avec le Conduit de
Ventilation 2.
Pour la carte graphique de 9,6” : Alignez la ligne pointillée A du Mylar avec le Conduit de
Ventilation 2.
4.Fixez le ventilateur de 120 x 38mm sur le Conduit de Ventilation 2.
5.Placez le Conduit de Ventilation 2 sur les cartes graphiques 3-Way et fixez-le à la plaque de la
carte mère avec les vis.
6.Placez l'éponge entre le ventilateur de 120 x 38 mm et la plaque de la carte mère pour éviter les
fuites d'air.
7.Connectez le câble à 3 broches du ventilateur de 120 x 38 mm au connecteur de ventilateur de la
carte mère.
Connectez le câble d'alimentation inutilisé aux cartes graphiques.
1
Fan Duct 2
Fan Duct 1
Sponge
Fan Duct 2


