background image

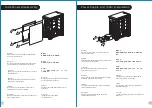
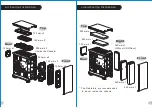
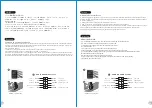
Motherboard Installation

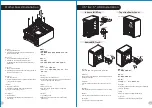
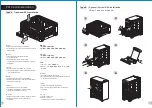
3.5" & 2.5" HDD Installation

In front of M/B Tray

Top of the Power Cover

Behind M/B Tray B

3.5” HDD

3.5” HDD

2.5” HDD

2.5” HDD

2.5” HDD

English /
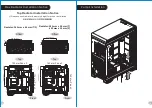
1.Lay down the chassis.
2.Install the motherboard in proper location and 

secure it with screws.

Deutsch /
1.Legen Sie das Gehäuse auf die Seite.
2.Installieren Sie die Hauptplatine in ihrer 

vorgesehenen Position und sichern Sie sie mit 
Schrauben. 

Français /
1.Posez à plat le châssis.
2.Installez la carte mère dans l'endroit approprié et 

sécurisez-la avec des vis.

Español /

1. 

Tumbe el chasis.

2. Instale la placa madre en la ubicación adecuada 

y asegúrela con tornillos.

Italiano /

1.

Poggiare lo chassis.

2.

Installare la scheda madre nella posizione 

appropriata e fissarla con le viti.

Português/
1. Deixe a caixa.
2. Instale a motherboard no local adequado e 

aparafuse.

繁體中文

 /

1. 

將機殼平放

2. 

將主機板放置在合適的位置並用零件包中之螺
絲固定

日本語 /

1.

シャーシを下に置きます。

2.

マザーボードを適切な場所に取り付け、ねじで

固定します。

Русский /

1. 

Раскройте


системный


блок

.


2. 

Установите материнскую плату в надлежащее 

место и закрепите ее винтами.

简体中文 /

1. 

放平机箱

2. 在合适的位置安装主板并以螺丝安全固定。

Türkçe


/

1.

Kasayı


yan


yat

ırın.

2.

A

na kartı


uygun


konuma


tak

ın ve vidalarla 

sabitleyin.

ภาษาไทย /
1.วางแชสซีส์นอนลง
2.ติดตั้งเมนบอร์ดในตำแหน่งที่เหมาะสมแล้วขันสก

รูยึดให้แน่น

English /
Insert the HDD and tighten it with the screws. 

Deutsch /
Führen Sie die Zoll HDD ein und befestigen Sie sie 
mit den Schrauben.  

Français /
Insérez le disque dur de et sécurisez-le avec les 
vis. 

Español /
Inserte el disco duro de y apriételo con los tornillos. 

Italiano /
Inserire il dispositivo HDD da e fissarlo con le viti. 

Português /
 Insira o disco rígido de e aparafuse. 

繁體中文 /
插入硬碟並用螺絲鎖上。

简体中文 /
插入硬盘并用螺丝锁上。

日本語 /

HDD

を挿入し、ねじで締め付けます。 

Русский /
Установите дюймовый жесткий диск и зафиксир
уйте его винтами. 

Türkçe /
HDD’yi yerleştirin ve vidalarla sabitleyin. 

ภาษาไทย /
ใส่ HDD ขนาด เข้าไปแล้วขันสกรูยึดให้แน่น 

7

8

藍色線條為尺寸標示,請勿印刷上去!

刀模線

125

 mm

176

 mm

產品料號

CA-1O3-00M1WN-00

S500 TG

說明書

19

/

05/09

A

產品名稱

印刷項目

發稿日期

版本

騎馬釘

32

105

G

雙銅

單色

其他特殊處理效果

表面處理

2

厚度

(g/m )

裝訂方式

材質

頁數

印刷色彩

規格樣式

整本

CHECK

DESIGN

David Lin

(19

/

05/09)

James

(

)

19

/

05/09

Summary of Contents for S500 TG

Page 1: ...FOR HOME OR OFFICE USE Picture is for reference only User s Manual Benutzerhandbuch Mode d emploi Manual del usuario Manuale dell utente Manual do Utilizador kullan c elkitab EEE Y netmeli ine Uygund...

Page 2: ...altake can designate to all power users which chassis have been tested to be best compatible with extreme liquid cooling configurations to ensure you get the best performance from the best features an...

Page 3: ...D Installation PCI Card Installation Air Cooling Installation Liquid Cooling Installation Max Radiator Installation Notice Pump Installation 05 06 07 08 09 11 12 13 14 Chapter 3 Leads Installation Cas...

Page 4: ...x 360mm Rear 1 x 120mm Right 1 x 360mm Without HDD Rack Case Type Dimension H W D 565 x 240 x 500 mm 22 2 x 9 4 x 19 7 inch Cooling System Fan Support Clearance Rear exhaust 120 x 120 x 25 mm fan 1000...

Page 5: ...excede los 172 mm 6 77 pulgadas Limitaci n de longitud de la tarjeta de v deo adicional Aseg rese de que la longitud de su tarjeta de v deo adicional no excede los 400 mm 15 74 pulgadas Attenzione Li...

Page 6: ...Remova os parafusos na parte de tr s da caixa e abra o painel lateral T rk e Kasan n arkas ndaki vidalar kar n ve yan paneli a n English Place the power supply in proper location and secure it with s...

Page 7: ...caci n adecuada y aseg rela con tornillos Italiano 1 Poggiare lo chassis 2 Installare la scheda madre nella posizione appropriata e fissarla con le viti Portugu s 1 Deixe a caixa 2 Instale a motherboa...

Page 8: ...eher 2 Installieren Sie die PCI Card in der vorgesehenen Position und sichern Sie sie mit Schrauben Fran ais 1 Desserrez les vis l aide d un tournevis 2 Installez la carte PCI dans l endroit appropri...

Page 9: ...60 mm x 1 360mm x1 Without HDD Rack 420 mm x 1 280 mm x 1 120 mm x 1 200 mm x 2 200 mm x 2 Inside the Chassis The Radiators are recommended to mount inside the chassis 140 mm x 2 140 mm x 3 120 mm x 3...

Page 10: ...emory height for proper installation Radiator 360 mm x 64 mm T F Radiator 280 mm x 55 mm T 420 mm x 55 mm F 120 mm Fan x 3 120 mm Fan x 3 Top Top Front Front Offset Offset 140 mm Fan x 2 140 mm Fan x...

Page 11: ...SENSE2_RETURN SENSE2_RETURN YELLOW YELLOW BROWN BROWN RED RED PORT1 R PORT1 R PORT2 R PORT2 R PORT1 L PORT1 L BLUE BLUE PORT2 L PORT2 L SENSE_SEND SENSE_SEND KEY KEY PURPLE PURPLE GREEN GREEN ORANGE...

Page 12: ...ctricos Consulte o manual de utilizador do fabricante da sua motherboard e ligue os fios parte superior do painel na motherboard B Liga o USB 3 0 1 Certifique se que a sua motherboard suporta liga o U...

Page 13: ...C Ses Ba lant s L tfen a a daki Ses konekt r resmine ve anakart n z n kullan m k lavuzuna bak n L tfen AC 97 veya HD Audio Azalia spesifikasyonunu kullanan bir anakart se in ses sisteminizin AC 97 ve...

Page 14: ...21 22...

Reviews: