

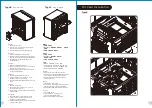
Guida di installazione dei contatti
A.
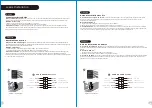
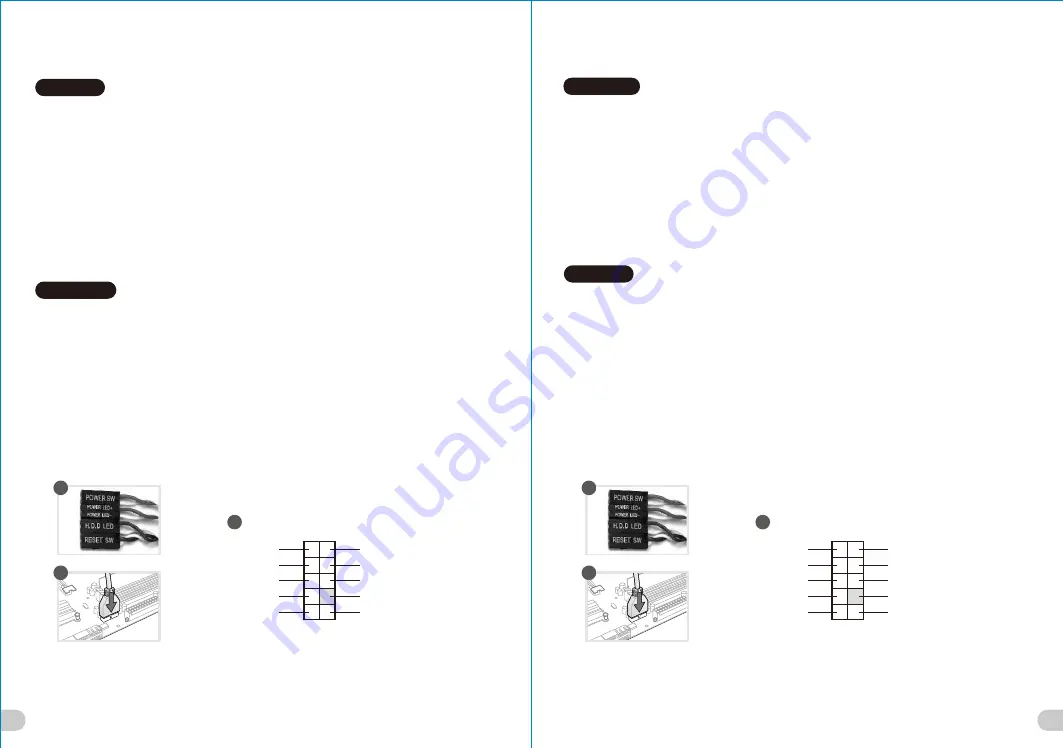
Connessione del LED del case
/
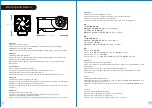
Nella parte anteriore del case, sono presenti alcuni contatti per interruttori e LED.
Consultare il manuale utente del produttore della scheda madre, quindi connettere i contatti alla parte superiore del
pannello sulla scheda madre.
B. Connessione USB 3.0
/
1. Accertarsi che la scheda madre supporti la connessione USB 3.0.
2. Collegare il cavo USB 3.0 alla porta USB 3.0 disponibile sul computer.
C. Connessione Audio
/
Fare riferimento all’illustrazione riportata di seguito del connettore Audio e al manuale utente
per la scheda madre.Selezionare la scheda madre relativa a AC’97 o HD Audio (Azalia) e considerare che il supporto audio
è compatibile con AC’97 o HD Audio (Azalia); in caso contrario, le periferiche potrebbero venire danneggiate.
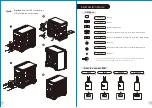
Guia de Instalação Eléctrica
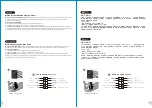
A. Ligação do LED da Caixa
/ Na parte dianteira da caixa pode encontrar alguns LEDs e fios eléctricos. Consulte o
manual de utilizador do fabricante da sua motherboard e ligue os fios à parte superior do painel na motherboard.
B. Ligação USB 3.0
/
1. Certifique-se que a sua motherboard suporta ligação USB 3.0.
2. Ligue o cabo USB 3.0 à porta USB 3.0 disponível no seu computador.
C. Ligação Áudio
/ Consulte a imagem seguinte do conector Áudio e o manual de utilizador da sua motherboard.
Seleccione a motherboard que utiliza AC’97 ou HD Áudio(Azalia), (verifique se a sua placa de áudio suporta AC’97 ou HD
Áudio(Azalia)) ou irá danificar o(s) seu(s) dispositivo(s).
Italiano
Português
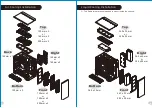
線材安裝說明
A.
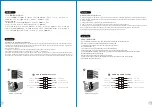
機殼
LED
連接方式
/
在機殼前方的面板後面
,
可以找到一些
LED
與開關線材
(
POWER Switch….
),
請參考主機板使用說明
書
,
並將機殼上的線材正確地連接到主機板上
,
這些線材通常都會印有標籤在上面
,
如果沒有的話
,
請找出機殼前方面板上線
材原本的位置以知道正確的來源。
B. USB 3.0
連接
/
1. 請確認主機板是否支援
USB 3.0
傳輸介面。
2. 連接
USB 3.0
傳輸線至主機板上的
USB3.0
接埠。
C
. 音效連接
/
請根據下面的音源接頭圖示與主機板使用手冊來連接音效裝置
,
請確認主機板上的音效裝置是支援
AC' 97
音效或
是
HD
音效
(Azalia)
,
裝置錯誤可能會導致主機板音效裝置的毀損
,
某些主機板的音效裝置不會與下方的圖示完全相同
,
請參酌
主機板使用手冊以得到正確的安裝資訊
线材安装说明
A
. 机壳
LED
连接方式 / 在机壳前方的面板后面,可以找到一些
LED
与开关线材(
POWER Switch….
),请参考主板使用说明
书,并将机壳上的线材正确地连接到主板上,这些线材通常都会印有标签在上面,如果没有的话,请找出机壳前方面板上线
材原本的位置以知道正确的来源。
B
.
USB 3.0
连接 /
1.
请确认主板是否支持
USB 3.0
传输接口。
2.连接
USB 3.0
传输线至主板上的
USB3.0
接埠。
音效连接 / 请根据下面的音源接头图示与主板使用手册来连接音效装置,请确认主板上的音效装置是支持
AC' 97
音效或是
C
.
HD
音效(
Azalia)
,装置错误可能会导致主板音效装置的毁损,某些主板的音效装置不会与下方的图标完全相同,请参酌主
板使用手册以得到正确的安装信息
繁體中文
简体中文
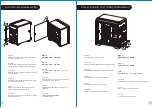
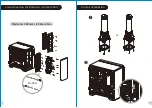
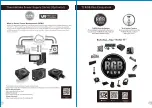
USB 3.0 Connection
USB 3.0 Connection
PRESENCE#
PRESENCE#
BLACK
BLACK
SENSE1_RETURN
SENSE1_RETURN
AUD GND
AUD GND
SENSE2_RETURN
SENSE2_RETURN
YELLOW
YELLOW
BROWN
BROWN
RED
RED
PORT1 R
PORT1 R
PORT2 R
PORT2 R
PORT1 L
PORT1 L
BLUE
BLUE
PORT2 L
PORT2 L
SENSE_SEND
SENSE_SEND
KEY
KEY
PURPLE
PURPLE
GREEN
GREEN
ORANGE
ORANGE
BLACK
BLACK
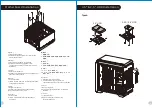
AUDIO HD AUDIO Function
AUDIO HD AUDIO Function
A
A
B
B
C
C
藍色線條為尺寸標示,請勿印刷上去!
產品料號
CA-1Q6-00M1WN-00
View 51 TG ARGB
說明書
19/12/24
A
產品名稱
印刷項目
發稿日期
版本
騎馬釘
28
105
G
雙銅
單色
無
無
其他特殊處理效果
表面處理
2
厚度
(g/m )
裝訂方式
材質
頁數
印刷色彩
規格樣式
整本
CHECK
DESIGN
Poki
(19/12/24)
A
nna
(19/12/24)
刀模線
125
mm
176
mm
20
19
Summary of Contents for VIEW 51 TG ARGB
Page 14: ...24 23 ...


