background image

Installation Method 

INSTALLING THE UNIT

Locate an appropriate  
place on a section of wall  
as mentioned opposite.

Fig 2.

 Remove screw which fixed the front and back case.


Fig 3.

 Open the 

front case, then 
connect power 
cable to the 
terminal blocks 
with L1, L2 and E in 
pointed position. 

7


ThermaQ Specification Hotline 01924 270847

L2

L1

E

Fig 1.

 Front 

and back of the 
appliance.

2890/ElectricPackagingManuals/A5.indd   7

08/10/2018   10:56

Summary of Contents for ELITE 11

Page 1: ...ThermaQ endeavour to keep the content of this brochure as up to date as possible We reserve the right to make changes to all ThermaQ products and services at anytime To ensure you have the most current information please contact ThermaQ directly Follow us on twitter ThermaQ EXCELLENCE IN HOT WATER TECHNOLOGY 2890 ElectricPackagingManuals A5 indd 12 08 10 2018 10 56 ...

Page 2: ...Elite Touch for single or multi point applications where an unvented storage solution is required E L I T E TOUCH EXCELLENCE IN HOT WATER TECHNOLOGY 2890 ElectricPackagingManuals A5 indd 1 08 10 2018 10 56 ...

Page 3: ... Shooting 11 Attention This is not a do it yourself project Failure to have this appliance installed by a licensed plumber and electrician will void all warranties Under no circumstances should you attempt to install repair or disassemble the electric instantaneous water heater without first shutting off all power to the unit directly at the circuit breaker box Installation of this product is rest...

Page 4: ...nce 7 This appliance MUST be permanently connected to the fixed circuit breaker and it must be installed vertically DO NOT install this appliance directly onto timber or in a strong magnetic field 8 This appliance MUST NOT be switched on if you think it may be frozen as this could result in serious damage to the unit Wait until you are sure that the ThermaQ Elite Touch has completely thawed out be...

Page 5: ...reaches over 62 C the electricity will be cut off to avoid getting scalded and the screen displays E1 The appliance will start to work automatically when temperature drops to the desired set temperature 4 Malfunction of sensor when there is a malfunction with the temperature sensor the heater stops working and displays E3 5 Dry heating thermal cut off When the heating temperature is over 95 C the ...

Page 6: ...T CODE EWH0010 EWH0011 EWH0012 POWER 7 5kW 9kW 11kW FLOW RATE UPTO 6L MIN 8L MIN 10L MIN RATED CURRENT 32 7A 39 2A 47 9A BODY MATERIAL STAINLESS STEEL SAFETY CLASS IP25 TEMP SETTING RANGE 30 C 55 C VOLTAGE 220 240V RECOMMENDED CABLE SIZE 10 0mm2 OVERHEAT PROTECTION 62 C THERMAL CUT OUT 95 C CONTROL MODE TOUCH SCREEN CONTROLS WORKING PRESSURE 6 bar WATER CONNECTIONS G1 2 DIMENSIONS 360 x 220 x 90 2...

Page 7: ...ted branch circuits of high voltage within the unit Ground wires must be brought to the ground at the circuit breaker panel 4 This appliance MUST be permanently connected to the fixed circuit breaker If you don t use the heater please switch off the circuit breaker 5 Do NOT install this appliance on timber or in the presence of a strong magnetic field The appliance can be installed above or under ...

Page 8: ...Fig 2 Remove screw which fixed the front and back case Fig 3 Open the front case then connect power cable to the terminal blocks with L1 L2 and E in pointed position 7 ThermaQ Specification Hotline 01924 270847 L2 L1 E Fig 1 Front and back of the appliance 2890 ElectricPackagingManuals A5 indd 7 08 10 2018 10 56 ...

Page 9: ...marks for punching then drill 3 holes with 6mm diameter and consequently insert screws into the wall Excellence in Hot Water Technology 8 124mm 1 2 3 4 320mm Position the paper template where you wish to place the unit Make a raw plug hole in the wall by means of a drill Fix the hangers to the wall Fix the unit to the hangers 3 2 6 m m 2890 ElectricPackagingManuals A5 indd 8 08 10 2018 10 56 ...

Page 10: ...the connections When all water connections are completed check for leaks and take corrective action before proceeding to turn the unit on ELECTRICAL CONNECTION 1 All electrical work must comply with national regulations and local electrical codes 2 The unit must be connected to a properly grounded dedicated branch circuit of proper voltage rating 3 While feeding the cable to terminal blocks circui...

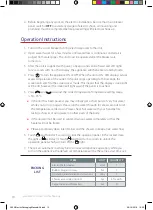
Page 11: ... temperature Temperature setting range is 30 55 C If the unit has been paused you may initially get a short burst of very hot water while you turn it on again Please run the water through for a few seconds to let the temperature settle down Please check hot water with your hand before taking a shower or using water on other parts of the body If the unit will not be used in winter drain out water c...

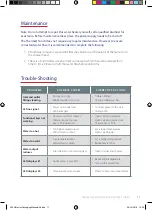
Page 12: ...VE ACTIONS Inlet and outlet fittings leaking Fittings not tight Rubber washer worn out Tighten fittings Change rubber washer LED no signal Power not connected LED Damaged Connect power to the unit Change LED Functional keys not working No water out from shower Water pressure too low Key or PCB damaged Open valve to get water Open valve to get pressure Change key or PCB Water too hot Too high tempe...

Reviews: