84
84
Service Instructions Safety Cabinet HERAsafe KS / KSP
Service Instructions Safety Cabinet HERAsafe KS / KSP
A
A
.
.
I
I
n
n
s
s
t
t
a
a
l
l
l
l
a
a
t
t
i
i
o
o
n
n
t
t
e
e
s
s
t
t
/
/
R
R
e
e
p
p
e
e
a
a
t
t
t
t
e
e
s
s
t
t
Values to be measured
Values to be measured
Direct exhaust velocity
Direct exhaust velocity
measured at nine measuring
measured at nine measuring
points.
points.
Values to be calculated
Values to be calculated
Average value for exhaust velocity V
Average value for exhaust velocity V
2
2
Exhaust airflow volume R
Exhaust airflow volume R
1
1
Average value for inflow velocity V
Average value for inflow velocity V
1
1
T
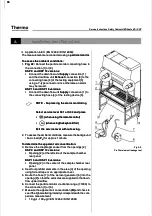
Test grid above the
est grid above the exhaust aperture
exhaust aperture
Fig. A6:
Fig. A6:
The direct exhaust velocity (V
The direct exhaust velocity (V
3
3
) is measured using an
) is measured using an
anemometer at distance
anemometer at distance
H
H
of 10 cm above the exhaust aper-
of 10 cm above the exhaust aper-
ture. The dimensions of the exhaust aperture are:
ture. The dimensions of the exhaust aperture are:
K
KS
S /
/ K
KS
SP 9
P 9
4
42
2..5
5 x
x 4
42
2..5
5 c
cm
m
K
KS
S /
/ K
KS
SP
P 1
12
2//1
15
5
5
57
7..8
8 x
x 4
42
2..5
5 c
cm
m
K
KS
S /
/ K
KS
SP
P 1
18
8
8
88
8..3
3 x
x 4
42
2..5
5
Along the width, the measuring points are locate
Along the width, the measuring points are located at an even
d at an even
distance of
distance of
A
A
to each other and to the lateral edges of the
to each other and to the lateral edges of the
exhaust aperture.
exhaust aperture.
K
KS
S /
/ K
KS
SP
P 9
9
1
10
0..5
5 c
cm
m
K
KS
S /
/ K
KS
SP
P 1
12
2//1
15
5
1
14
4..5
5 c
cm
m
K
KS
S /
/ K
KS
SP
P 1
18
8
2
22
2..5
5
The measuring points along the depth are located at an even
The measuring points along the depth are located at an even
distance of
distance of
C
C
= 10.7 cm to each other and to the lateral ed-
= 10.7 cm to each other and to the lateral ed-
ges of the exhaust aperture.
ges of the exhaust aperture.
T
Test
est measurement
measurement
1.
1. Instal
Install the
l the testing
testing equipmen
equipment to t
t to the test
he test grid.
grid.
2.
2. Move t
Move the front w
he front window t
indow to the meas
o the measuring p
uring positi
osition and ope
on and ope--
rate the air system blowers for approx 20 minutes.
rate the air system blowers for approx 20 minutes.
3.
3. Perform
Perform measur
measurement at a
ement at all nine me
ll nine measuring p
asuring points ab
oints above
ove
the exhaust aperture for a minimum of one minute for each
the exhaust aperture for a minimum of one minute for each
measuring point.
measuring point.
4.
4. Evaluat
Evaluate t
e the
he individu
individual
al measurem
measurements.
ents.
Fig. A6,
Fig. A6,
T
Test grid above
est grid above the exhaust
the exhaust
aperture
aperture
HH
A
A
C
C
C
C
C
C
C
C
B
B
T
T
A
A
A
A
A
A
Summary of Contents for HERAsafe KS
Page 118: ...117 117 ...


