background image

All installations and services must be performed by qualified service personnel. 


H.  HEAT EXCHANGER CLEANING INSTRUCTIONS: 
 

c

WARNING: THE HEAT EXCHANGER MUST BE CLEANED BY A QUALIFIED 

SERVICE  PERSON. 

It is important to inspect and clean the heat exchanger once a year, or as necessary, to remove any build-up of soot. 
A layer of soot on the inside of the heat exchanger will act as an insulator and reduce heat transfer, resulting in less 
efficiency. 
 
To clean the heat exchanger, first turn off all power to the unit.  Remove clean-out plugs, the vent connector pipe to 
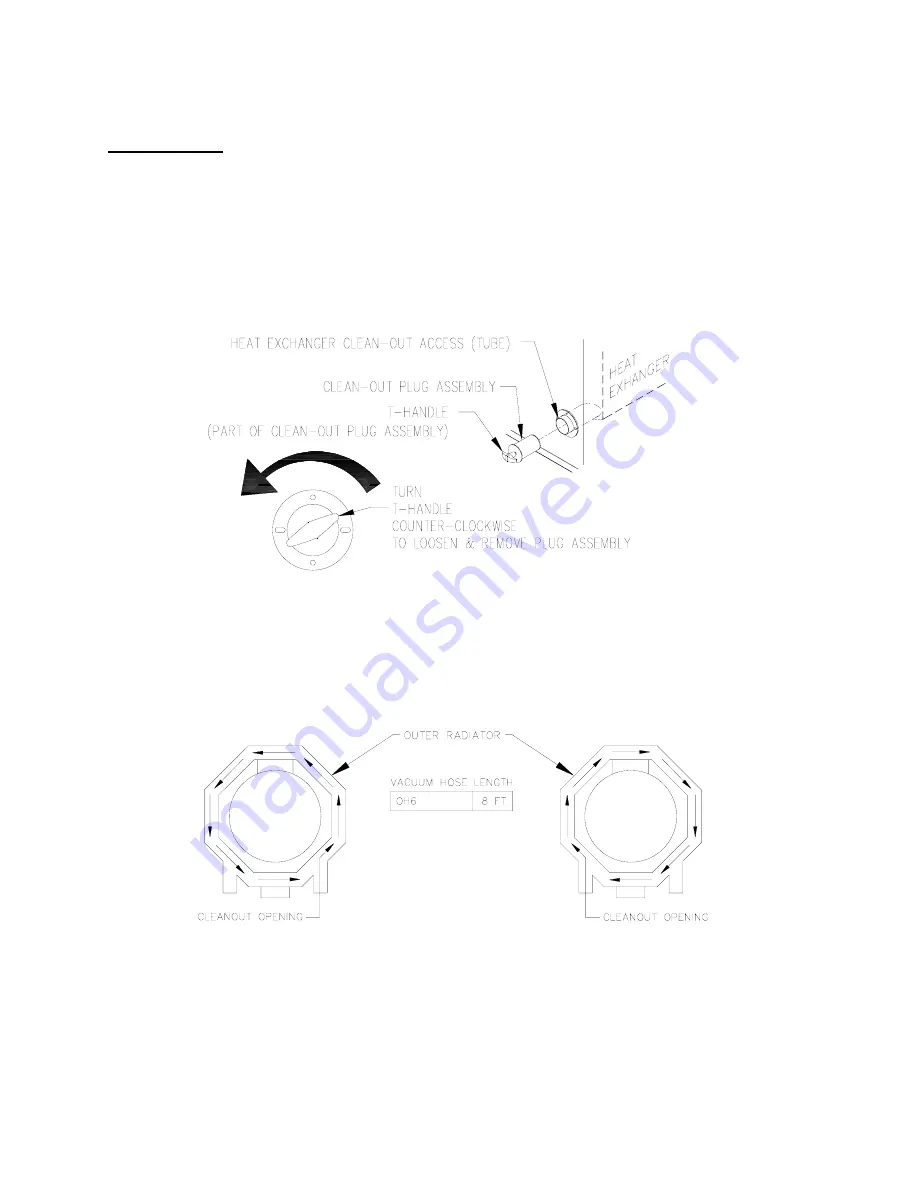
the chimney, the burner, and the burner mounting plates. When removing the clean-out plugs, turn T-handle 
counterclockwise approximately two (2) full turns or just until the plug is able to be pulled from tube. Take care not 
to remove T-handle from assembly. 

Fig. 15: Clean-out plug removal 

 
With access to the inside of the heat exchanger through the burner area, clean-out openings, and vent pipe 
connection, it is possible to use a long, flexible wire brush and an industrial type vacuum cleaner to remove any soot 
build-up. 

NOTE:

 A one inch (outside diameter) vacuum cleaner hose will fit into the radiator. 

 
To vacuum and brush the outer radiator of the heat exchanger, go through the clean-out openings in both directions, 
as shown in figure 16, below. 

Fig. 16: Recommended method and device for cleaning inside of heat exchanger. 


Reassemble the furnace to its original construction*. Remount the burner being certain that the air tube is properly 
inserted into the chamber opening (see section F). If heavy soot deposits were found in the heat exchanger, this may 
indicate the burner is out of adjustment.  
 
*When returning clean-out plugs to their original position, insert plug and turn T-handle clockwise 2-3 turns or until 
plug cannot be pulled from the clean-out access tube. This is sufficient for sealing the access tube. 
 

Summary of Contents for OH6FA072D48R

Page 1: ...ND LIQUIDS IN THE VICINITY OF THIS OR ANY OTHER APPLIANCE c WARNING IMPROPER INSTALLATION ADJUSTMENT ALTERATION SERVICE OR MAINTENANCE CAN CAUSE INJURY OR PROPERTY DAMAGE REFER TO THIS MANUAL FOR ASSI...

Page 2: ...al injury substantial property damage or death See Page 4 cWARNING THE HEAT EXCHANGER MUST BE CLEANED BY A QUALIFIED SERVICE PERSON See Page 7 cCAUTION DO NOT ATTEMPT TO MAKE REPAIRS YOURSELF See Page...

Page 3: ...R CONDITIONING 3 D FILTERS MOUNTED EXTERNAL TO FURNACE 3 E LIMIT POSITION AND LOCATION 4 F BURNER INSTALLATION 5 G BURNER SPECIFICATIONS AND APPLICATIONS 6 H HEAT EXCHANGER CLEANING INSTRUCTIONS 7 III...

Page 4: ...BUSTIBLE MATERIAL and NON COMBUSTIBLE MATERIAL COMBUSTIBLE MATERIAL Material made of or surfaced with wood compressed paper plant fibers plastics or other material that will ignite and burn whether fl...

Page 5: ...eld model FDVS 45 FVOP 415 side wall vent kit for such applications When installing the FDVS 45 FVOP 415 side wall vent kit outside combustion air must also be applied to the burner The following tabl...

Page 6: ...ided to prevent chilled air from entering the furnace If such a damper is manually operated it must be equipped with a means to prevent operation of either unit unless the damper is in the full heat o...

Page 7: ...he filter rack and slide the filter into place Dimensions for adapting the return air plenum to the filter rack are provided See Fig 5 Fig 5 A typical filter rack and dimensions for the OH6FA072D furn...

Page 8: ...during shipping and helps to maintain insertion depth DO NOT remove this retainer when installing burner Fig 8 Typical location of the overfire air tap and components in burner mounting plate area Fig...

Page 9: ...E NOZZLE SIZE GIVES THE NOMINAL FLOWRATE IN GPH FOLLOWED BY THE SPRAY ANGLE IN DEGREE S AND THE SPRAY PATTERN EITHER H FOR HOLLOW CONE OR S FOR SOLID CONE FOR EXAMPLE A NOZZLE RATED AT 0 65 GPH 100 PS...

Page 10: ...lug removal With access to the inside of the heat exchanger through the burner area clean out openings and vent pipe connection it is possible to use a long flexible wire brush and an industrial type...

Page 11: ...loration of materials and damage from rust or corrosion FLUE PIPE VENT PIPE OR CONNECTOR The furnace vent pipe should be inspected for signs of rust corrosion pitting or holes in pipe and leakage arou...

Page 12: ...stem and home cWARNING To avoid injury from moving parts hot surfaces or electrical shock shut off the power to the furnace before removing any furnace access doors to service the air filters The filt...

Page 13: ...HIMNEY W INDUCER MASONRY CHIMNEY W METAL LINER FUEL LINE FILTER DRAFT CONTROL COMBUSTION TESTS Operate burner at least 10 minutes before CO2 in stack pipe INITIAL SERVICE SERVICE SERVICE INSTALLATION...

Page 14: ...All installations and services must be performed by qualified service personnel 11 APPENDIX A Replacement Parts List...

Page 15: ...All installations and services must be performed by qualified service personnel 12 APPENDIX B Wiring Diagrams...

Page 16: ...All installations and services must be performed by qualified service personnel 13...

Page 17: ......

Reviews: