background image

All installations and services must be performed by qualified service personnel. 

I.   BLOWER CONTROLLER INFORMATION 
 
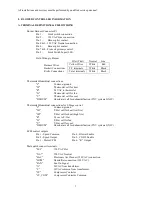
A. TERMINAL DEFINITIONS & FIELD WIRING


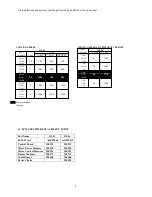
Burner Harness Connector P1  

Pin  1 –      Limit switch connection. 
Pin  2 –      120 VAC Line connection. 
Pin  3 –      Burner pilot contact. 
Pin  4&5 – 120 VAC Neutral connection. 
Pin  6 –      Burner pilot contact. 
Pin  7&8 – From oil primary control.  
Pin  9 –      Limit Switch Input (LSI). 
 
Field Wiring to Burner 


              Pilot (Tstat)        Neutral      Line        

Harness Wires 
Beckett Connections 
Riello Connections 

Yellow Wires 

White 

Red 

T-T terminals 

White 

Black 

T-stat terminals 

White 

Black 


Thermostat/Humidistat connections 

"C" 


Common/ground 

"W" 


Thermostat call for heat 

"R" 


24 VAC to thermostat 

"G" 


Thermostat call for fan 

"Y" 


Thermostat call for cool 

“DEHUM”  

Humidistat call for dehumidification (TXV systems ONLY) 


Thermostat/Humidistat connections for 2-Stage control 

"C" 


Common/ground 

"W1" 


T-Stat call for heat (low fire) 

"W


T-Stat call for heat (high fire) 

"R" 


24 vac to T-Stat 

"G" 


T-Stat call for fan 

"Y" 


T-Stat call for cool 

“DEHUM”  

Humidistat call for dehumidification (TXV systems ONLY) 


ECM control outputs  

Pin 1 - Speed Common 


Pin 4 – Blower Enable 

Pin 2 - Speed Output 


Pin 5 – COOL Enable 

Pin 3 – Motor CFM 


Pin 6 – “R” Output


Male quick connect terminals. 

"S1-3”   

120 VAC Hot 

“N1-7”   

120 VAC Neutral  

“EAC”   

Electronic Air Cleaner (120 VAC) connection. 

“HUM”   

Humidifier connection (120 VAC). 

"FAN"   

Fan On Signal 

“X” 


24VAC from transformer. 

“C” 


24VAC common from transformer. 

"CC" 


Compressor Contactor 

"CC_COM" 

Compressor Contactor Common

Summary of Contents for OL11-105FDBE

Page 1: ...DS IN THE VICINITY OF THIS OR ANY OTHER APPLIANCE INSTALLATION AND SERVICE MUST BE PERFORMED BY A QUALIFIED INSTALLER SERVICE AGENCY OR THE GAS SUPPLIER REFERRED TO IN THESE INSTRUCTIONS AS A QUALIFIE...

Page 2: ......

Page 3: ...I BLOWER CONTROL INFORMATION 1 A TERMINAL DEFINITIONS FIELD WIRING 1 B WIRING SWITCHES 2 C INPUTS 4 D OUTPUTS 4 E OPERATING MODES 5 F CFM TABLES 7 G ECM SPECIFIC REPLACEMENT PARTS 8 III ECM TROUBLESH...

Page 4: ...mostat call for heat R 24 VAC to thermostat G Thermostat call for fan Y Thermostat call for cool DEHUM Humidistat call for dehumidification TXV systems ONLY Thermostat Humidistat connections for 2 Sta...

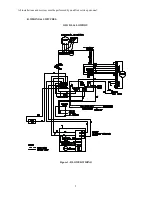
Page 5: ...All installations and services must be performed by qualified service personnel 2 B WIRING SWITCHES OL11 OL16 LOWBOY Figure 1 BLOWER WIRING...

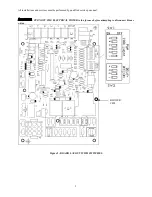
Page 6: ...lations and services must be performed by qualified service personnel 3 TURN OFF THE ELECTRICAL POWER to the furnace before attempting to disconnect blower wiring Figure 2 BOARD LAYOUT WITH SWITCHES B...

Page 7: ...oling is recognized when the thermostat connects Y to R This input has an indicator LED that will light when the control receives a call for cooling Refer to the Cool Mode section for the control oper...

Page 8: ...their respective thermostat connections W Y G and DEHUM and operate whenever a call is present See Diagnostic Features for a function description of operation Motor CFM LED This green LED will flash...

Page 9: ...d low fire is activated for 15 minutes If a call for heat still exists high fire will be activated and will continue until the demand for heat has been satisfied Counterflow units in addition will run...

Page 10: ...es their tabular values are enacted when their function is called Three additional dip switches select 8 heating speeds which are enacted when heat is called This allows independent selection of heati...

Page 11: ...rness 350271 350271 Transformer 350464 350464 Power Choke 350855 COOLING SPEEDS HEATING SPEEDS TEMPERATURE RISE F Rise CFM COOL LOW DEHUM 3 ON 6 OFF 2 OFF 5 OFF 1 OFF 4 OFF 3 ON 6 OFF 2 OFF 5 OFF 1 ON...

Page 12: ...servicing motor Wait at least 5 minutes after disconnecting power before opening motor SYMPTOM CAUSE PROCEDURE Motor rocks slightly when starting This is normal start up for ECM Motor won t start No...

Page 13: ...moving panel or filter reduce puffing Reduce restriction Reduce max airflow Evidence of Moisture Motor failure or malfunction has occurred and moisture is present Replace motor and perform Moisture Ch...

Page 14: ...rain plugged Check for low airflow too much latent capacity Check for undercharged condition Check and plug leaks in return ducts cabinet Comfort Check Check proper airflow settings Low static pressur...

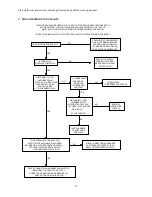
Page 15: ...TO MOTOR IF CONNECTIONS ARE GOOD AND MOTOR STILL DOES NOT RUN REPLACE MOTOR THIS GUIDE SHOULD BE USED IN THE CASE OF A STOPPED OR MANFUNCTIONED ECM BLOWER MOTOR THE FOLLOWING SHOULD HELP ESTABLISH THE...

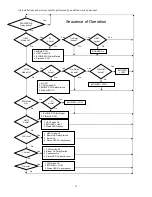
Page 16: ...Status LED Off 1 HEAT mode On 2 BLOWER HEAT 3 Status LED Flashes 1 COOL mode On 2 Blower On Delay Started 3 Condenser On 4 Status LED On continuous 1 FAN mode On 2 BLOWER LOW 3 Status LED On continuo...

Page 17: ...Fire Connect 2 Stage T stat to both W1 and W2 Single Stage T stat W2 Connect single stage T stat to W2 only BLOWER Speeds HEAT The Heating Blower speed selected by positions 1 2 3 of SW1 CFM tables o...

Reviews: