Installation Instruction
ADA Undercounters - Laboratory Refrigerators & Freezers
Installation and Operation Manual
5
5 Installation
Instruction
5.1 Basic Installation
This product is a complete packaged unit ready to operate when plugged into an
electrical source. Read all the instructions before proceeding with installation.
1. The cabinet will pass through a standard 30’’ door opening.
2. Remove the exterior and interior packaging.
3.
CAUTION
Before connecting the unit to a power source, let it stand
for approximately 2 hours. This will reduce the possibility of a
malfunction in the cooling system from handling during transportation.
4. Choose well ventilated area with temperatures above 15
°
C and below
32
°
C. Unit should be installed in an area protected from the elements
such as wind, rain, water spray etc.
5. Move the cabinet into the desired location. Make sure the bottom of the
cabinet is evenly supported. When moving the unit, be careful not to
damage the power cord.
6. Make certain the cabinet is located so the front grill is unobstructed.
7. The unit is shipped in ready to operate condition. Adjustment of
operating temperatures or set point is not necessary and if changed, may
adversely affect unit performance.
8. Use of electrical supply, other than that specified on the serial plate will
cause permanent damage to the product.
9.
WARNING
Do not connect or Disconnect when your hands are wet.
10. Do not use extension cord with this appliance.
5.2 Door Handle
Installation
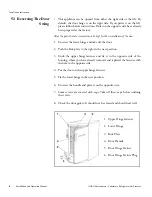
The door has two screw holes on each side, allowing you to install a handle
(included). To do so, align the handle with the screw holes on the side you prefer.
Fix the handle in place with the included screws, then cover the screw heads with
the handle seal (included).


