8600 Series
3-1
Thermo Scientific
Section 3
Configuration
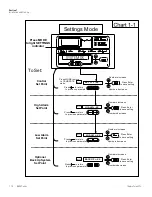
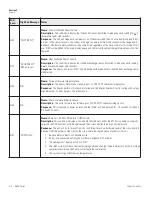
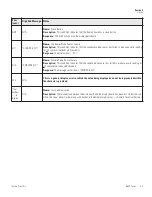
Configuration Mode is used for testing and custom setup of the freezer.
The configuration functions listed and described below may not be
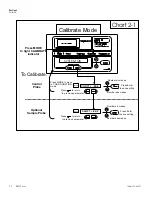
necessary in all applications, but are available if needed. See Chart 3-1 for
more detail.
The high alarm test is used to verify that the high alarm will activate,
should the freezer temperature equal or exceed the high alarm set point.
1. Press the Mode key until the Configuration indicator lights.
2. Press the right arrow until HI ALRM TEST is displayed in the
message center.
3. Press Enter to initiate the test.
The temperature on the display will begin to increase until the high alarm
set point has been reached. The audible alarm will sound and the alarm
indicator will flash. Press the Silence key to mute the alarm.
The low alarm test is used to verify the that low alarm will activate, should
the freezer temperature equal or become less than the low alarm set point.
1. Press the Mode key until the Configuration indicator lights.
2. Press the right arrow until LO ALRM TEST is displayed in the
message center.
3. Press Enter to initiate the test.
The temperature on the display will begin to decrease until the low alarm
set point has been reached. The audible alarm will sound and the alarm
indicator will flash. Press the Silence key to mute the alarm.
High Alarm Test
Low Alarm Test
Summary of Contents for Forma 8600 Series
Page 55: ...8600 Series 8 1 Thermo Scientific Section 8 Spare Parts...
Page 75: ...8600 Series 9 1 Thermo Scientific Section 9 Refrigeration Schematics...
Page 76: ...9 2 8600 Series Thermo Scientific Section 9 Refrigeration Schematics...
Page 77: ...8600 Series 9 3 Thermo Scientific Section 9 Refrigeration Schematics...
Page 78: ...9 4 8600 Series Thermo Scientific Section 9 Refrigeration Schematics...
Page 79: ...8600 Series 9 5 Thermo Scientific Section 9 Refrigeration Schematics...
Page 80: ...9 6 8600 Series Thermo Scientific Section 9 Refrigeration Schematics...
Page 81: ...8600 Series 10 1 Thermo Scientific Section 10 Electrical Schematics...
Page 82: ...10 2 8600 Series Thermo Scientific Section 10 Electrical Schematics...
Page 83: ...8600 Series 10 3 Thermo Scientific Section 10 Electrical Schematics...
Page 84: ...10 4 8600 Series Thermo Scientific Section 10 Electrical Schematics...
Page 85: ...8600 Series 10 5 Thermo Scientific Section 10 Electrical Schematics...
Page 86: ...10 6 8600 Series Thermo Scientific Section 10 Electrical Schematics...
Page 87: ...8600 Series 10 7 Thermo Scientific Section 10 Electrical Schematics...
Page 88: ...10 8 8600 Series Thermo Scientific Section 10 Electrical Schematics...
Page 89: ...8600 Series 10 9 Thermo Scientific Section 10 Electrical Schematics...
Page 90: ...10 10 8600 Series Thermo Scientific Section 10 Electrical Schematics...
Page 91: ...8600 Series 10 11 Thermo Scientific Section 10 Electrical Schematics...
Page 92: ...10 12 8600 Series Thermo Scientific Section 10 Electrical Schematics...
Page 93: ...8600 Series 10 13 Thermo Scientific Section 10 Electrical Schematics...
Page 94: ...10 14 8600 Series Thermo Scientific Section 10 Electrical Schematics...
Page 95: ...8600 Series 10 15 Thermo Scientific Section 10 Electrical Schematics...
Page 96: ...10 16 8600 Series Thermo Scientific Section 10 Electrical Schematics...
Page 97: ...8600 Series 10 17 Thermo Scientific Section 10 Electrical Schematics...
Page 98: ...10 18 8600 Series Thermo Scientific Section 10 Electrical Schematics...
Page 99: ...8600 Series 10 19 Thermo Scientific Section 10 Electrical Schematics...
Page 100: ...10 20 8600 Series Thermo Scientific Section 10 Electrical Schematics...
Page 101: ...8600 Series 10 21 Thermo Scientific Section 10 Electrical Schematics...
Page 102: ...10 22 8600 Series Thermo Scientific Section 10 Electrical Schematics...
Page 103: ...8600 Series 10 23 Thermo Scientific Section 10 Electrical Schematics...
Page 104: ...10 24 8600 Series Thermo Scientific Section 10 Electrical Schematics...

