3
4
1
2
5
6
1
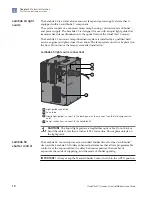
Power switch
2
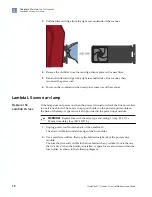
Pry here to remove the fuse holder
3
Top view of the fuse holder
4
Side view of the fuse holder
5
Active fuse
6
Press here for spare fuse
3.
Press down on compartment end, then push it out of the other end. You can use
the old fuse to push out the spare fuse compartment.
4.
Replace the active fuse with the spare, then reinstall the fuse holder and power
cord.
If the lamp fails to power on with the new fuse installed, call Technical Support.
After the normal life expectancy of the lamp has expired, the software application
alerts you to the requirement to replace the lamp. The lamp replacement procedure is
simple, but good health and safety precautions must be followed.
CAUTION!
Do not try to replace the lamp when the scanner is in use or
powered on.
Lamp life/imaging device status notices
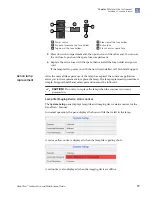
The System Setup pane displays lamp life and imaging device status notices for the
GeneTitan
™
Scanner.
In normal operation, the pane displays the hours of life that is left in the lamp.
A red or yellow notice is displayed when the lamp life is getting short.
A red notice is also displayed when the imaging device is offline.
Xenon lamp
replacement
Chapter 3
Maintain the Instrument
Lambda LS xenon arc lamp
3
GeneTitan
™
Scanner Use and Maintenance Guide
19


