background image

Thermo Scientific Jewett CTF306 Blood Plasma Freezers

Installation and Operation

8

Hinge And Latch Adjustment

8.1 Hinge Adjustment

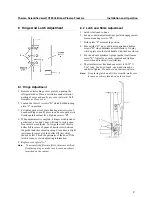
1. Remove exterior hinge cover plate by opening the 

refrigerator door. Place a screwdriver under interior 

portion of cover and gently pry cover outward.  Pull 

straight out. Close cover.

2. Loosen the three (3) screws "B" which hold adjusting 

plate "C" in position.

3.  To tighten gasket seal, place hand against exterior of 

door near hinges; gently press in on door so gasket sits 

firmly against cabinet face. Tighten screws "B".

4.  When adjustment is complete, it hinges are adjusted so 

gasket seal is too tight, door will tend to spring open.  

Door must be readjusted. To test gasket seal, insert a 
dollar bill (or piece of paper of similar size) between 

the gasket and the cabinet opening. Close door; a slight 

resistance to removal of the dollar bill (test strip) 
should be felt. Check the perimeter of the door. If the 

latch is loose, see latch-adjusting information.

5.  Replace cover plate "A."

Note:

 To accomplish different offsets, shims are utilized.  

If replacing hinges, make sure to reuse any shims 
furnished on the cabinet.

8.2 Latch and Strike Adjustment

1.  Latch is fastened to door.
2.  For up or down adjustment (proper latch engagement) 

loosen mounting screws "B".

3.  Strike plate "C" remains in position.
4.  Move strike "D" up or down as required and tighten 

screws "B" when adjustment is satisfactory. No play 

will be present in the latch handle with the door closed.

5.  For in and out adjustment (proper gasket seal) loosen 

screw "E". Adjust in or out as required and tighten 

screw when adjustment is satisfactory.

6.  The stainless steel hex head cap screw is 10/32" X 

5/16" long. Use box wrench, open-end wrench, or 
ratchet to tighten. Do not use a nut driver or pliers.

Note:

 If replacing latch and strike assembly, make sure 

to reuse any shims furnished on the cabinet.

 
9

Summary of Contents for Jewett CTF306

Page 1: ...Installation and Operation Manual Thermo Scientific Jewett CTF306 Blood Plasma Freezers...

Page 2: ...2009 Thermo Fisher Scientific All rights reserved Suva is a registered trademark of DuPont All other trademarks are the property of Thermo Fisher Scientific Inc and its subsidiaries...

Page 3: ...peration Do not adjust the refrigerant valves or the temperature control 7 Use of electrical characteristics other than those specified on the serial plate will cause permanent damage to the mechanism...

Page 4: ...2...

Page 5: ...3...

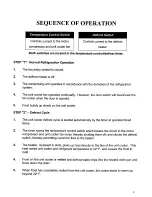
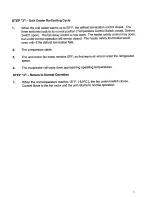
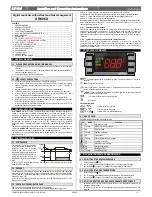
Page 6: ...ormed according to the temperature measured by the thermostat probe with a positive differential from the set point if the temperature increases and reaches set point plus differential the compressor...

Page 7: ...2 100 P2 CCt Compressor ON time during continuous cycle 0 0 24 0h res 10min Allows to set the length of the continuous cycle compressor stays on without interruption for the CCt time Can be used for i...

Page 8: ...The alarm stops just after the digital input is de activated 8 3 SERIOUS ALARM MODE i1F bAL When the digital input is activated the unit will wait for did delay before signalling the CA alarm message...

Page 9: ...P Third probe presence n not present Y pres n Pr2 O3 Third probe calibration 12 12 C 120 120 F 0 0 0 Pr2 P4P Fourth probe presence n not present Y pres n Pr2 O4 Fourth probe calibration 12 12 C 120 12...

Page 10: ...ce to removal of the dollar bill test strip should be felt Check the perimeter of the door If the latch is loose see latch adjusting information 5 Replace cover plate A Note To accomplish different of...

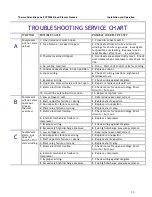
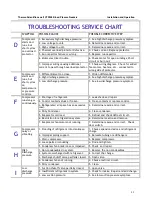
Page 11: ...line solenoid will not open 10 Repair or replace coil 1 Low voltage to unit 1 Determine reason and correct 2 Start capacitor failure or wrong 2 Replace start capacitor 3 Run capacitor failure or wrong...

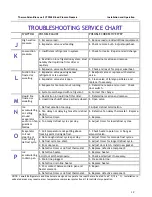
Page 12: ...nt 1 Leak check and repair 2 Control contacts stuck or frozen 2 Clean contacts or replace control 3 Refrigerated air space has an excessive load 3 Determine reason and correct 4 Dirty Condenser 4 Clea...

Page 13: ...lve 1 Defrost duration too long 1 Adjust defrost termination 2 Fan delay not delaying fans after defrost period 2 Defective fan delay thermostat Replace 3 Defective timer 3 Replace N Ice accumulating...

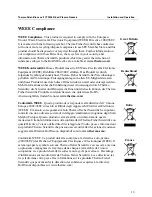
Page 14: ...unter diese RoHS Anweisungfallen finden Sie unter www thermo com Conformit WEEE Questo prodotto deve rispondere alla direttiva dell Unione Europea 2002 96EC in merito ai Rifiuti degli Apparecchi Elet...

Page 15: ...e information can be found on the dataplate attached to the equipment If available please provide the date purchased the source of purchase manufacturer or specific agent rep organization and purchase...

Page 16: ...Thermo Fisher Scientific Inc 275 Aiken Road Asheville NC 28804 United States www thermofisher com 306650H01 Rev D...

Reviews: